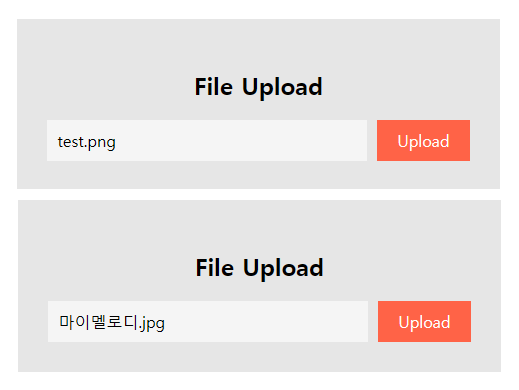
[ jQuery 응용 해보기 - File Upload 파일 업로드 함수 ]
<!DOCTYPE html>
<head>
<style>
.di{
background-color: rgb(230, 230, 230);
padding:30px;
}
.di .di2{
display: flex;
}
.di h2{
text-align: center;
}
.di3{
background-color: whitesmoke;
width: 300px;
padding: 10px;
margin-right: 10px;
}
body{
height: 100vh;
display: flex;
justify-content: center;
align-items: center;
}
.di4{
display: flex;
align-items: center;
}
.di4 label{
background-color: tomato;
color:white;
padding:10px 20px;
}
.di4 #up{
display: none;
}
</style>
</head>
<body>
<div class="di">
<h2>File Upload</h2>
<div class="di2">
<div class="di3">test.png</div>
<div class="di4">
<label for="up">Upload</label>
<input type="file" id="up">
</div>
</div>
</div>
<script>
$('#up').change(function(e){
let n=e.target.files[0].name
$('.di3').text(n);
});
</script>
</body>
</html>
[ jQuery 응용 해보기 - checkbox 클릭 함수 ]
<!DOCTYPE html>
<head>
<style>
body {
margin: 0;
display: flex;
justify-content: center;
}
.di {
width: 500px;
}
.di h2 {
text-align: center;
}
.di2 {
border: 1px solid gainsboro;
border-radius: 5px;
padding: 20px;
margin: 10px 0;
}
.di2 label {
display: block;
margin: 10px 0;
}
.di5 {
display: none;
}
.di5 input {
width: 100%;
border: 1px solid gainsboro;
padding: 10px;
border-radius: 5px;
outline: none;
}
</style>
</head>
<body>
<div class="di">
<h2>Checkbox</h2>
<div class="di2">
<b>Do you have passport?</b>
<label>
<input type="checkbox" class="user">Yes
</label>
<div class="di5">
<input type="text" class="form-control" placeholder="Enter your passport number">
</div>
</div>
<div class="di2">
<b>Do you have card?</b>
<label>
<input type="checkbox" class="user">Yes
</label>
<div class="di5">
<input type="text" class="form-control" placeholder="Enter your membership number">
</div>
</div>
</div>
<script>
//Yes체크박스 클릭시 input 보여야함
$('.user').click(function(){
let n=$(this).is(':checked'); //true or false
if(n==true){ //find앞에는 부모태그 와야함
$(this).parents('.di2').find('.di5').show();
}
else{
$(this).parents('.di2').find('.di5').hide();
}
})
</script>
</body>
</html>

[ jQuery 응용 해보기 - To Do List 함수 ]
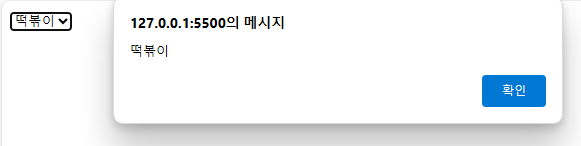
[ JavaScript 응용 해보기 - <head>에 <script> 짜기 ]
<!DOCTYPE html>
<head>
<script>
$(document).ready(function(){
//선택한 값을 3초 후 alert 창으로 띄운다
setTimeout(function(){
let n=$('select > option:selected').val();
alert(n);
}, 3000);
})
</script>
</head>
<body>
<select>
<option>치킨</option>
<option>피자</option>
<option>라면</option>
<option>떡볶이</option>
</select>
</body>
</html>
<!DOCTYPE html>
<head>
<script>
function on(){
let aa=document.getElementById('aa');
let bb=document.getElementById('bb');
bb.value=eval(aa.value);
}
</script>
</head>
<body>
수식<input type="text" id="aa"><br>
결과<input type="text" id="bb"> <button onclick="on()">버튼</button>
</body>
</html>

[ JavaScript 응용 해보기 - setTimeout ]
<!DOCTYPE html>
<html>
<head>
</head>
<body>
<img id="im" src="images/마이멜로디.jpg" onmouseover="start(5000)"
onmouseout="cancel()">
<script>
let n=null;
//이미지에 마우스오버하면 5초후 naver.com으로 이동되면서
//이미지위에 "시작!!" 출력
function start(t){
document.getElementById('im').title='시작!!';
}
function cancel(){
if(n!=null){
clearTimeout(n); //타임 중단
}
}
function load(url){
window.location=url;
}
</script>
</body>
</html>
 마이멜로디 사진에 마우스를 5초간 대고 있으면 네이버로 이동 됨
[ JavaScript 응용 해보기 - window location ]
<!DOCTYPE html>
<html>
<head>
<script>
function load(){
let n=document.getElementById('sel');
window.location=n.options[n.selectedIndex].value;
}
</script>
</head>
<body>
<!--선택한 value로 url이동-->
<select id="sel">
</select>
<button onclick="load()">사이트</button>
<script>
</script>
</body>
</html>
 다음, 구글 선택하면 해당 사이트로 이동 됨
[ JavaScript 응용 해보기 - each() 배열 관리 메서드 ]
<!DOCTYPE html>
<html>
<head>
<script>
$(document).ready(function(){
];
$.each(array, function(index, item){
let n='';
n+='<a href="'+item.link+'">'
n+='<h2>'+item.name+'</h2>';
n+='</a>';
document.body.innerHTML+=n;
});
})
</script>
</head>
<body>
<script>
</script>
</body>
</html>
 kim을 누르면 네이버로, lee를 누르면 다음으로 이동 됨
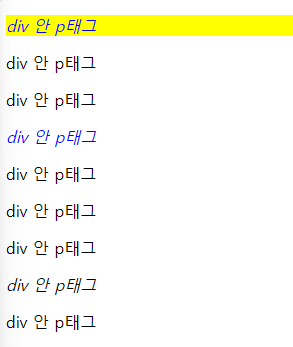
[ jQuery 응용 해보기 - 인덱스 선택자 ]
<!DOCTYPE html>
<html>
<head>
<script>
$(function() {
$('p:eq(0)').css('background-color','yellow');
$('p:nth-child(1)').css('color','blue'); //p태그 자식의 첫번째값 -> 그래서 마지막 div의 첫번째줄은 인식 안 됨
$('p:nth-of-type(1)').css('font-style','italic'); //p태그의 첫번째 값
})
</script>
</head>
<body>
<div>
<p>div 안 p태그</p>
<p>div 안 p태그</p>
<p>div 안 p태그</p>
</div>
<div>
<p>div 안 p태그</p>
<p>div 안 p태그</p>
<p>div 안 p태그</p>
</div>
<div>
<div>div 안 p태그</div>
<p>div 안 p태그</p>
<p>div 안 p태그</p>
</div>
</body>
</html>
[ jQuery 응용 해보기 - 태그 이름 설정 ]
<!DOCTYPE html>
<html>
<head>
<script>
$(function() {
//$(태그명[속성명])
$('p[title]').css('background-color','pink');
$('p[title=aa]').css('color','orange');
$('p[title!=aa]').css('color','red');
})
</script>
</head>
<body>
<p>제이쿼리</p>
<p title="aa">p태그1</p> <!-- 마우스 커서 갖다대면 aa가 뜸 -->
<p title="bb">p태그2</p> <!-- 마우스 커서 갖다대면 bb가 뜸 -->
</body>
</html>

[ jQuery 응용 해보기 - 배열 응용 ]
<!DOCTYPE html>
<html>
<head>
<script>
$(function() {
let n=['green','blue','pink'];
//배열을 활용한 첫번째 방법
$('h1').each(function(i) {
$(this).css('color',n[i]);
})
})
//배열을 활용한 두번째 방법
$('h1').css('color',function(i) {
return n[i];
})
</script>
</head>
<body>
<h1>성진</h1>
<h1>승빈</h1>
<h1>상우</h1>
</body>
</html>

[ jQuery 응용 해보기 - 배열 응용 ]
<!DOCTYPE html>
<html>
<head>
<script>
$(function() {
$('button').click(function() {
$(this).text('unactive');
$(this).parent().css('color','blue');
$(this).parent().find('span').text('active');
})
})
</script>
</head>
<body>
<body>
<div>
<span>비활성화</span>
<button>활성화</button>
</div>
<div>
<span>비활성화</span>
<button>활성화</button>
</div>
</body>
</html>

[ jQuery 응용 해보기 - trigger 글씨 클릭하면 ♥ 생기게 강제 이벤트 발생 ]
<!DOCTYPE html>
<html>
<head>
<script>
$(function() {
$('h1').click(function() {
$(this).html(function(idx, html){
return html + '♥';
})
})
//클릭을 안 해도 ♥가 생기는 이벤트 강제로 발생 되는 trigger
setInterval(function() {
$('h1').last().trigger('click');
},1000);
})
</script>
</head>
<body>
<h1>one</h1>
<h1>two</h1>
</body>
</html>

[ jQuery 응용 해보기 - filter ]
<!DOCTYPE html>
<html>
<head>
<script>
//첫번째 방법
$(function() {
$('h2').filter(':even').css({
backgroundColor:'black',
color:'yellow'
})
})
//두번째 방법
$(function() {
$('h2').filter(function(index){
return index%2==0;}).css({
backgroundColor:'black',
color:'yellow'
})
})
</script>
</head>
<body>
<h2>지현</h2>
<h2>화연</h2>
<h2>가영</h2>
</body>
</html>

[ jQuery 응용 해보기 - setInterval ]
<!DOCTYPE html>
<html>
<head>
</head>
<body>
<!--setInterval을 사용해서 1초마다 body에 ‘1초가 경과했습니다’ 라고 1초 단위로
body에 계속 출력하기-->
<script>
let n=1;
let m=setInterval(function(){
document.write(n+ '초가 경과했습니다<br>');
n++;
},1000);
let n=location.href;
document.write(n);
//10초후에 네이버홈페이지로 이동
setTimeout(function(){
},10000);
</script>
</body>
</html>

[ jQuery 응용 해보기 - 다른 html 파일로 이동하기 ]
<!DOCTYPE html>
<html>
<head>
</head>
<body>
<div>
<a href="index.html">index.html로 이동하기</a>
<p>
<button onclick="goBack()">뒤로가기</button>
<button onclick="num()">개수</button>
</p>
</div>
<script>
function goBack() {
history.back();
}
function num() {
alert(history.length);
}
</script>
</body>
</html>
[ jQuery 응용 해보기 - 캡처링, 버블링 stopPropagation ]
<!DOCTYPE html>
<html>
<head>
<style>
body{
margin: 20px;
}
#di{
border: 1px solid black;
padding: 30px;
}
#di a{
text-decoration: none;
border: 1px solid black;
padding: 10px;
}
</style>
</head>
<body>
<div id="di">
<a class="link" href="#none">link</a>
</div>
<script>
let n=document.getElementById('di'); //외부(=상위)
let m=document.querySelector('#di a'); //내부(=하위)
//상위요소로 전달되는 버블링,
//하위요소로 전달되는 캡처링
n.onclick=function() {
this.style.borderColor='red';
}
m.onclick=function() {
e.stopPropagation(); //버블링, 캡처링 막는 함수
this.style.borderColor='blue';
}
</script>
</body>
</html>

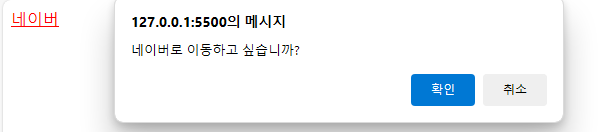
[ jQuery 응용 해보기 - preventDefault ]
<!DOCTYPE html>
<head>
</head>
<body>
<script>
let n=document.querySelector('.link');
n.addEventListener('click',function(e){
e.preventDefault(); //이벤트 취소(클릭안됨)
console.log(m);
let z=confirm('네이버로 이동하고 싶습니까?');
if(z==true){
location.href=m;
}
});
</script>
</body>
</html>
[ jQuery 응용 해보기 - 프로필사진 업로드 createObjectURL ]
<!DOCTYPE html>
<html lang="en">
<head>
<style>
body{
height: 100vh;
display: flex;
justify-content: center;
align-items: center;
}
.profile{
background-color: whitesmoke;
width: 300px;
text-align: center;
padding: 30px;
box-shadow: 0 0 15px gainsboro;
}
.profile h3{
text-transform: capitalize;
}
.photo-upload input[type=file]{
display: none;
}
.photo-upload label{
background-color: tomato;
color: white;
display: block;
padding: 10px;
}
.profile-photo img{
width: 200px;
border-radius: 50%;
}
.photo-upload{
margin-top: 20px;
}
</style>
</head>
<body>
<body>
<div class="profile">
<h3>upload profile</h3>
<div class="profile-photo">
<img src="images/a.jpg">
</div>
<div class="photo-upload">
<label for="upload">Upload Photo</label>
<input type="file" id="upload">
</div>
</div>
<script>
$('#upload').change(function(e){
let n=URL.createObjectURL(e.target.files[0]);
$('.profile-photo img').attr('src',n);
})
</script>
</body>
</html>

Modal · Bootstrap (getbootstrap.com)
Modal
Use Bootstrap’s JavaScript modal plugin to add dialogs to your site for lightboxes, user notifications, or completely custom content.
getbootstrap.com
W3Schools Online Web Tutorials
W3Schools Online Web Tutorials
W3Schools offers free online tutorials, references and exercises in all the major languages of the web. Covering popular subjects like HTML, CSS, JavaScript, Python, SQL, Java, and many, many more.
www.w3schools.com