

| 일 | 월 | 화 | 수 | 목 | 금 | 토 |
|---|---|---|---|---|---|---|
| 1 | 2 | 3 | ||||
| 4 | 5 | 6 | 7 | 8 | 9 | 10 |
| 11 | 12 | 13 | 14 | 15 | 16 | 17 |
| 18 | 19 | 20 | 21 | 22 | 23 | 24 |
| 25 | 26 | 27 | 28 | 29 | 30 | 31 |
- Board
- db
- rpa
- Java
- 배열
- Uipath
- View
- mysql
- 상속
- Array
- Eclipse
- 조건문
- MVC
- Controller
- string
- jquery
- Scanner
- React
- Thymeleaf
- spring
- html
- 문자열
- Database
- 이클립스
- git
- API
- jsp
- JDBC
- SpringBoot
- Oracle
- Today
- Total
유정잉
34일차 jQuery [ jQuery ] 본문
[ 제이쿼리 ]
1. css() : 스타일 변경 메서드
$('선택자').css('속성','값');
$('선택자').css('속성':'값', '속성':'값');
2. children(): 선택자를 기준으로 자식요소 선택하는 메서드
$('선택자').children('선택자');
find(): 선택자를 기준으로 자손요소 선택하는 메서드
$('선택자').find('선택자');
3. siblings() : 선택자를 기준으로 형제요소 선택하는 메서드
$('선택자').siblings('선택자');
parent() : 선택자를 기준으로 부모요소 선택하는 메서드
$('선택자').parent('선택자');
4. next(), prev(), nextAll(), prevAll(), nextUntil(), prevUntil()
-- 요소 탐색 선택자--
5. eq(index) ,요소:first-child, 요소:last-child, 요소:nth-child
6. 요소:gt(index) , 요소:lt(index), 문서객체.not('선택자'), 문서객체.has('선택자')
gt(>) : 선택된 인덱스부터 다음의 모든 요소 선택
lt(<) : 선택된 인덱스부터 이전의 모든 요소 선택
not : 선택자 제외
has : 선택요소를 포함(has)한 요소
7. show(), hide(), toggle()
faedOut(), fadeIn(), fadeToggle()
slideDown(), slideUp(), slideToggle()
8. text(), html(), val()
text() : 선택자 하위에 있는 자식 태그들의 문자열만 출력
html() : 선택자 하위에 있는 자식 태그들의 문자열, 태그 등 출력
val() : form의 값을 가져오거나 설정
9. attr(), prop()
attr(속성명) : getter
attr(속성명, 속성값) : setter
removeAttr(속성명) : 속성값 제거
prop (속성명) : getter
prop (속성명, 속성값) : setter
removeProp (속성명) : 속성값 제거
10. append(), prepend(), after(), before()
11. remove(), empty()
remove() : 선택한것만 삭제
empty() : 선택한 자식들 모두 삭제
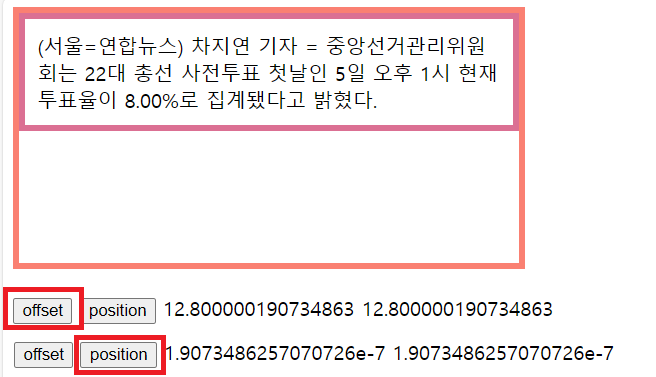
12. offset(), position()
13. is() 참과거짓반환
14. slice(시작인덱스, 끝인덱스): 끝인덱스는 포함 안됨
15. animate()
$('선택자').animate({CSS스타일}, 지속시간, 이징, 콜백함수);
16. animate() - delay()
faeln(), slideDown()와 같이 쓰임
[ 첫 번째 태그 선택하기 ]
- :first : 가장 처음 태그 선택된다.
- :first-child : 선택자에 해당되는 태그 중에서 각 영역별 첫번째 태그가 선택된다.
처음 태그가 선택자에 해당하지 않으면 선택되지 않는다.
- :first-of-type : 선택자에 해당되는 태그 중에서 각 영역별 처음 태그가 선택된다.
[ 인덱스 번째 태그 선택하기 ]
- eq(인덱스) : 인덱스(0부터 시작)번째 해당하는 태그 선택
- nth-child(인덱스) : 각 영역의 인덱스(1부터 시작)번째 해당하는 태그를 선택.
인덱스번째 태그가 선택자에 해당하지 않으면 선택되지 않는다.
- nth-of-type(인덱스) : 각 영역의 인덱스(1부터 시작)번째 해당하는 태그를 선택.
[ 속성 선택자 ] : 태그에 설정되어 있는 속성을 선택하는 선택자
- [속성] : 속성을 가지고 있는 태그 선택
- [속성=값] : 속성의 값이 지정된 값과 일치하는 태그 선택
- [속성!=값] :
- [속성$=값] : 속성의 값이 지정된 값으로 끝나는 태그 선택
jQuery CDN
jQuery CDN – Latest Stable Versions jQuery Core Showing the latest stable release in each major branch. See all versions of jQuery Core. jQuery 3.x jQuery 2.x jQuery 1.x jQuery Migrate jQuery UI Showing the latest stable release for the current and legac
releases.jquery.com
[ jQuery ]
1) Google에 제이쿼리 CDN 검색
2) 제일 최신버전 -> minified 클릭 -> 링크 복사
3) <head>와</head> 사이에 복사한 링크 삽입


[ jQuery 링크 삽입 방법 ]
[ jQuery 기본 구조 ]
<!DOCTYPE html>
<html lang="en">
<head>
	<script src="https://code.jquery.com/jquery-3.7.1.min.js" ></script>
	<script>
		$(document).ready(function() {
			//실행코드
		});

		$(function() {

		});
	</script>
</head>
<body>
	<script>
		//실행코드
	</script>
</body>
</html>
[ jQuery 응용 해보기 - 1 CSS 함수 ]

[ jQuery 응용 해보기 - 2 children(), find() 함수 ]


[ jQuery 응용 해보기 - 3 siblings(), parent() 함수 ]

[ jQuery 응용 해보기 - 4 next(), prev() 함수 ]

[ jQuery 응용 해보기 - 5 eq(index), 요소:first-child, 요소:last-child, 요소-nth-child 함수 ]

[ jQuery 응용 해보기 - 6 요소:gt(index),요소:lt(index),문서객체.not('선택자'),문서객체.has('선택자') 함수 ]
gt(<) : 선택된 인덱스부터 다음의 모든 요소 선택
lt(>) : 선택된 인덱스부터 이전의 모든 요소 선택
not() : 선택자 제외하고(=이외) 모든 요소 선택
has() : 선택요소를 포함(has)한 요소만 선택

[ jQuery 응용 해보기 - 7 이벤트 처리 addClass, removeClass, toggleClass 버튼 클릭 ]


[ jQuery 응용 해보기 - 8 show(), hide(), toggle() 함수 ]
- show,hide,toggle은 클릭시 탁 탁 나오고
- fadeIn(), fadeOut(), fadeToggle() 클릭시 잔상처럼 천천히 나오고
- slideDown()=show, slideUp()=hide, slideToggle() 클릭시 슬라이드 되면서 나온다

[ jQuery 응용 해보기 - 8 fadeIn(), fadeOut(), fadeToggle() 함수 ]
[ jQuery 응용 해보기 - 8 slideDown(), slideUp(), slideToggle() 함수 ]

[ jQuery 응용 해보기 - 9 text(), html(), val() 함수 ]


[ jQuery 응용 해보기 - 10 attr(), prop() 함수 ]


[ jQuery 응용 해보기 - 11 append(), prepend(), after(), before() 함수 ]

[ jQuery 응용 해보기 - 12 remove(), empty() 함수 ]

[ jQuery 응용 해보기 - 12 offset(), position() 함수 ]
[ jQuery 응용 해보기 - 13 is() 함수 ]

[ jQuery 응용 해보기 - 14 slice() 함수 ]

[ jQuery 응용 해보기 - 15 change() 함수

[ jQuery 응용 해보기 - 16 animate() 함수 ]
- easing 속도감 관련 함수


[ jQuery 응용 해보기 - 17 부트스트랩 아이콘을 이용한 다크 모드 & 라이트 모드 함수 ]
- bootstrap icon : Dark Mode & Light Mode


[ jQuery 응용 해보기 - 18 textarea를 활용한 입력수 제한 함수 ]
- 예를 들어 자소서 쓸 때 처럼 입력하는 만큼 글자수 올라가면서 글자수 제한 걸리는 작업

[ jQuery 응용 해보기 - 19 Scroll를 활용한 스크롤 함수 ]


[ jQuery 응용 해보기 - 19 $(document).ready(function(){} <head>에 <script> 함수 ]

[ jQuery 응용 해보기 - 20 checkList 만들기 체크리스트 함수 ]
- click 과 toggleClass 활용

[ jQuery 응용 해보기 - 21 on함수로 이벤트 처라 작업 함수 ]

[ jQuery 응용 해보기 - 22 함수 ]
[ jQuery 응용 해보기 - 23 함수 ]

[ jQuery 응용 ]
<!DOCTYPE html>
<head>
<script src="https://code.jquery.com/jquery-3.7.1.min.js"></script>
<style>
</style>
</head>
<body>
<div id="di">
<div class="di2">
<span class="s1">
<span id="num">1</span>/<span>3</span>
</span>
<button class="prev"><</button>
<button class="next">></button>
</div>
<div class="di3">
<div><img src="마이멜로디.jpg"></div>
</div>
</div>
<script>
// $('.next').click(function(){
// $('.di3 img').attr('src','헬로키티.jpg');
// })
var currentIndex = 0; // 현재 이미지의 인덱스를 나타내는 변수
$('.next').click(function(){
var images = ['마이멜로디.jpg', '헬로키티.jpg', '어피치.jpg']; // 이미지 경로 배열
currentIndex++; // 다음 이미지 인덱스로 이동
if (currentIndex >= images.length) {
currentIndex = 0; // 인덱스가 배열의 길이보다 크거나 같으면 처음으로 돌아감
}
$('.di3 img').attr('src', images[currentIndex]); // 이미지 변경
$('#num').text(currentIndex + 1); // 텍스트 변경
});
$('.prev').click(function(){
var images = ['마이멜로디.jpg', '헬로키티.jpg', '어피치.jpg']; // 이미지 경로 배열
currentIndex--; // 이전 이미지 인덱스로 이동
if (currentIndex < 0) {
currentIndex = images.length - 1; // 인덱스가 0보다 작으면 마지막 이미지로 이동
}
$('.di3 img').attr('src', images[currentIndex]); // 이미지 변경
$('#num').text(currentIndex + 1); // 텍스트 변경
});
</script>
</body>
</html><!DOCTYPE html>
range늘릴때마다 글자 폰트사이즈가 변경됨
<head>
<script src="https://code.jquery.com/jquery-3.7.1.min.js"></script>
<style>
body{
display: flex;
justify-content: center;
}
.di{
width: 400px;
border-radius: 5px;
box-shadow: 0 0 30px gray;
padding: 30px;
}
</style>
</head>
<body>
<div class="di">
<span class="s1">20</span>px
<input type="range" value="20" min="0" max="100">
<hr>
<p>Q. 투표도장은 왜 ‘점 복(卜)' 자?<br>
상하좌우 대칭 모양이 모두 달라 명확하게 구분할 수 있다.</p>
</div>
<script>
$('input').on('input',function(){
let n = $('input').val();
$('.s1').text(n);
$('p').css('font-size',n+'px');
})
</script>
</body>
</html><!DOCTYPE html>
1. input에 클릭했을 때 글자가 위로 올라간다 (focus)
2. input을 벗어나면 다시 원위치
<head>
<script src="https://code.jquery.com/jquery-3.5.1.min.js"></script>
<style>
body{
display: flex;
justify-content: center;
align-items: center;
height: 100vh;
}
.di{
width: 350px;
border-radius: 5px;
box-shadow: 0 0 30px gainsboro;
padding: 30px;
}
.di .di2{
position: relative;
margin: 20px 0;
}
.di .s1{
position: absolute;
left:0;
top:10px;
transition: 0.3s;
color:gray;
pointer-events: none;
}
.di input{
border: none;
border-bottom: 1px solid gainsboro;
outline: none;
width: 100%;
padding: 10px 0;
font-size:15px;
}
button{
background-color: violet;
color:white;
width:100%;
padding: 10px 30px;
border: none;
cursor: pointer;
}
.s1.active{
top:-10px;
color:yellowgreen;
}
</style>
</head>
<body>
<form>
<div class="di">
<div class="di2">
<span class="s1">Email</span>
<input type="email">
</div>
<div class="di2">
<span class="s1">Password</span>
<input type="password">
</div>
<div class="di2">
<span class="s1">Password Confirm</span>
<input type="password">
</div>
<button>Login</button>
</div>
</form>
<script>
let $n=$('.di input');
$n.focus(function(){
$(this).parent().find('.s1').addClass('active');
});
$n.focusout(function(){
if($(this).val()==''){
$(this).parent().find('.s1').removeClass('active');
}
});
</script>
</body>
</html><!DOCTYPE html>
아이디는 “자바” 패스워드는 “1234”이어야 로그인이 되고, 둘 중 하나라도 틀리게 입력하면 “다시 입력” 이라는 경고창이 뜬다.
<head>
<script src="https://code.jquery.com/jquery-3.7.1.min.js"></script>
<style>
#login{
background-color: pink;
color: whitesmoke;
border: 1px solid black;
height: 40px;
width: 100px;
font-size: 15px;
font-weight: bold;
margin-top: 20px;
}
#login:hover{
background-color: tomato;
}
#di input[type="text"] {
margin-bottom: 10px; /* 입력란 사이의 간격 조정 */
width: 300px; /* 입력란의 너비 조정 */
}
</style>
</head>
<body>
<h1>로그인</h1>
<div id="di">
아이디<br><input type="text" placeholder="아이디를 입력해주세요..." id="id1"><br>
패스워드<br><input type="text" placeholder="비밀번호를 입력해주세요..." id="pw1"><br>
</div>
<button id="login">로그인</button>
</body>
<script>
$('#login').click(function(){ // 버튼에 클릭 이벤트를 추가하고, 함수 내부에 로그인 로직을 작성합니다.
var id = $('#id1').val(); // 아이디 입력란의 값을 가져옵니다.
var pw = $('#pw1').val(); // 패스워드 입력란의 값을 가져옵니다.
if(id === '자바' && pw === '1234') { // 아이디와 패스워드가 모두 일치하는지 확인합니다.
alert('로그인 성공'); // 일치하면 로그인 성공 알림창을 띄웁니다.
} else {
alert('아이디 또는 비밀번호를 다시 확인해주세요.'); // 일치하지 않으면 알림창을 띄웁니다.
}
});
</script>
</html>
<!DOCTYPE html>

스크롤바 사용해서 섹션 변경하기

<html lang="en">
<head>
    <script src="https://code.jquery.com/jquery-3.7.1.min.js"></script>
<style>
    header{
        background-color: salmon;
        text-align: center;
        height: 50px;
        position: fixed;
        justify-content: flex-end;
        display: flex;
        width:100%;
    }
    section{
        height: 100vh;
        background-color: whitesmoke;
        display: flex;
        justify-content: center;
        align-items: center;
    }
    section h1{
        font-size: 3em;
    }
    .di2{
        padding: 0 20px;
        font-size: 1.5em;
    }
    section:nth-of-type(odd){
        background-color: gainsboro;
    }
</style>
</head>
<body>
    <div class="di">
        <header>
            <div class="di2">
                <a href="#s1">Section1</a>
                <a href="#s2">Section2</a>
                <a href="#s3">Section3</a>
                <a href="#s4">Section4</a>
            </div>
        </header>
        <section id="s1">
            <h1>Section #01</h1>
        </section>
        <section id="s2">
            <h1>Section #02</h1>
        </section>
        <section id="s3">
            <h1>Section #03</h1>
        </section>
        <section id="s4">
            <h1>Section #04</h1>
        </section>
    </div>
</body>
<script>
    $('.di2 a').click(function(){
        let n=$(this).attr('href');
        $('html, body').animate({
            scrollTop:$(n).offset().top
        },500);
    });
</script>
</html>
<!DOCTYPE html>
Scroll 버튼 만드는 작업 ( 스크롤 내리지 않으면 스크롤 버튼 보이지 않게 )
<head>
<script src="https://code.jquery.com/jquery-3.7.1.min.js"></script>
<style>
.di{
background-color: salmon;
height: 100px;
display: flex;
text-align: center;
align-items: center;
justify-content: center;
font-size: 2em;
margin: 0;
}
.di2{
height: 150vh;
display: flex;
justify-content: center;
align-items: center;
width: 85%;
}
.di3{
position: fixed;
right:20px;
bottom: 20px;
background-color: blue;
color: whitesmoke;
padding: 5px;
border-radius: 5px;
display: none;
cursor: pointer;
}
</style>
</head>
<body>
<div class="di">
header
</div>
<div class="di2">
<h3>hi</h3>
<p>(샌프란시스코=연합뉴스) 김태종 특파원 = 미국 전기차업체 테슬라
최고경영자(CEO) 일론 머스크는 8일(현지시간) 인간을 능가하는
AI(인공지능)가 "내년 안에 나올 수도 있다"고 전망했다.
</p>
</div>
<div class="di">footer</div>
<div class="di3">Scroll To Top</div>
<script>
let offsetTop=100;
let $n=$('.di3'); //변수선언
$(window).scroll(function() {
if($(this).scrollTop() > offsetTop) { //스크롤바를 내리면 버튼이 보이는 작업
$n.fadeIn(); //천천히 나타나게
}
else{ //스크롤바를 내리지 않으면 버튼이 보이지 않는 작업
$n.fadeOut();
}
});
$n.click(function() {
$('html, body').animate({
scrollTop:0}, 500);
});
</script>
</body>
</html><!DOCTYPE html>
input type color 에 따른 배경 색 바꾸기
<head>
<script src="https://code.jquery.com/jquery-3.7.1.min.js"></script>
<style>
.di{
text-align: center;
}
body{
display: flex;
align-items: center;
justify-content: center;
height: 100vh; /* viewport height (부모자식 상관 없이 눈에 보이는 값) */
margin: 0;
}
.di input{
width: 100%; /* 브라우저 전체 (부모태그의 전체) */
}
.di h1{
margin-top: 0;
}
</style>
</head>
<body>
<div class="di">
<h1>Change Color</h1>
<input type="color" value="#8C7AE6" id="c1" class="c1">
</div>
<script>
// on 함수 실질적인 이벤트 거는 함수
$('.c1').on('input' , function(){ //단순한 클릭이 아니라 input타입 으로 부터 알아낸 값을 적용하는 것
$('body').css({ 'background-color':$(this).val()
});
if($('#c1').val() <= '#050505' ){ //HEX값
$('.di h1').css({
'color':'black'
});
}
else{
$('.di h1').css({'color':'white'});
}
})
</script>
</body>
</html><!DOCTYPE html>
바탕 아무곳이나 더블클릭하면 배경색이 랜덤하게 변하는 웹 페이지를 작성해라.
<head>
<script src="https://code.jquery.com/jquery-3.7.1.min.js"></script>
<style>
body {
margin: 0;
padding: 0;
height: 100vh;
display: flex;
justify-content: center;
align-items: center;
font-size: 24px;
cursor: pointer; /* 마우스 커서를 변경하여 사용자에게 클릭 가능함을 나타냄 */
}
</style>
</head>
<body>
<script>
// 더블 클릭 이벤트 리스너를 등록하여 배경색 변경
$(document).on('dblclick', function() {
// 랜덤 RGB 값을 생성
var randomColor = 'rgb(' + Math.floor(Math.random() * 256) + ',' + Math.floor(Math.random() * 256) + ',' + Math.floor(Math.random() * 256) + ')';
// body의 배경색을 랜덤 색상으로 변경
$('body').css('background-color', randomColor);
});
</script>
</body>
</html>
---------------------------------------------------------------------------------------
<!DOCTYPE html>
<head>
<script src="https://code.jquery.com/jquery-3.7.1.min.js"></script>
<style>
body {
margin: 0;
padding: 0;
height: 100vh;
display: flex;
justify-content: center;
align-items: center;
font-size: 24px;
cursor: pointer; /* 마우스 커서를 변경하여 사용자에게 클릭 가능함을 나타냄 */
}
</style>
</head>
<body>
<h4>화면 아무데나 더블 클릭하면 색상 랜덤 변경</h4>
<script>
window.ondblclick=function() {
let a=Math.floor(Math.random()*256);
let b=Math.floor(Math.random()*256);
let c=Math.floor(Math.random()*256);
document.body.style.backgroundColor="rgb("+a +","+b+","+c+")";
}
</script>
</body>
</html><!DOCTYPE html>
textarea에 글자수 제한 걸고 그 글자수가 초과될때 경고창 띄우는 작업 ex) 자소서
<head>
<script src="https://code.jquery.com/jquery-3.7.1.min.js"></script>
<style>
textarea{
width: 100px;
height: 100px;
padding: 20px;
outline: none;
}
.msg1{
color: red; /* 일종의 경고 메세지 */
display: none; /* 글자수 초과하기 전 까진 안 보이게 */
}
</style>
</head>
<body>
<div class="di">
<textarea id="t1" maxlength="100"></textarea>
<div class="di2">
<p class="msg1">입력수 초과되었다</p>
<p class="count"><span class="count2">0</span>/100</p>
</div>
</div>
<script>
$('#t1').keyup(function(){ //내가 textarea에 키보드로 문자를 쓸 때
let n=$(this).val().length; //내가 textarea쓴 문자의 실제 길이
$('.count2').text(n);
//만약 글자수가 100글자가 넘어가면 입력수 초과되었다 띄우기
//red색으로 border값도 설정해주기
if(n>99){
$(this).css('border','1px solid red');
$('.msg1').show();
}
else{
$('.msg1').hide();
}
})
</script>
</body>
</html><!DOCTYPE html>
jQuery 응용 해보기 - 부트스트랩 아이콘을 이용한 다크모드&라이트모드 함수
bootstrap icon : Dark Mode & Light Mode
<head>
<script src="https://code.jquery.com/jquery-3.7.1.min.js"></script>
<style>
@import url("https://cdn.jsdelivr.net/npm/bootstrap-icons@1.11.1/font/bootstrap-icons.css");
body{
margin: 0;
background-color: whitesmoke;
display: flex;
justify-content: center;
align-items: center;
transition: 0.5s;
}
.di{
width: 850px;
text-align: center;
}
.btn-toggle{
position: fixed;
top: 20px;
right: 20px;
border: none;
padding: 5px 10px;
cursor: pointer;
}
.dark{
background-color: black;
color: whitesmoke;
}
</style>
</head>
<body>
<!-- 라이트 모드 & 다크 모드 전환 -->
<div class="di">
<h1>라이트 모드 & 다크 모드</h1>
<p class='p1'>
LG전자가 자사 세탁기·건조기 구입 고객 중 77%가 워시타워·워시콤보를 선택했다고 8일 밝혔다.
LG전자는 지난 2020년 원바디(One Body) 세탁건조기 ‘트롬 오브제컬렉션 워시타워’를 출시하며, 복합형 세탁건조기 시장에 진출했다.
</p>
<button class="btn-toggle dark-btn" id="btn-toggle">
<span>Dark Mode </span><i class="bi bi-moon-fill"></i> <!-- Dark Mode 아이콘 삽입 -->
</button>
</div>
<script>
$('.btn-toggle').click(function(){
$('body').toggleClass('dark'); //toggleClass : Class가 추가 됐다 사라졌다 하는 작업 // 버튼을 누를때 dark라는 calss 추가 됨
$(this).css({'border':'1px solid black'}); //버튼을 클릭하면 blcak border가 생기는 작업
$(this).children('span').text(
$(this).children('span').text() == 'Light Mode' ? 'Dark Mode' : 'Light Mode'
);
$(this).find('i').toggleClass('bi bi-sunset'); //Light Mode 아이콘 바꾸는 작업
})
</script>
</body>
</html>메뉴판 만들기 작업
<head>
<script src="https://code.jquery.com/jquery-3.7.1.min.js"></script>
<style>
.cafe{
list-style: none;
width: 200px;
}
.cafe li > a, .sub a{
text-decoration: none;
color: whitesmoke;
text-transform: capitalize; /* 맨 앞글자가 대문자로 */
}
.cafe li > a {
background-color: blueviolet;
border-bottom: 3px solid black; /* boder box 밑 부분만 생성 됨 */
display: block;
}
.sub{
display: none;
}
.sub a:hover{
background-color: pink;
}
.cafe li > a:after{ /* after : 내가 선택한 것 에다가 원하는 것 추가 하는 작업 */
float:left;
content: '+'; /* left 때문에 글씨 맨 왼쪽에 / '+' 생성 */
}
</style>
</head>
<body>
<ul class="cafe">
<li>
<a href="#menu">home</a>
<div class="sub">
<a href="#menu">americano</a>
<a href="#menu">latte</a>
<a href="#menu">capuccino</a>
</div>
</li>
<li>
<a href="#menu">sandwich</a>
<div class="sub">salmon sandwich</div>
</li>
<li>
<a href="#menu">salad</a>
<div class="sub">chicken salad</div>
</li>
</ul>
<script>
$('.sub').eq(0).show(); //eq는 인덱스 지정 // sub의 ep인덱스(0)을 show해라 // 즉 americano, latte, cappuccino
$('.cafe li > a').click(function() { //보라색을 클릭 했을 떄 안에 메뉴 올라오게
$(this).next().slideDown();
$(this).parent().siblings().children('.sub').slideUp();
//this클릭된거 기준으로 parent부모의 siblings형제요소중 children자식요소의 slideUp() // <a href="#menu">home</a> -> 가 this
})
</script>
</body>
::after - CSS: Cascading Style Sheets | MDN (mozilla.org)
::after - CSS: Cascading Style Sheets | MDN
In CSS, ::after creates a pseudo-element that is the last child of the selected element. It is often used to add cosmetic content to an element with the content property. It is inline by default.
developer.mozilla.org
Bootstrap · The most popular HTML, CSS, and JS library in the world. (getbootstrap.com)
Bootstrap
Powerful, extensible, and feature-packed frontend toolkit. Build and customize with Sass, utilize prebuilt grid system and components, and bring projects to life with powerful JavaScript plugins.
getbootstrap.com
'네이버 클라우드 부트캠프 > 복습 정리' 카테고리의 다른 글
| 37일차 [ 톰캣 다운로드, Ajax ] (0) | 2024.04.12 |
|---|---|
| 35~36일차 jQuery [ 복습 ] (0) | 2024.04.11 |
| 33일차 Java [ Gson, Json, jQuery ] (0) | 2024.04.05 |
| 30~32일차 JavaScript [ 코드 복습 ] (0) | 2024.04.02 |
| 29일차 JavaScript [ 문서 객체 모델, Node ] (1) | 2024.04.01 |


