
| 일 | 월 | 화 | 수 | 목 | 금 | 토 |
|---|---|---|---|---|---|---|
| 1 | 2 | 3 | ||||
| 4 | 5 | 6 | 7 | 8 | 9 | 10 |
| 11 | 12 | 13 | 14 | 15 | 16 | 17 |
| 18 | 19 | 20 | 21 | 22 | 23 | 24 |
| 25 | 26 | 27 | 28 | 29 | 30 | 31 |
- mysql
- Java
- string
- Eclipse
- Controller
- jsp
- git
- 이클립스
- API
- 조건문
- Oracle
- 문자열
- Array
- 상속
- jquery
- Scanner
- React
- Uipath
- rpa
- Database
- html
- MVC
- JDBC
- spring
- 배열
- View
- Thymeleaf
- db
- SpringBoot
- Board
- Today
- Total
유정잉
37일차 [ 톰캣 다운로드, Ajax ] 본문
[ Tomcat 다운로드 & eclipse 연동 ]
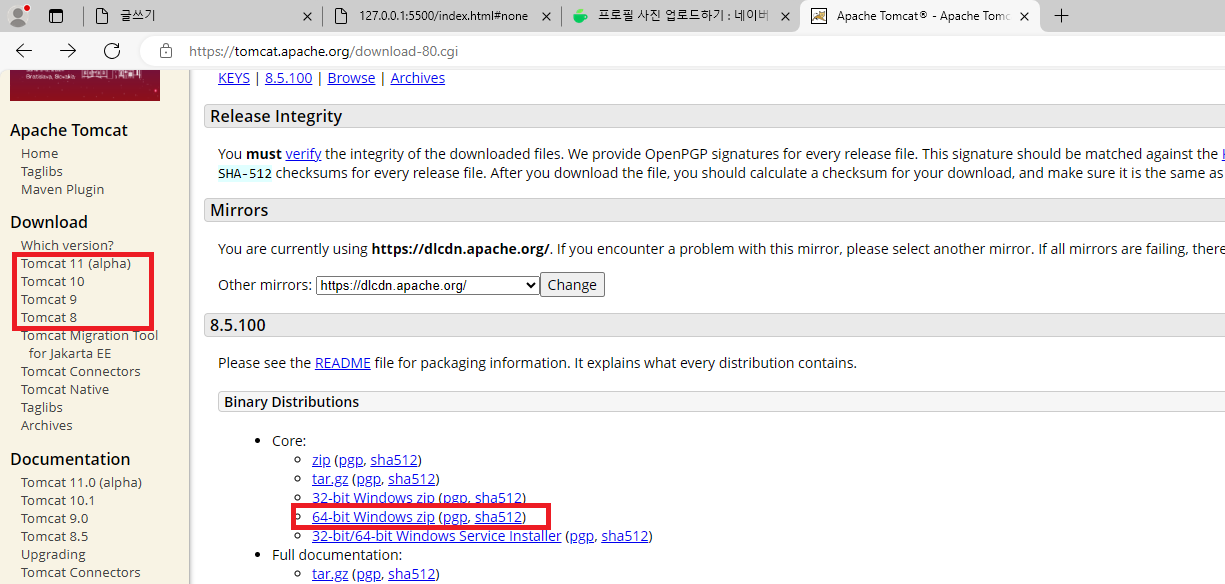
1) Google에 톰캣 다운로드 검색 후 버전에 맞게 선택 후 다운로드 ( -> C드라이브에서 압축 풀기 )
2)
[IntelliJ] 인텔리제이 톰캣(Tomcat) 연동 (tistory.com)
[IntelliJ] 인텔리제이 톰캣(Tomcat) 연동
Intellij 톰캣(Tomcat) 연동 로컬에 톰캣이 있다는 가정하에 진행하려고 한다. 만일 톰캣이 설치되어 있지 않다면 아래 사이트에서 톰캣을 다운받으면 된다. 나의 경우 9 버전으로 다운받았는데 원하
computer-science-student.tistory.com
3) eclipse -> File -> New -> New Project

3) Web -> Dynamic Web Project

4) Progect name 설정, Target runtime 을 내가 설치한 tomcat과 동일한 버전으로 선택.

5) No 클릭

5) Project 잘 생성 됐는지 확인 ( 일반 프로젝트와 달리 지구모양 생김)


[ 인텔리제이 & 톰캣 ]
사용자정의태그를 쓰고 싶을 땐 .xml확장자에서 <root>활용
<!DOCTYPE html>
<html lang="en">
<head>
    <meta charset="UTF-8">
    <title>Title</title>
    <script src="https://code.jquery.com/jquery-3.5.1.min.js"></script>
    <script>
        function getText() {
            $.ajax({
                url:"data.txt",
                type:"post",
                dataType:"text",
                success:function(rec_data){
                    $("#result").text(rec_data);
                }
            })
        }

         function getHtml() {
            $.ajax({
                url:"data2.html",
                type:"post",
                dataType:"html",
                success:function(rec_data){
                    $("#result").html(rec_data);
                }
            })
        }

        function getXml() {
            $.ajax({
                url:"data3.xml",
                type:"post",
                dataType:"xml",
                success:function(rec_data){
                    let n=$(rec_data).find('data');

                    $(n).each(function(idx,obj){
                        let food1=$(obj).find('food1');
                        let food2=$(obj).find('food2');

                        let food11=$(food1).text();
                        let food22=$(food2).text();

                        $("#result").append(food11+"<br>");
                        $("#result").append(food22+"<br>");
                    })
                }
            })
        }

        function getJson() {
             $.ajax({
                url:"data4.json",
                type:"post",
                dataType:"json",
                success:function(rec_data){
                    $('#result').append(rec_data.age+"<br>");
                    $('#result').append(rec_data.kg+"<br>");
                    $('#result').append(rec_data.name+"<br>");
                }
             })
        }

    </script>
</head>
<body>
    <button onclick="getText()">문자열</button>
    <button onclick="getHtml()">html</button>
    <button onclick="getXml()">xml</button>
    <button onclick="getJson()">json</button>
    <div id="result"></div>
    <script></script>
</body>
</html>
[ data1.txt ]

금요일입니다.
[ data2.html ]

<!DOCTYPE html>
<html lang="en">
<head>
    <meta charset="UTF-8">
    <title>Title</title>
</head>
<body>
<a href="http://www.naver.com">naver</a>

</body>
</html>
[ data3.xml ]

<?xml version="1.0" encoding="utf-8" ?>

<root>
    <data>
        <food1>된찌</food1>
        <food2>김찌</food2>
    </data>

    <data>
        <food1>짜장</food1>
        <food2>짬뽕</food2>
    </data>

    <data>
        <food1>피자</food1>
        <food2>치킨</food2>
    </data>
</root>
[ data4.json ]

{
    "age": 30,
    "kg": 66.66,
    "name": "gildong"
}


[ 실제 데이터로 부터 배열로 가져오는 작업 ]
<!DOCTYPE html>
<html>
<head>
    <meta charset="UTF-8">
    <title>Title</title>
    <script src="https://code.jquery.com/jquery-3.5.1.min.js"></script>
    <script>
    	//h1으로 띄우기
        $(document).ready(function() {
            let ary=[{name:'수정', addr:'서울'},
                     {name:'지현', addr:'서울'},
                     {name:'유정', addr:'서울'}];

            $.each(ary, function(idx, item) {
                let r='';
                r+='<h1>'+item.name+'</h1>';
                r+='<h1>'+item.addr+'</h1>';
                document.body.innerHTML+=r;
            })
        })
    </script>
</head>
</html>
https://www.data.go.kr/index.do
공공데이터 포털
국가에서 보유하고 있는 다양한 데이터를『공공데이터의 제공 및 이용 활성화에 관한 법률(제11956호)』에 따라 개방하여 국민들이 보다 쉽고 용이하게 공유•활용할 수 있도록 공공데이터(Datase
www.data.go.kr
'네이버 클라우드 부트캠프 > 복습 정리' 카테고리의 다른 글
| 43일차 JSP [ forward, cookie ] (0) | 2024.04.22 |
|---|---|
| 40~41일차 JSP [ 개념, Tomcat 연결 ] (0) | 2024.04.17 |
| 35~36일차 jQuery [ 복습 ] (0) | 2024.04.11 |
| 34일차 jQuery [ jQuery ] (0) | 2024.04.08 |
| 33일차 Java [ Gson, Json, jQuery ] (0) | 2024.04.05 |


