

| 일 | 월 | 화 | 수 | 목 | 금 | 토 |
|---|---|---|---|---|---|---|
| 1 | 2 | 3 | ||||
| 4 | 5 | 6 | 7 | 8 | 9 | 10 |
| 11 | 12 | 13 | 14 | 15 | 16 | 17 |
| 18 | 19 | 20 | 21 | 22 | 23 | 24 |
| 25 | 26 | 27 | 28 | 29 | 30 | 31 |
- jsp
- Array
- MVC
- string
- Board
- 상속
- html
- API
- rpa
- jquery
- mysql
- Uipath
- JDBC
- Thymeleaf
- 조건문
- Oracle
- 자료구조
- 배열
- spring
- Java
- Scanner
- Eclipse
- Controller
- db
- React
- SpringBoot
- 문자열
- View
- Database
- 이클립스
- Today
- Total
유정잉
30~32일차 JavaScript [ 코드 복습 ] 본문
this 있을 때 변수명 obj로 많이 줌
[ DOM 문서 객체 이벤트 ]
1) 문서객체.on이벤트타입명 = 이벤트핸들러;
ex) n.onclick=function();
n.onclick=ch;
2) 문서객체.addEventListener("이벤트타입",콜백함수);
ex) n.addEventListener('click',function(){});
3) 문서객체.removeEventListener('이벤트타입',콜백함수);
[ JavaScript 이벤트 종류 ]
1) 마우스 이벤트 (click, dbclick, mouseover, mouseout, mousemove...)
2) 키 이벤트 (keydown, keyup, keypress...)
3) 로드 이벤트 (load, resize, scroll...)
4) 폼 이벤트 (focus, blur, change, submit, reset, select)
change : 요소에 값이 변경 되었을 때
submit ; submit 버튼을 눌렀을 때 이벤트 발생
select : input, textarea 요소 안의 텍스트를 선택했을 때 발생
[ HTML DOM Node ]
※ node란 : js에서 html 모든 요소를 말한다. ( window -> document .. 모두를 말함 )
※ 최상단 Node : window -> document-> html -> body
-> (이 이후로는 짜기 나름) -> (예를들어) table -> t.body -> tr -> td
document -> (문서노드) html -> (루트노드) <img src, width=400, height=400> src, width, height -> (속성노드)
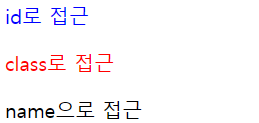
[ JavaScript Node 폼 접근 - document.폼요소.요소네임 ]
※폼에 접근하는 3가지 방법
- document.폼네임.요소네임 => 주로 많이 이용
- document.forms['폼네임'].elements['요소네임']
- document.forms['폼네임']['요소네임']
[ dataset속성 (data- 속성) ]
ex) data-속성='값;
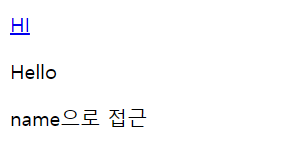
[ 문자처리 = innerHTML, innerText, textContent ]
[ 객체 표현 ]
String str="홍길동, 서울, 010-111-1111#김길동, 서울, 010-111-1111"
xml 파일형식) <내가정한태그이름>홍길동</name> <addr>서울</addr> <tel>010-111-1111</tel>
json) [{'name':'홍길동', 'addr', 'seoul'. 'tel'...}]
gson)
[ getElementsById, getElementByTagName, querySelector ]
[ appendChild() ]
[ onclick 에 함수 기능 구현하기 ]

[ onclick + addEventListener 같은 결과 다른 방식 여러 사용 법 ]


[ getElementsByTagName ]
[ appenChild, removeChild ]

[ querySelectoAll 을 활용하여 배열과 for문으로 style.color 주기 ]
[ select, Date 함수로 현재 날짜 뽑기 ]
[ mouseover, mouseout 함수 이용 ]

[ eval 함수와 onclick 함수를 이용해 사칙연산 하기 ]

[ onblur 와 onfocus 함수 이용하기 ]

[ value 값 이용하여 checkbox 합계 구하기 ]

[ radio 버튼 주문하기 ]
[ onmousemove + pageX 와 pageY를 이용하여 마우스 X,Y 좌표값 얻기 ]

[ select option과 onchange 작업으로 사진 변경하기 ]

[ DOM 개념 복습 - 1 선언 방식 ]
[ DOM 개념 복습 - 2 스타일 적용 방식 ]
[ DOM 개념 복습 - 3 innerHTML, innerText, textContent ]
[ DOM 개념 복습 - 4 onclick 과 addEventListener ]

[ DOM 개념 복습 - 5 form 접근 방법 ]
[ DOM 개념 복습 - 6 display 활용 ]
[ DOM 개념 복습 - 7 onclick 과 onmouseout 활용 하기 ]

[ DOM 개념 복습 - 8 ul li list 와 for of 문 과 addEventListener 이용 ]

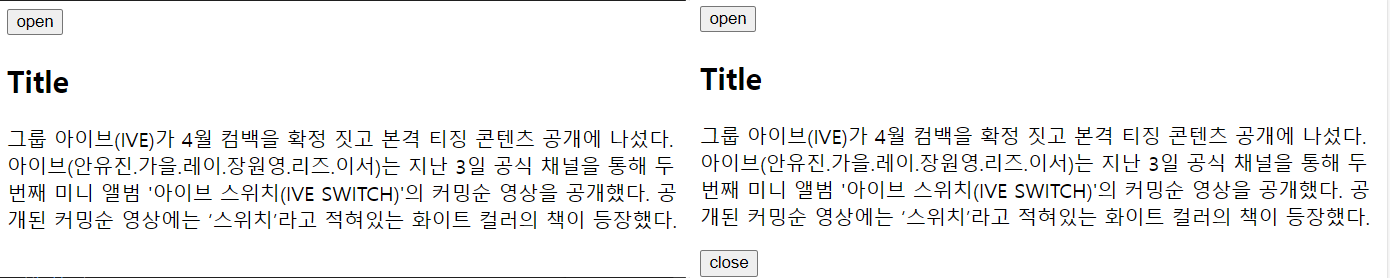
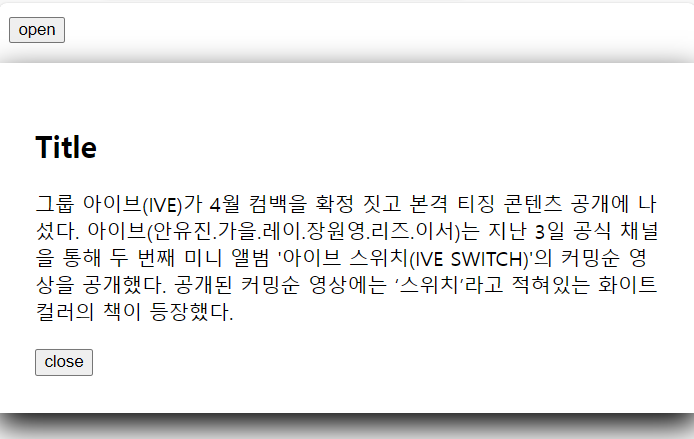
[ DOM 개념 복습 - 9 window.open() ]
[ 문제 풀이 ]
[ 문제 복습 숫자 클릭하면 1~3까지 난수 발생 성공 실패 알려주기 - 첫번째 방법 ]
<head>
<script>
	function on(){
	let n=document.getElementsByName('a');
	let arr=[Math.floor(Math.random()*3)+1,
			 Math.floor(Math.random()*3)+1,
			 Math.floor(Math.random()*3)+1];

	//1 1 1
	//이 위치에 arr배열값 넣기
	for(let i=0;i<arr.length;i++){
		n[i].innerHTML=arr[i];
	}

	let m=document.getElementById('aa');
		if(n[0].innerHTML==n[1].innerHTML && n[1].innerHTML==n[2].innerHTML){
			m.innerHTML="성공";
		}
		else{
			m.innerHTML='실패';
		}
	}
</script>
</head>
<body>
	<p>숫자를 클릭하면 1~3까지 난수발생</p>
	<div onclick="on()">
		<span name="a">1</span>
		<span name="a">1</span>
		<span name="a">1</span>
	</div>
	<p id="aa">성공</p>
</body>
[ 문제 복습 숫자 클릭하면 1~3까지 난수 발생 성공 실패 알려주기 - 두번째 방법 ]
<head>
<script>
	function on(obj){
		let n=document.getElementsByTagName('span');
		let m=(Math.random()*3)+1;
		let m2=Math.floor(m);

		let z=document.createElement('p'); //<p>성공</p>
		let z2=document.createTextNode('성공');
		z.appendChild(z2);

		obj.innerHTML=m2;
		if(n[0].innerHTML==n[1].innerHTML && n[1].innerHTML==n[2].innerHTML){
			document.body.appendChild(z);
		}
	}
</script>
</head>
<body>
	<p>숫자를 클릭하면 1~3까지 난수발생</p>
	<div id="num">
		<span onclick="on(this)">1</span>
		<span onclick="on(this)">1</span>
		<span onclick="on(this)">1</span>
	</div>
</body>
[ 문제 복습 10초 시간이 지나면 자동으로 채점되는 기능 ]
<!DOCTYPE html>
<head>
<link rel="stylesheet" href="st.css">
<script src="cl.js" defer></script>
</head>
<body>
<h2>문제는 자동으로 생성되며, 10초가 지나면 자동 채점</h2>
<h3>남은시간
<span id="sec">10</span>
</h3>
<hr>
<span class="op"></span><input type="text" class="ans"><br>
<span class="op"></span><input type="text" class="ans"><br>
<span class="op"></span><input type="text" class="ans"><br>
<span class="op"></span><input type="text" class="ans"><br>
<input type="button" value="다시" class="re"><span class="res"></span>


</body>
</html>
let opEle=document.querySelectorAll(".op");
let ansEle=document.querySelectorAll('.ans');
let secEle=document.querySelector('#sec');
let reEle=document.querySelector('.re');
let resEle=document.querySelector('.res');
//31+23
let ops=new Array('+','-','*','/');
let num1=0;
let num2=0;
let time=10; //10 9 8 7 6 5 4 3 2 1 0
window.onload=function(){
let t=setInterval(function(){
secEle.innerText=time--;
if(time < 0){
clearInterval(t);
let o=0;
for(let i=0;i<opEle.length;++i){
if(eval(opEle[i].innerText) === parseInt(ansEle[i].value))
o++;
else{
opEle[i].style.textDecoration='line-through';
ansEle[i].style.color='red';
ansEle[i].value=eval(opEle[i].innerText);
}
}
resEle.innerText="정답: "+ o +"개";
}
},1000);
};
let op="";
for(let i=0;i<opEle.length;i++){
num1=Math.floor(Math.random()*101);
num2=Math.floor(Math.random()*101);
opEle[i].innerText=
num1+" "+ops[Math.floor(Math.random()*4)]+" "+num2;
}
reEle.addEventListener('click',function(){
location.reload();
});.op{
float: left;
width: 100px;
margin-left: 30px;
}
.ans{
width: 120px;
}
[ 복습 코드 ]
<body>
	<p id="t"></p>
	<script>
		setInterval(function(){
			let n=new Date();
			let t=n.getHours()+"시"+
			n.getMinutes()+"분"+ n.getSeconds()+"초";

			document.getElementById('t').innerHTML=t;
			},1000);
	</script>
</body>
<!DOCTYPE html>
<head>
</head>
<body>
<p id="aa">자바스크립트 넘나 재밌는 것</p>
<script>
let n=document.getElementById('aa');
let m=setInterval("on()",500);
//0.5초 주기로 on함수 호출
n.onclick=function(){
clearInterval(m); //타이머 해제
}
function on(){
let a=n.innerHTML;
let b=a.substr(0,1); //자
let c=a.substr(1, a.length-1);
a=c+b;
n.innerHTML=a;
}
</script>
</body>
</html><!DOCTYPE html>
<head>
</head>
<body>
<form id="mm">
비번<input type="password" name="pa" id="p"><br>
비번확인 <input type="password" name="pp" id="pi"><br>
<input type="submit" value="제출">
</form>
<script>
window.onload=function(){
document.getElementById('mm').onsubmit=function(){
let n=document.getElementById('p').value;
let m=document.getElementById('pi').value;
if(m==n){
alert('성공');
}
else{
alert('다시 입력');
return false;
}
}
}
</script>
</body>
</html><!DOCTYPE html>
<html lang="ko">
<head>
</head>
<body>
<h2>Q. 컴퓨터 분야 뭐가 관심있니?</h2>
<button id="q1" onclick="ch(this)">답보기</button>
<h2>Q. 뭐 먹고싶니?</h2>
<button id="q2" onclick="ch(this)">답보기</button>
</body>
<script>
let n = document.getElementById('q1');
let m = document.getElementById('q2');
function ch(button){
var str = document.createElement('p');
if(button.id === "q1"){
str.innerHTML="서버";
str.onclick=function(){
let p=this.parentElement;
p.removeChild(this);
}
document.body.appendChild(str);
}else{
str.innerHTML="짜장면";
str.onclick=function(){
let p=this.parentElement;
p.removeChild(this);
}
document.body.appendChild(str);
}
}
</script>
</html><!DOCTYPE html>
<html lang="ko">
<head>
</head>
<body>
<h1>라면을 끓이는 순서</h1>
<hr>
<ol onclick="this.style.backgroundColor='yellow'">
<li>물을 끓인다.</li>
<li>라면과 스프를 넣는다.</li>
<li>계란을 넣는다.</li>
<li>얌얌<b>맛있게</b> 먹는다.</li>
</ol>
<script>
let n=document.getElementsByTagName("li");
for(let i=0;i<n.length;i++){
let a=n[i];
a.style.color='green';
}
</script>
</body>
</html><!DOCTYPE html>
<head>
<script>
function result(obj){
let pa=obj.parentElement.innerText; //3 + 4 =
let index=pa.indexOf("="); //위치반환(인덱스 반환)
obj.innerText=eval(pa.slice(0,index-1)); //3+4
}
</script>
</head>
<body>
<ul>
<li>3 + 4 = <label onclick="result(this)">답</label></li>
<li>5 * 20 + 60 = <label onclick="result(this)">답</label></li>
<li>20 / 5 - 4 * 5 = <label onclick="result(this)">답</label></li>
</ul>
</body>
</html><!-- 월~수요일이면 배경색을 green, 목~금요일이면 blue로 출력해라.
(Date객체의 getDay() 활용, 일요일=0. 월요일=1, …토요일=6이다)-->
<body id="bod">
<script>
body = document.getElementById('bod');
let today = new Date();
let day = today.getDay();
if(day === 1 ||day === 2 || day === 3){
bod.style.backgroundColor= 'green';
}else if(day ===4 || day === 5 || day ===6){
bod.style.backgroundColor= 'blue';
}
</script>
</body><!DOCTYPE html>
<head>
<script>
function getInt() {
var num = parseInt(prompt("1~4 사이의 정수 입력"));
if (num >= 1 && num <= 4) {
switch (num) {
case 1: alert("남")
break;
case 2: alert("여")
break;
case 3: alert("남")
break;
case 4: alert("여")
break;
}
} else {
alert("정수 다시 입력");
getInt();
}
}
</script>
</head>
<body>
<button onclick="getInt()">정수 입력</button>
</body>
</html> <!-- 내장 함수 setInterval을 변수식 함수로 사용해서 1초마다 body에 ‘1초가 경과했습니다’ 라고
1초 단위로 body에 계속 출력하고 10초 후 setInterval 함수를 멈추기-->
<body>
<script>
let count = 0;
const intervalID = setInterval(function() {
count++;
document.body.textContent = count + '초가 경과했습니다';
if (count >= 10) {
clearInterval(intervalID);
}
}, 1000);
</script>
</body><!DOCTYPE html>
<head>
</head>
<body>
<!--생성자 함수와 prototype을 활용해서 시험 평균을 구하기 인스턴스 3개 :
김길동 95 85 85, 이길동 88 77 90, 박길동 66 76 79 / 매개변수 이름 : name, kor, eng, math-->
<script>
function Test(name, kor, eng, math) {
this.name = name;
this.kor = kor;
this.eng = eng;
this.math = math;
}
Test.prototype.calculateAverage = function() {
return (this.kor + this.eng + this.math) / 3;
};
const student1 = new Test('김길동', 95, 85, 85);
const student2 = new Test('이길동', 88, 77, 90);
const student3 = new Test('박길동', 66, 76, 79);
console.log(student1.name + '의 평균 : ' + student1.calculateAverage());
console.log(student2.name + '의 평균 : ' + student2.calculateAverage());
console.log(student3.name + '의 평균 : ' + student3.calculateAverage());
</script>
</body>
</html><!DOCTYPE html>
<head>
<style>
.f{
border: 1px solid gray;
padding: 20px;
border-radius: 10px;
width: 500px;
}
</style>
</head>
<body>
<div class="f">
<h1>java script</h1>
<p>
여기에서는 프론트 엔드 웹 개발자가 되기 위해 알아야 할 모든 것을 배울수 있는 체계적인 강좌를 제공한다.<br>
각 섹션을 통해 학습하면서 새로운 기술을 배우거나 기존 기술을 개선하세요. <br>
각 섹션에는 진행하기 전에 잘 이해하고 있는지 확인하기 위한 연습 및 평가가 포함되어 있습니다.<br>
</p>
<button id="bu" onclick="">클릭</button>
</div>
<script>
let f=document.querySelector(".f"); //class이기 때문에 .f
let b=document.getElementById("bu"); //getElemetById이기 떄문에 # 필여없음
// 버튼 클릭시 이벤트 발생
b.addEventListener('click',function() {
this.parentNode.style.backgroundColor='yellow';
this.parentNode.style.boxShadow='0 0 20px blue';
//this는 자기자신.부모노드선택
})
</script>
</body>
</html><!DOCTYPE html>
<head>
<style>
</style>
</head>
<body>
<form name="test" calss="t"> <!-- disabled 값 활성화 안 되어 있음 수정할 수 없다는 뜻 -->
<input type="text" name="first" maxlength="6" value="001111" disabled> <!-- form 태그 안에 input 타입에 여러 속성들 셋팅 -->
<input type="text" name="gender" maxlength="1">
<input type="radio" name="g1" id="male">
<label for="male">남</label>
<input type="radio" name="g1" id="female">
<label for="female">여</label>
</form>
</body>
<script>
let n=document.test.gender; // 1 하나의 숫자 입력
let male=document.getElementById('male');
let female=document.getElementById('female');
n.onkeyup=function() {
let num=this.value; //여기서 this는 하나의 숫자
if(num>=1 && num<=4) {
if(num==1 || num==3) {
male.checked=true; // checked=true 체크가 되어짐
female.checked=false;
}
else {
male.checked=false;
female.checked=true;
}
}
}
</script>
</html><head>
<style>
.di{
border-radius: 10px;
width: 300px;
box-shadow: 0 0 20px palevioletred;
padding: 20px;
}
#me .di2{
display: flex;
margin: 10px 0;
}
#me .di2 label {
flex: 1;
}
#me .di2 input {
border: 1px solid gainsboro;
border-radius: 5px;
padding: 5px;
}
</style>
</head>
<body>
<div class="di">
<h2>정보입력</h2>
<form id="me" name="test" class="t">
<div class="di2">
<label for="username">이름</label>
<input type="text" id="username" name="username">
</div>
<div class="di2">
<label for="addr">주소</label>
<input type="text" id="addr" name="addr">
</div>
<button>정보입력</button>
</form>
</div>
</body><!DOCTYPE html>
<head>
<style>
.di{
border-radius: 10px;
width: 300px;
box-shadow: 0 0 20px palevioletred;
padding: 20px;
}
#me .di2{
display: flex;
margin: 10px 0;
}
#me .di2 label {
flex: 1; /* flex-grow:1 채우는작업, flex-shrink:1 줄어드는작업, flex-basis:0 기본에맞추는작업 */
}
#me .di2 input {
border: 1px solid gainsboro;
border-radius: 5px;
padding: 5px;
flex: 3; /* input text 너비 넓어짐 */
}
#me button{
width: 100%;
border: none;
cursor: pointer;
}
</style>
</head>
<body>
<div class="di">
<h2>정보입력</h2>
<form id="me" name="test" class="t">
<div class="di2">
<label for="username">이름</label>
<input type="text" id="username" name="username">
</div>
<div class="di2">
<label for="addr">주소</label>
<input type="text" id="addr" name="addr">
</div>
<input type="submit" value="정보입력">
</form>
</div>
</body>
<script>
let n=document.getElementById('me');
n.onsubmit=function() {
let n2=document.createElement('p');
n2.textContent=this.username.value + ' , ' + this.addr.value;
// p태그에 입력한 이름, 주소 들어감
n.appendChild(n2);
this.username.value='';
this.addr.value='';
return false;
}
</script>
</html><!DOCTYPE html>
<head>
<style>
</style>
</head>
<body>
<form name="f">
<p>수 입력</p>
<input type="number" name="num" id="num" min="1" max="100" required>
<button type="button" id="ch">확인</button>
</form>
<div id="di"></div>
</body>
<!-- 유효성 검사 -->
<script>
let n=document.getElementById('num');
let n2=document.getElementById('ch');
let n3=document.getElementById('di');
n2.addEventListener('click', function() {
if(n.checkValidity()) { // 입력요소에 유효한 데이터면 true, 아니면 false
n3.innerHTML='유효한 데이터임';
}
else{ // 유효성이 거짓일 경우 메시지 띄우기
n3.innerHTML=n.validationMessage;
}
});
</script>
</html><!DOCTYPE html>
<head>
<style>
.incorrect{
text-decoration: line-through;
}
</style>
</head>
<body>
<form name="math">
<label for="1">5*3</label><input type="text" id="1"><br>
<label for="2">1+2*3</label><input type="text" id="2"><br>
<label for="3">12*2</label><input type="text" id="3"><br>
<button type="button" id="ch">결과</button>
</form>
</body>
<!-- 실제 답과 내가 입력한 답이 맞는 지 확인해서 틀리면 수식에 취소선, 맞은 답의 개수 출력 -->
<script>
document.getElementById('ch').addEventListener('click', function() {
let answers = [15, 7, 24]; // 각 문제의 실제 답
let input1 = parseInt(document.getElementById('1').value); // 첫 번째 입력값
let input2 = parseInt(document.getElementById('2').value); // 두 번째 입력값
let input3 = parseInt(document.getElementById('3').value); // 세 번째 입력값
let correctCount = 0; // 맞은 답의 개수
// 첫 번째 문제의 입력값과 실제 답을 비교하여 결과 출력
if (input1 === answers[0]) {
document.getElementById('1').style.textDecoration = '';
correctCount++;
} else {
document.getElementById('1').style.textDecoration = 'line-through';
}
// 두 번째 문제의 입력값과 실제 답을 비교하여 결과 출력
if (input2 === answers[1]) {
document.getElementById('2').style.textDecoration = '';
correctCount++;
} else {
document.getElementById('2').style.textDecoration = 'line-through';
}
// 세 번째 문제의 입력값과 실제 답을 비교하여 결과 출력
if (input3 === answers[2]) {
document.getElementById('3').style.textDecoration = '';
correctCount++;
} else {
document.getElementById('3').style.textDecoration = 'line-through';
}
// 맞은 답의 개수 출력
alert("맞은 답의 개수: " + correctCount);
});
</script>
</html><!DOCTYPE html>
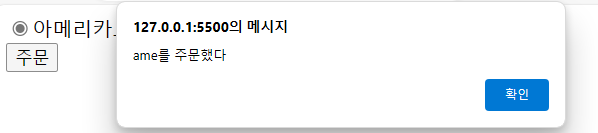
<html lang="en">
<head>
<style>
@import url('https://fonts.googleapis.com/css?family=Noto+Sans+KR:300,400,500,700,900&display=swap');
</style>
</head>
<body>
<div class="di">
<h2>커피 주문</h2>
<div class="di2">
<h1 data-price='4500' data-cafe="아이스아메리카노">아이스아메리카노</h1>
<h1 data-price='5000' data-cafe="카푸치노">카푸치노</h1>
<h1 data-price='7000' data-cafe="스무디">스무디</h1>
</div>
<p> <span id="order">메뉴 없음</span>
<span id="price">0</span>원
</p>
</div>
<script>
let n=document.querySelectorAll(".di2 h1"); //h1 3개
let n2=document.getElementById('order');
let n3=document.getElementById('price');
for(let i=0;i<n.length;i++) {
n[i].addEventListener('click',function() {
let menu=this.dataset.cafe; // 선택한 카페메뉴
let price=this.dataset.price; // 선택한 카페가격
n2.textContent=menu;
n3.textContent=price;
})
}
</script>
</body>
</html><!DOCTYPE html>
<html lang="en">
<head>
<link rel="stylesheet" href="style.css">
</head>
<body>
<h1 id="clock"></h1>
<script src="cl.js"></script>
</body>
</html>
js
setInterval(function(){
let today = new Date();
let hour = today.getHours();
let minute = today.getMinutes();
let second = today.getSeconds();
let h1 = document.getElementById('clock');
h1.innerHTML= hour + ":"+ minute + ":"+ second;
},1000);
css
#clock{
text-align:center;
text-justify:center;
font-size:40px;
font-weight:700;
}
'네이버 클라우드 부트캠프 > 복습 정리' 카테고리의 다른 글
| 34일차 jQuery [ jQuery ] (0) | 2024.04.08 |
|---|---|
| 33일차 Java [ Gson, Json, jQuery ] (0) | 2024.04.05 |
| 29일차 JavaScript [ 문서 객체 모델, Node ] (1) | 2024.04.01 |
| 28일차 JavaScript [ 객체, 내장객체 ] (0) | 2024.03.29 |
| 27일차 JavaScript [ 출력, 함수 ] (0) | 2024.03.28 |


