

| 일 | 월 | 화 | 수 | 목 | 금 | 토 |
|---|---|---|---|---|---|---|
| 1 | 2 | 3 | ||||
| 4 | 5 | 6 | 7 | 8 | 9 | 10 |
| 11 | 12 | 13 | 14 | 15 | 16 | 17 |
| 18 | 19 | 20 | 21 | 22 | 23 | 24 |
| 25 | 26 | 27 | 28 | 29 | 30 | 31 |
- spring
- Uipath
- View
- Eclipse
- JDBC
- API
- 상속
- 문자열
- string
- 조건문
- html
- SpringBoot
- db
- rpa
- jquery
- React
- jsp
- mysql
- 배열
- MVC
- Java
- Controller
- Thymeleaf
- 이클립스
- Array
- Board
- git
- Scanner
- Database
- Oracle
- Today
- Total
유정잉
50일차 스프링 [ 환경설정, 개념 ] 본문
[ 스프링 개념 ]
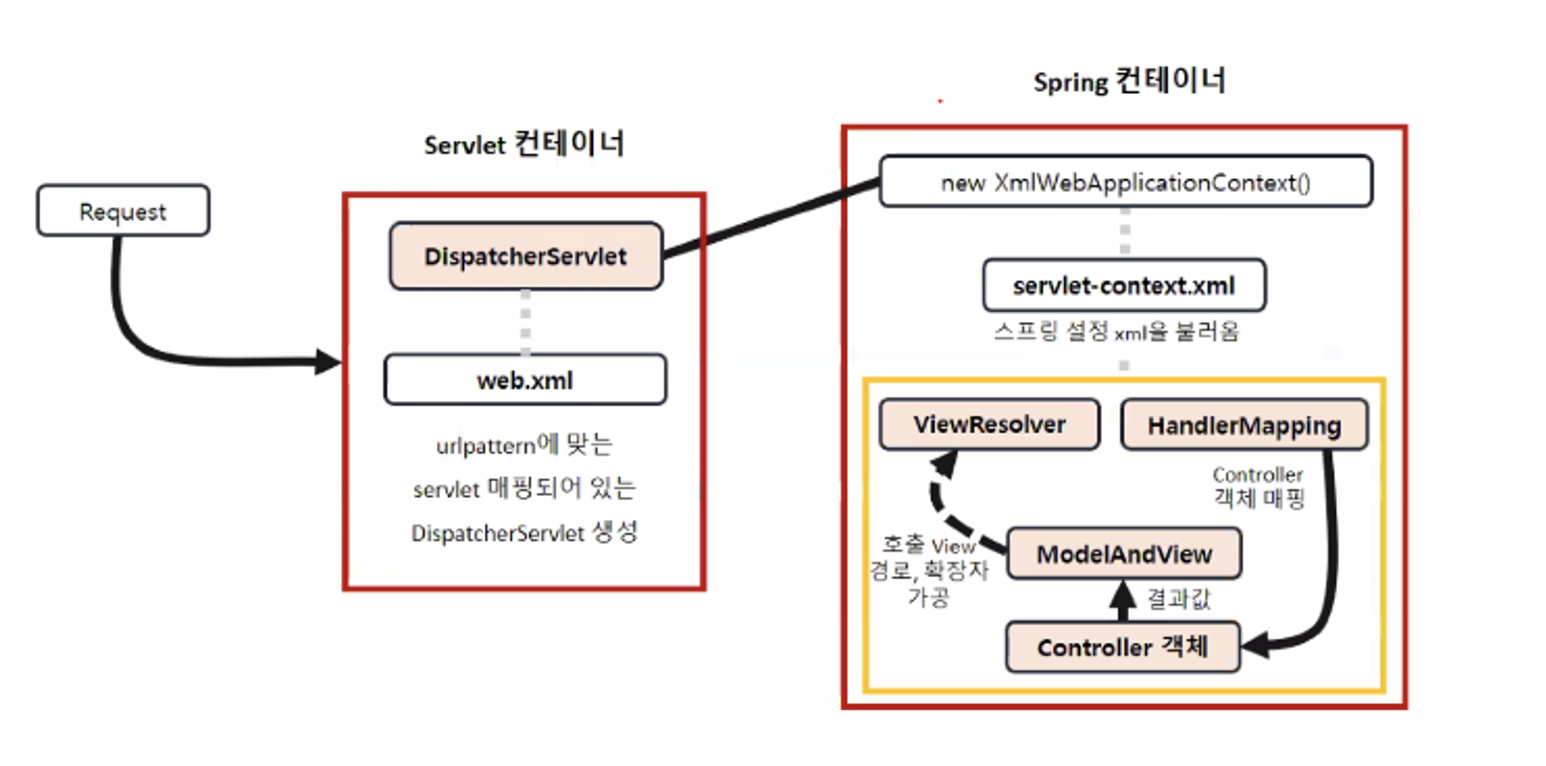
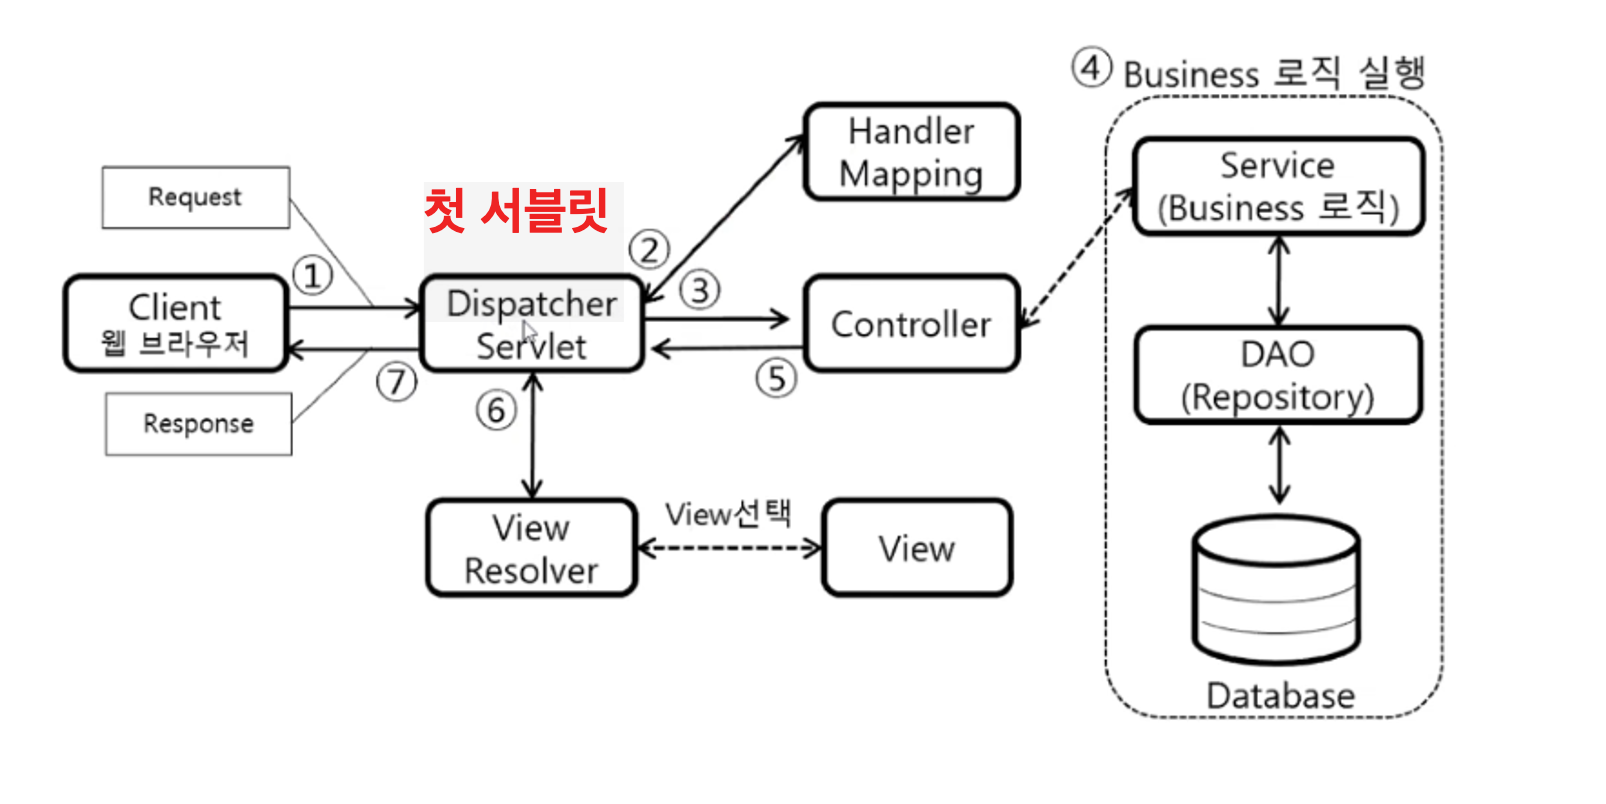
[ 스프링 mvc - 레거시 ]
[ 스프링 레거시 플젝 ]
----------------------------------------
[ 스프링 부트 ] - 리액트
[ 스프링 부트 플젝 ]
[ beans.xml ]
이때 id 값을 적지 않으면 객체 생성해서 사용할 수 없음 !!! id 값을 지정해줘야 주소 값을 이용할 수 있다.
id 값을 설정하면 getBean 메서드를 통해 객체의 주소값을 가져올 수 있다.
싱글톤 개념의 객체 = 생성된 객체는 더 이상 생성되지 않는다
[ Spring1 project - 이클립스(eclipse) 스프링(spring) 기본 설정 및 객체 생성과 라이브러리 설정 방법 ]
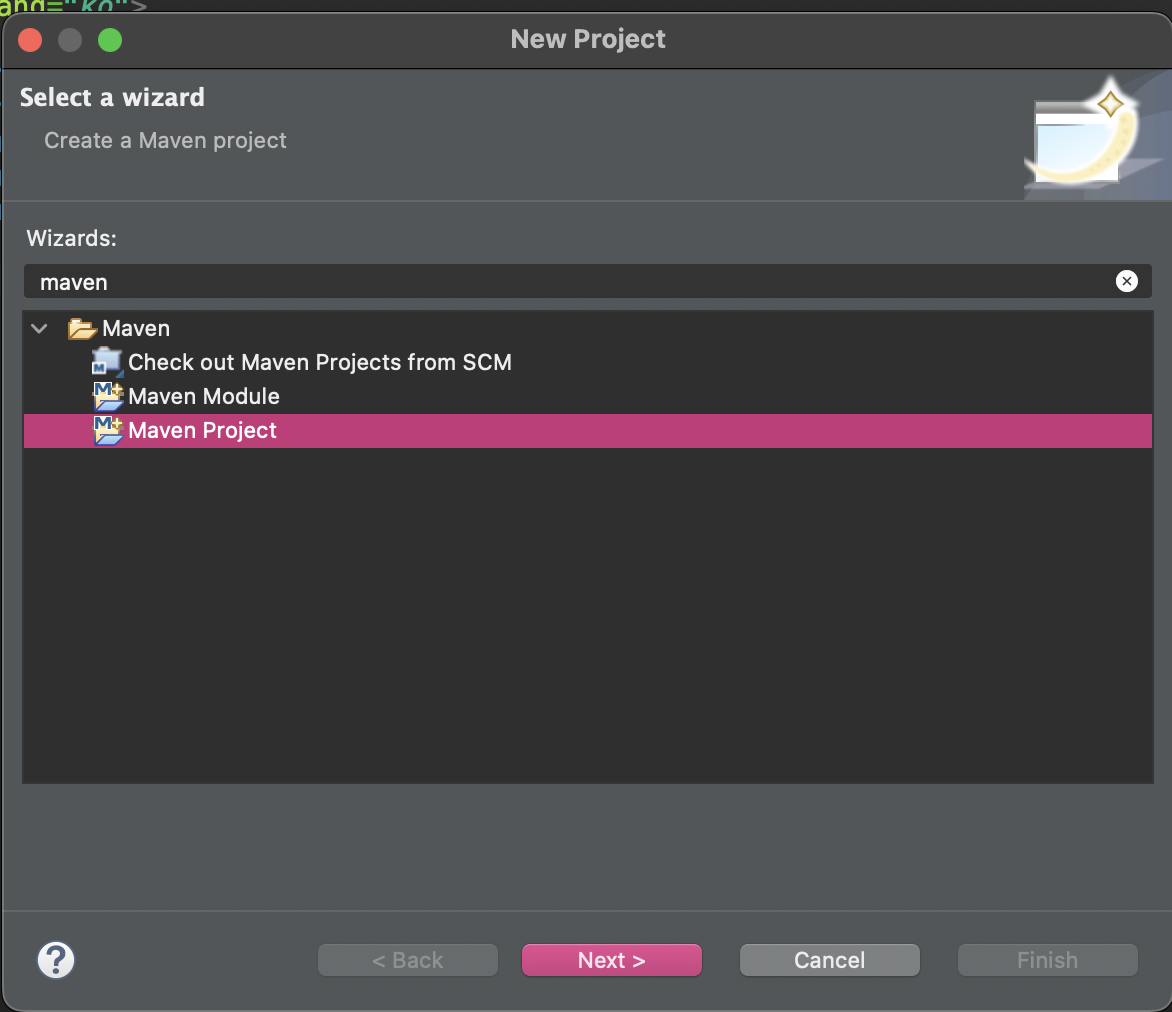
1) File -> New -> Maven project
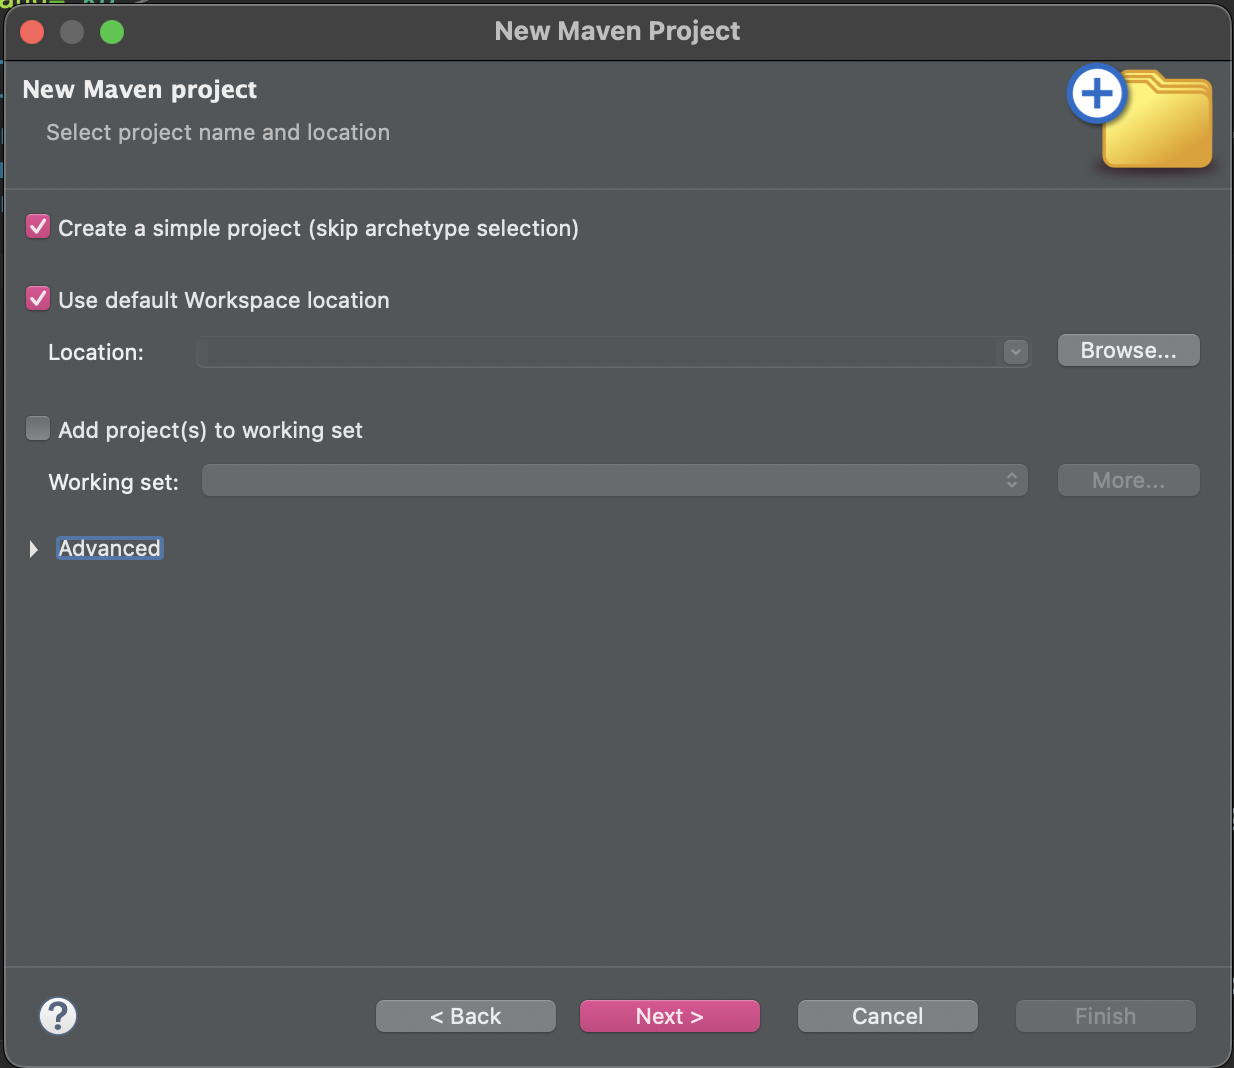
2) Create a simple project 체크
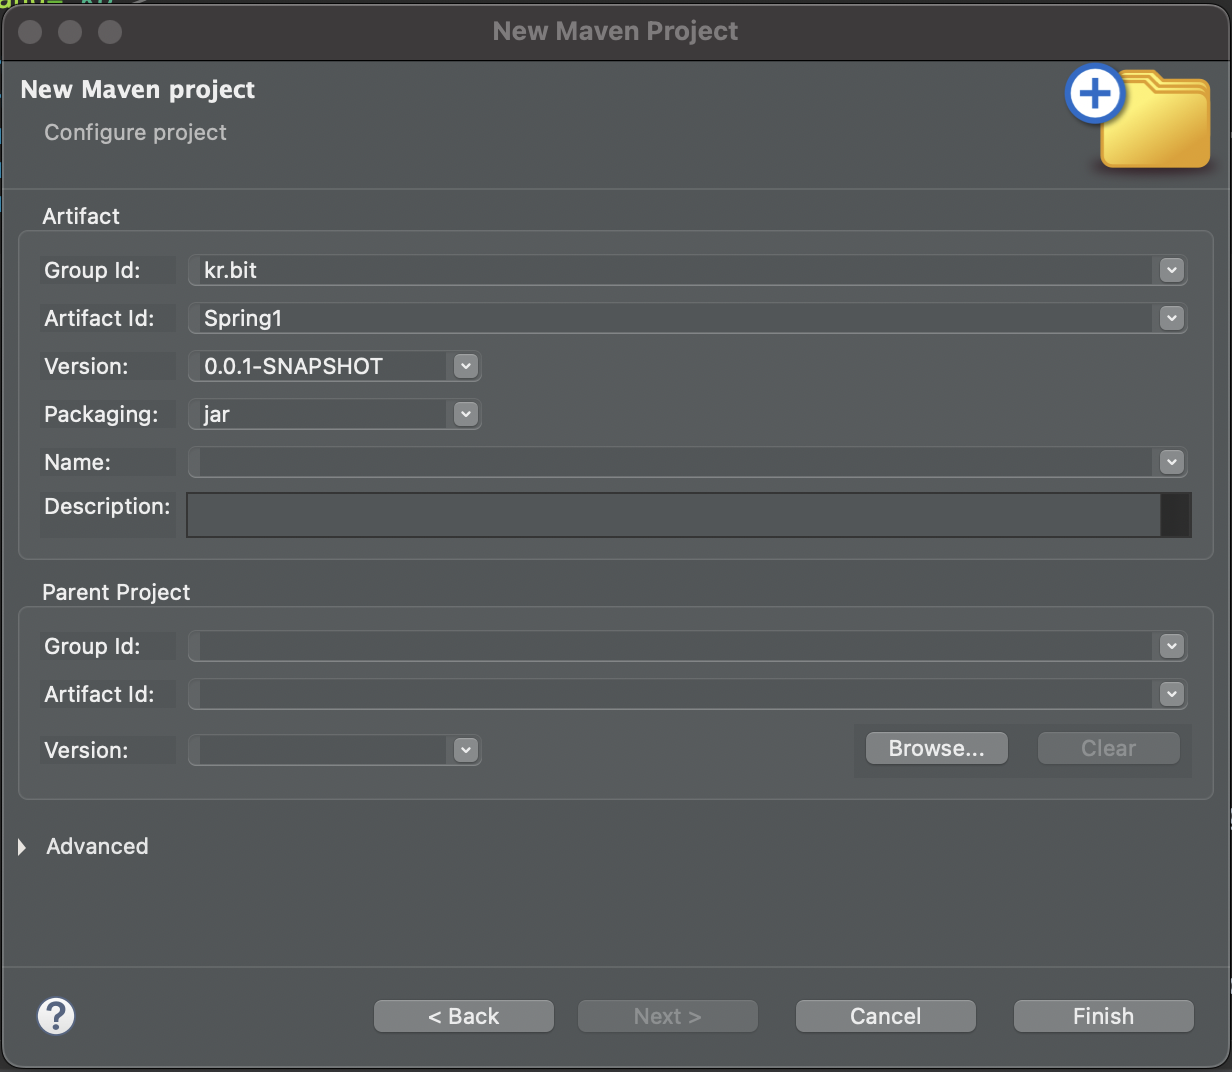
3) Group Id 는 보통 도메인 거꾸로 줌. Artifact Id는 project 이름 줌.
4) Maven project 파일 생성 됨
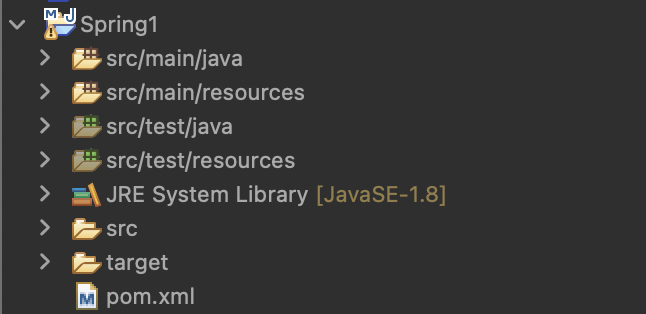
5) 스프링 환경설정 하는 파일 pom.xml [ POM - project object model ]
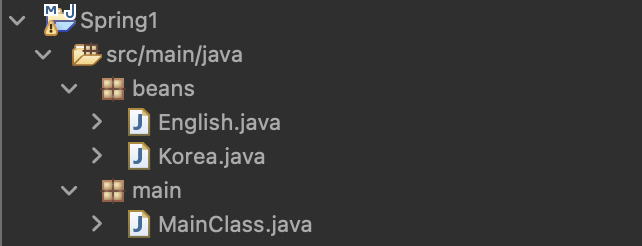
6) src/mail/java에 packge 생성 (beans, main)
beans pakage에 English와 Korea class 생성 / main package에 MainClass class 생성
7) 객체 생성 후 함수 호출 : English.java 와 Korea.java 클래스에 함수 생성 후 MainClass.java에서 객체 생성 후 함수 호출 가능 ! (혹은 MainClass.java에서 함수를 생성해서 호출할 수도 있음) -> 각각의 객체 생성을 해야하는 혹은 매개변수를 일일히 변경해줘야 하는 번거로움이 존재
package beans;
public class English {
public void hi() {
System.out.println("hi!");
}
}
package beans;
public class Korea {
public void hi() {
System.out.println("안녕!");
}
}
package main;
import beans.English;
import beans.Korea;
public class MainClass {
public static void main(String[] args) {
English en = new English(); //English 객체 생성
call(en); //main에서 만든 call 함수로 호출
Korea kor = new Korea();
kor.hi();
//call(kor); -> 오류 call 함수에 들어가는 매개변수는 en이기 때문에 ! 매개변수를 일일히 바꿔줘야 하는 번거로움 !!!
}
public static void call (English en) { //main에서 함수를 만어서 call()함수를 호출 할 수도 있음 !!!
en.hi();
}
}
8) 다형성을 이용한 함수 호출 : beans package에 Lang.java interface 파일로 생성 후
English.java와 Korea.java에서 implements Lang
package beans;
public interface Lang {
public void hi();
}
package beans;
public class English implements Lang{
public void hi() {
System.out.println("hi!");
}
}
package beans;
public class Korea implements Lang{
public void hi() {
System.out.println("안녕!");
}
}
package main;
import beans.English;
import beans.Korea;
import beans.Lang;
public class MainClass {
public static void main(String[] args) {
Lang en = new English(); //upcasting 작업
call(en);
Lang ko = new Korea(); //upcasting 작업
call(ko);
}
public static void call (Lang la) { //Lang la = en
la.hi();
}
}
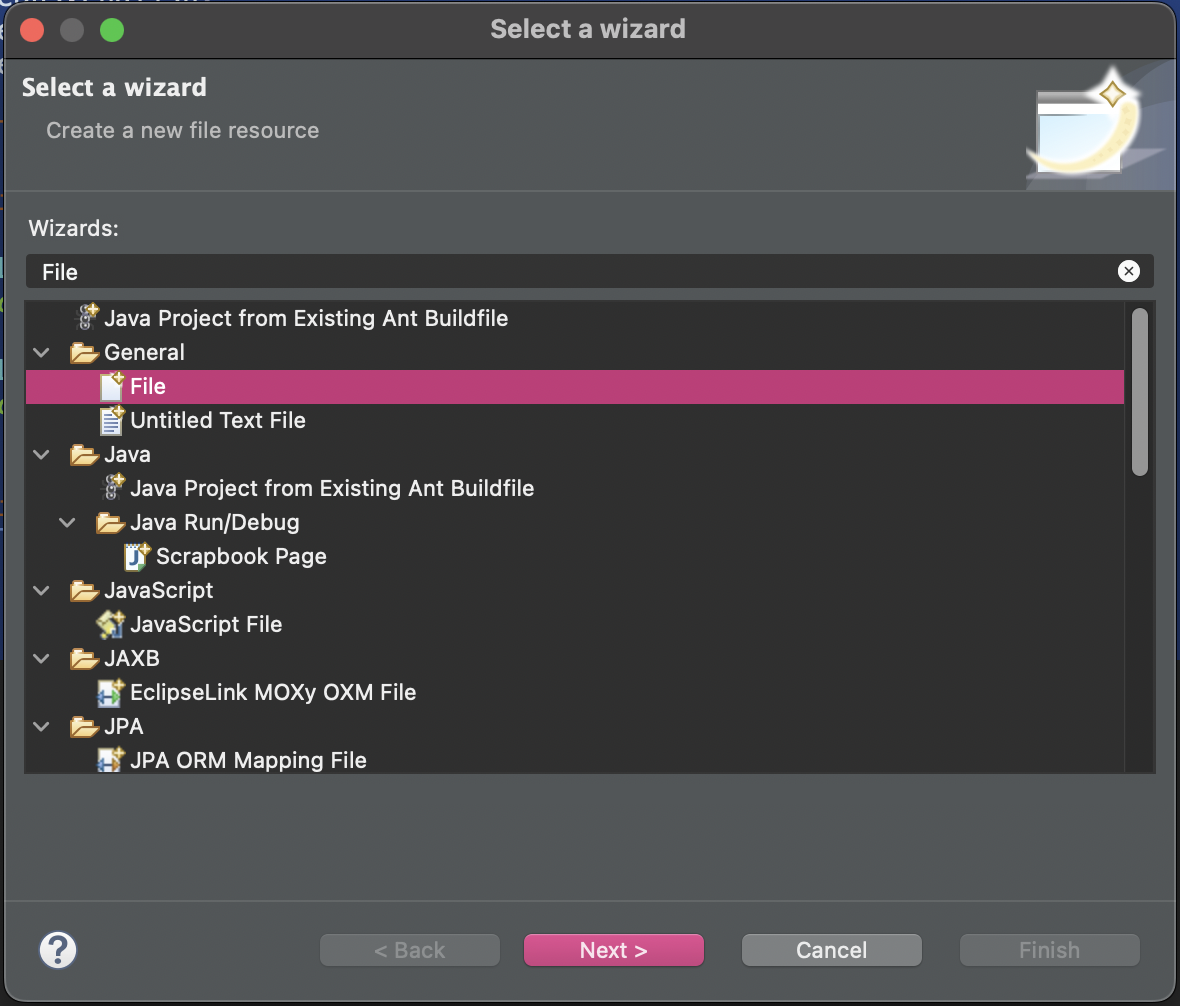
9) sec/main/java 에 config package 생성 후 -> new other -> General -> File -> 확장자 .xml로 beans.xml 파일 생성
10) beans.xml 파일에 아래 코드 추가 (=일종의 컨테이너 역할) 스프링환경에서 객체를 bean으로 부른다 !
<?xml version="1.0" encoding="UTF-8"?>
<beans xmlns="http://www.springframework.org/schema/beans"
xmlns:xsi="http://www.w3.org/2001/XMLSchema-instance"
xsi:schemaLocation="http://www.springframework.org/schema/beans
http://www.springframework.org/schema/beans/spring-beans.xsd">
</beans>
beans.xml에 객체 생성
<bean id="hi" class="beans.English" />
<!-- English hi = new English(); 객체를 등록하는 파일 만드는 작업 -->
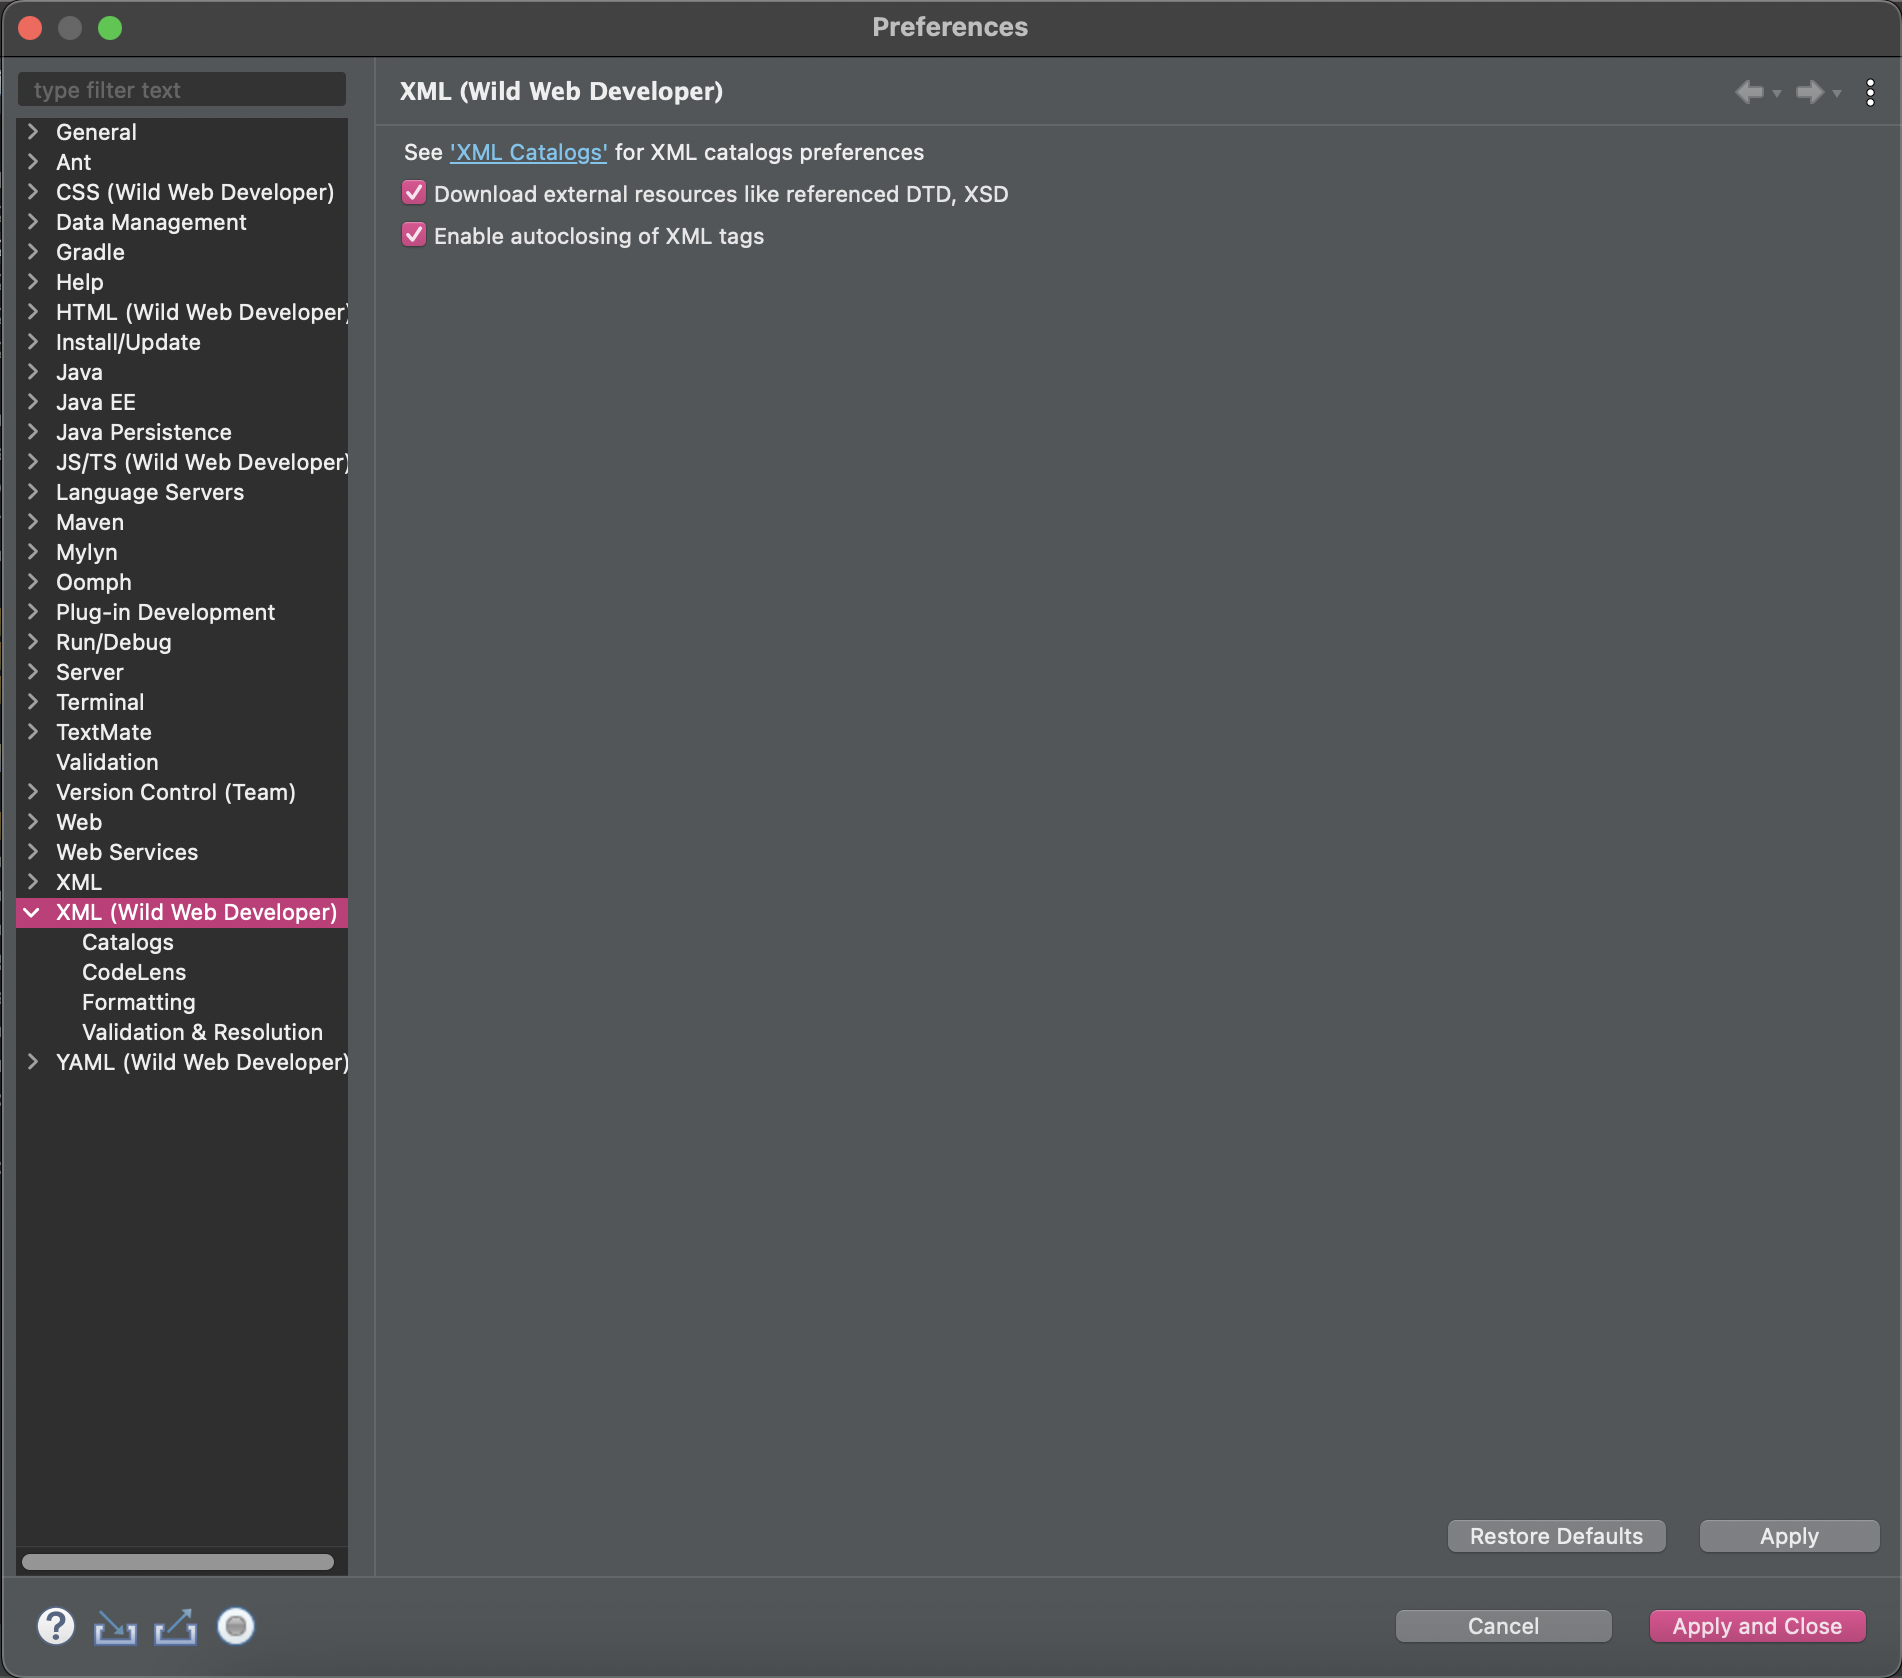
◈ 만약 이때 오류가 발생하면 환경설정 preferences -> XML(Wild Web Developer) -> Download 클릭
11) pom.xml에 <properties>사이에 라이브러리 정보를 넣어 줌. 아래 사이트에서 환경에 맞는 링크 가져와서 복붙 하면 됨 !
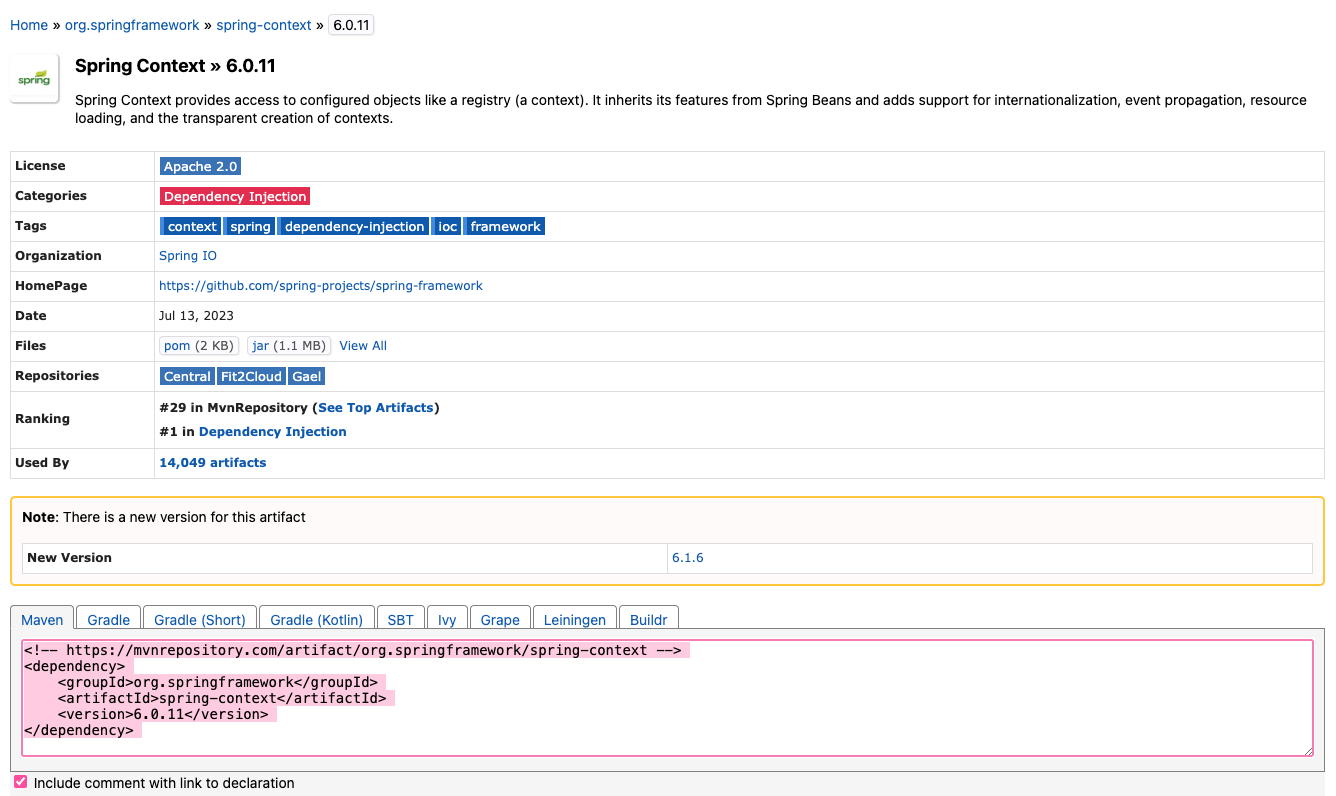
12) pom.xml에 라이브러리 설정 (보통 자주 쓰이는 거)
<project xmlns="http://maven.apache.org/POM/4.0.0"
	xmlns:xsi="http://www.w3.org/2001/XMLSchema-instance"
	xsi:schemaLocation="http://maven.apache.org/POM/4.0.0 https://maven.apache.org/xsd/maven-4.0.0.xsd">
	<modelVersion>4.0.0</modelVersion>
	<groupId>kr.bit</groupId>
	<artifactId>Spring1</artifactId>
	<version>0.0.1-SNAPSHOT</version>

	<!-- xml에서 사용할 속성들 -->
	<properties>
		<!-- 자바 버전 -->
		<java-version>1.8</java-version>
		<!-- 스프링 버전 -->
		<org.springframework-version>6.0.11</org.springframework-version>
		<!--<org.springframework-version>4.3.25.RELEASE</org.springframework-version> -->
		<org.slf4j-version>1.7.26</org.slf4j-version>
		<ch.qos.logback-version>1.2.3</ch.qos.logback-version>
	</properties>

	<!-- 프로젝트에서 사용할 라이브러리 정보 -->
	<dependencies>
		<!-- spring context -->
		<dependency>
			<groupId>org.springframework</groupId>
			<artifactId>spring-context</artifactId>
			<version>${org.springframework-version}</version>
		</dependency>
		<!-- slf4j -->
		<dependency>
			<groupId>org.slf4j</groupId>
			<artifactId>slf4j-api</artifactId>
			<version>${org.slf4j-version}</version>
		</dependency>
		<!-- logback -->
		<dependency>
			<groupId>ch.qos.logback</groupId>
			<artifactId>logback-classic</artifactId>
			<version>${ch.qos.logback-version}</version>
			<exclusions>
				<exclusion>
					<groupId>org.slf4j</groupId>
					<artifactId>slf4j-api</artifactId>
				</exclusion>
			</exclusions>
			<scope>runtime</scope>
		</dependency>
	</dependencies>
</project>
13) MainClass.java class에서 ClassPathXmlApplicationContext 객체 생성 후
Lang 객체 .getBean으로 가져와서 call() 함수로 출력
package main;

import org.springframework.context.support.ClassPathXmlApplicationContext;

import beans.Lang;

public class MainClass {

	public static void main(String[] args) {

		//ApplicationContext의 종류는 3가지가 있음
		//1.Xml 파일 로딩
		ClassPathXmlApplicationContext ctx = new ClassPathXmlApplicationContext("config/beans.xml");

		Lang lang = (Lang)ctx.getBean("hi"); //beans.xml에 id 값을 "hi"라고 설정해서 "hi"라고 넣어줌
		call(lang);
	}
	public static void call(Lang lang) {
		lang.hi(); //hi! 출력
	}

}
<?xml version="1.0" encoding="UTF-8"?>
<beans xmlns="http://www.springframework.org/schema/beans"
xmlns:xsi="http://www.w3.org/2001/XMLSchema-instance"
xsi:schemaLocation="http://www.springframework.org/schema/beans
http://www.springframework.org/schema/beans/spring-beans.xsd">
<!-- English hi = new English(); 객체를 등록하는 파일 만드는 작업 -->
<bean id="hi" class="beans.English" />
</beans>
[ Spring2 - project ]
- 위에랑 beans.xml과 pom.xml의 셋팅은 동일.
1) beans.xml에 객체 등록(=객체 생성은 MainClass.java에서)
<?xml version="1.0" encoding="UTF-8"?>
<beans xmlns="http://www.springframework.org/schema/beans"
	xmlns:xsi="http://www.w3.org/2001/XMLSchema-instance"
	xsi:schemaLocation="http://www.springframework.org/schema/beans
	                    http://www.springframework.org/schema/beans/spring-beans.xsd">

	<bean id="test1" class="beans.Test"></bean>

</beans>
2) beans package에 Test.java class 생성
package beans;

public class Test {

	public Test() {
		System.out.println("Test");
	}
}
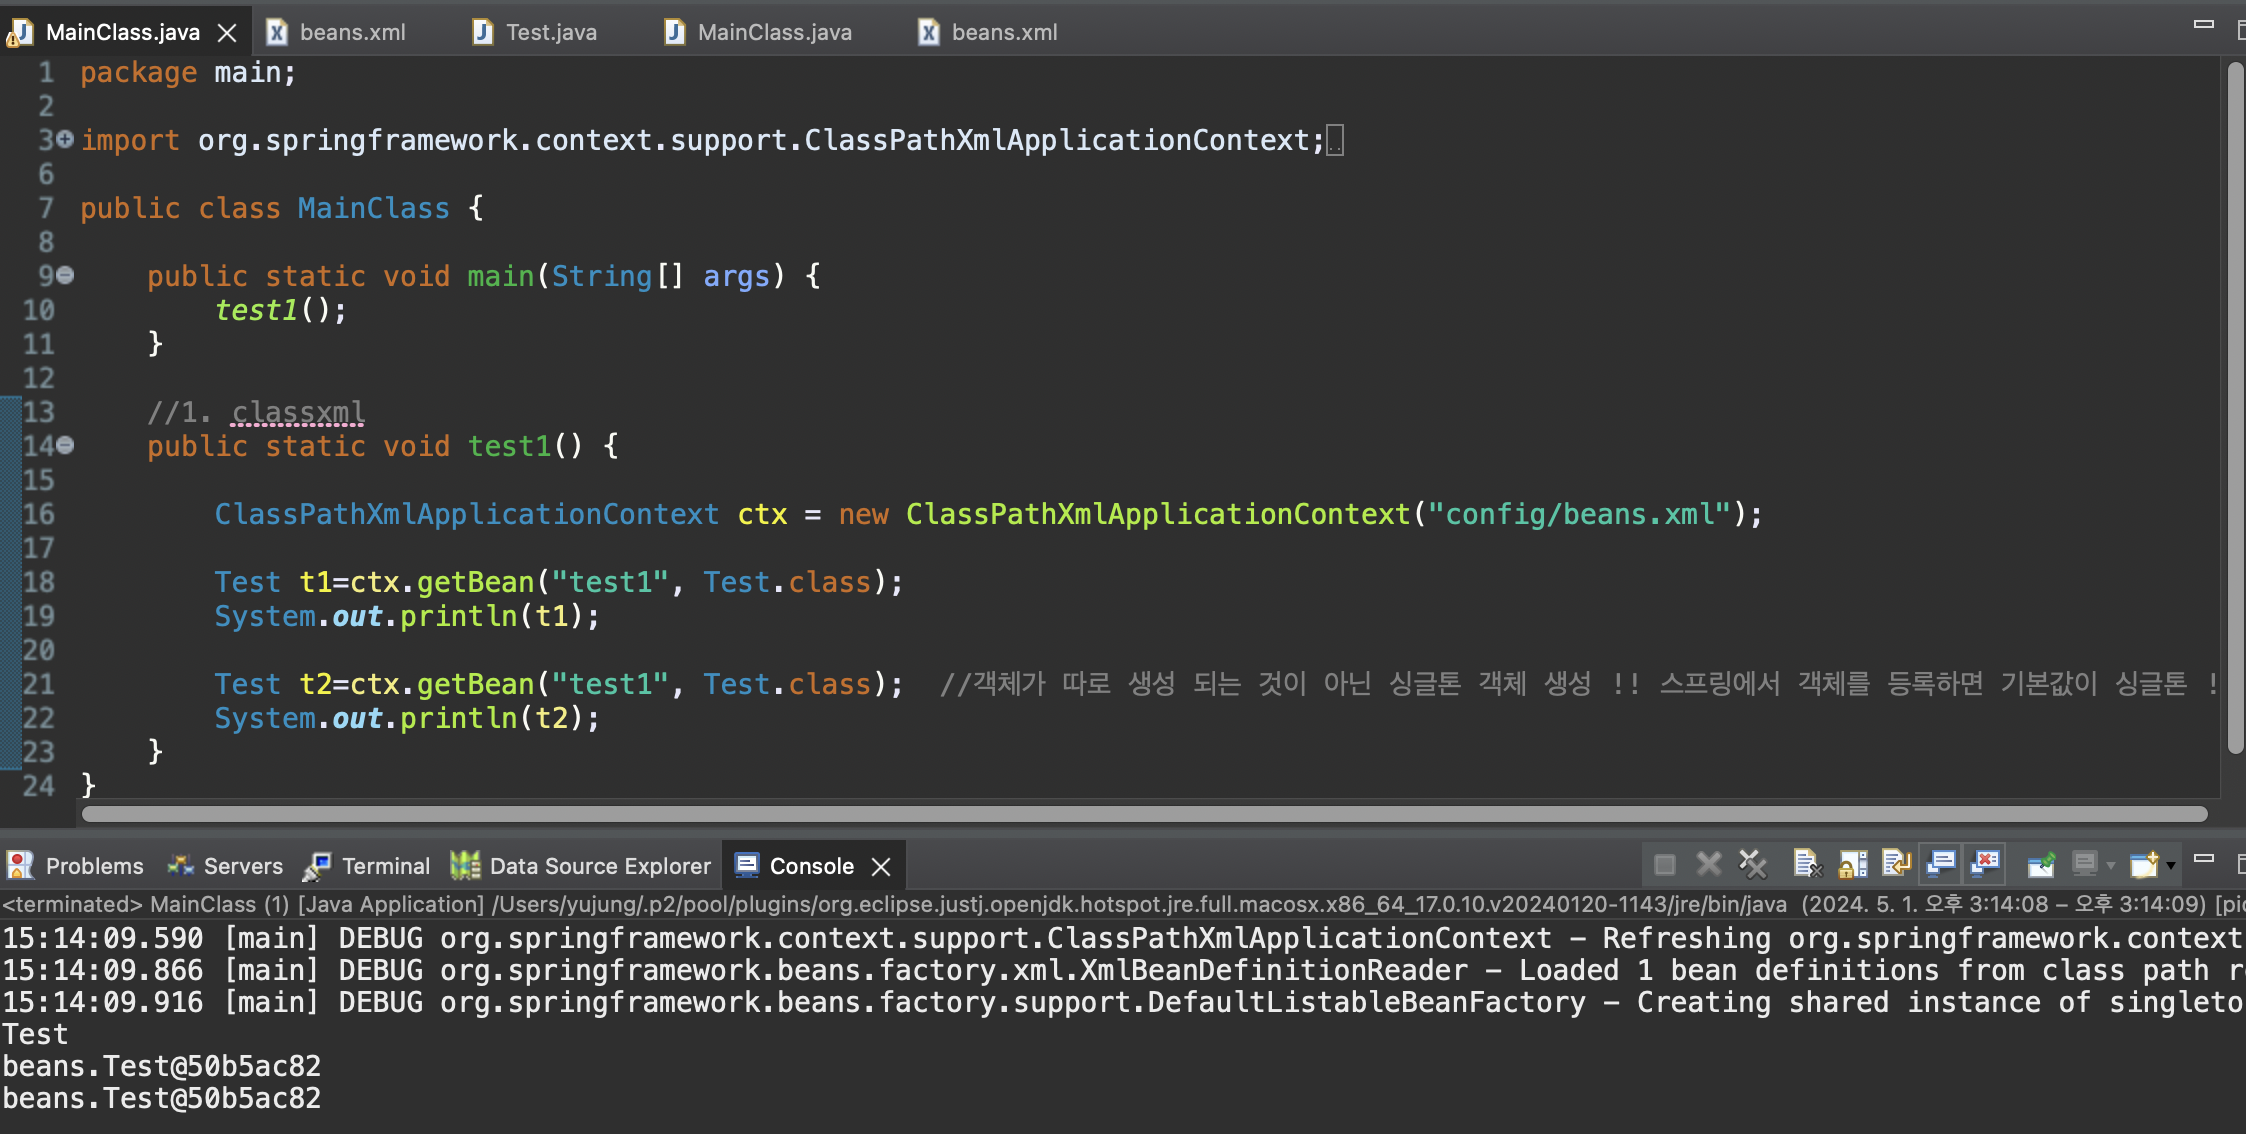
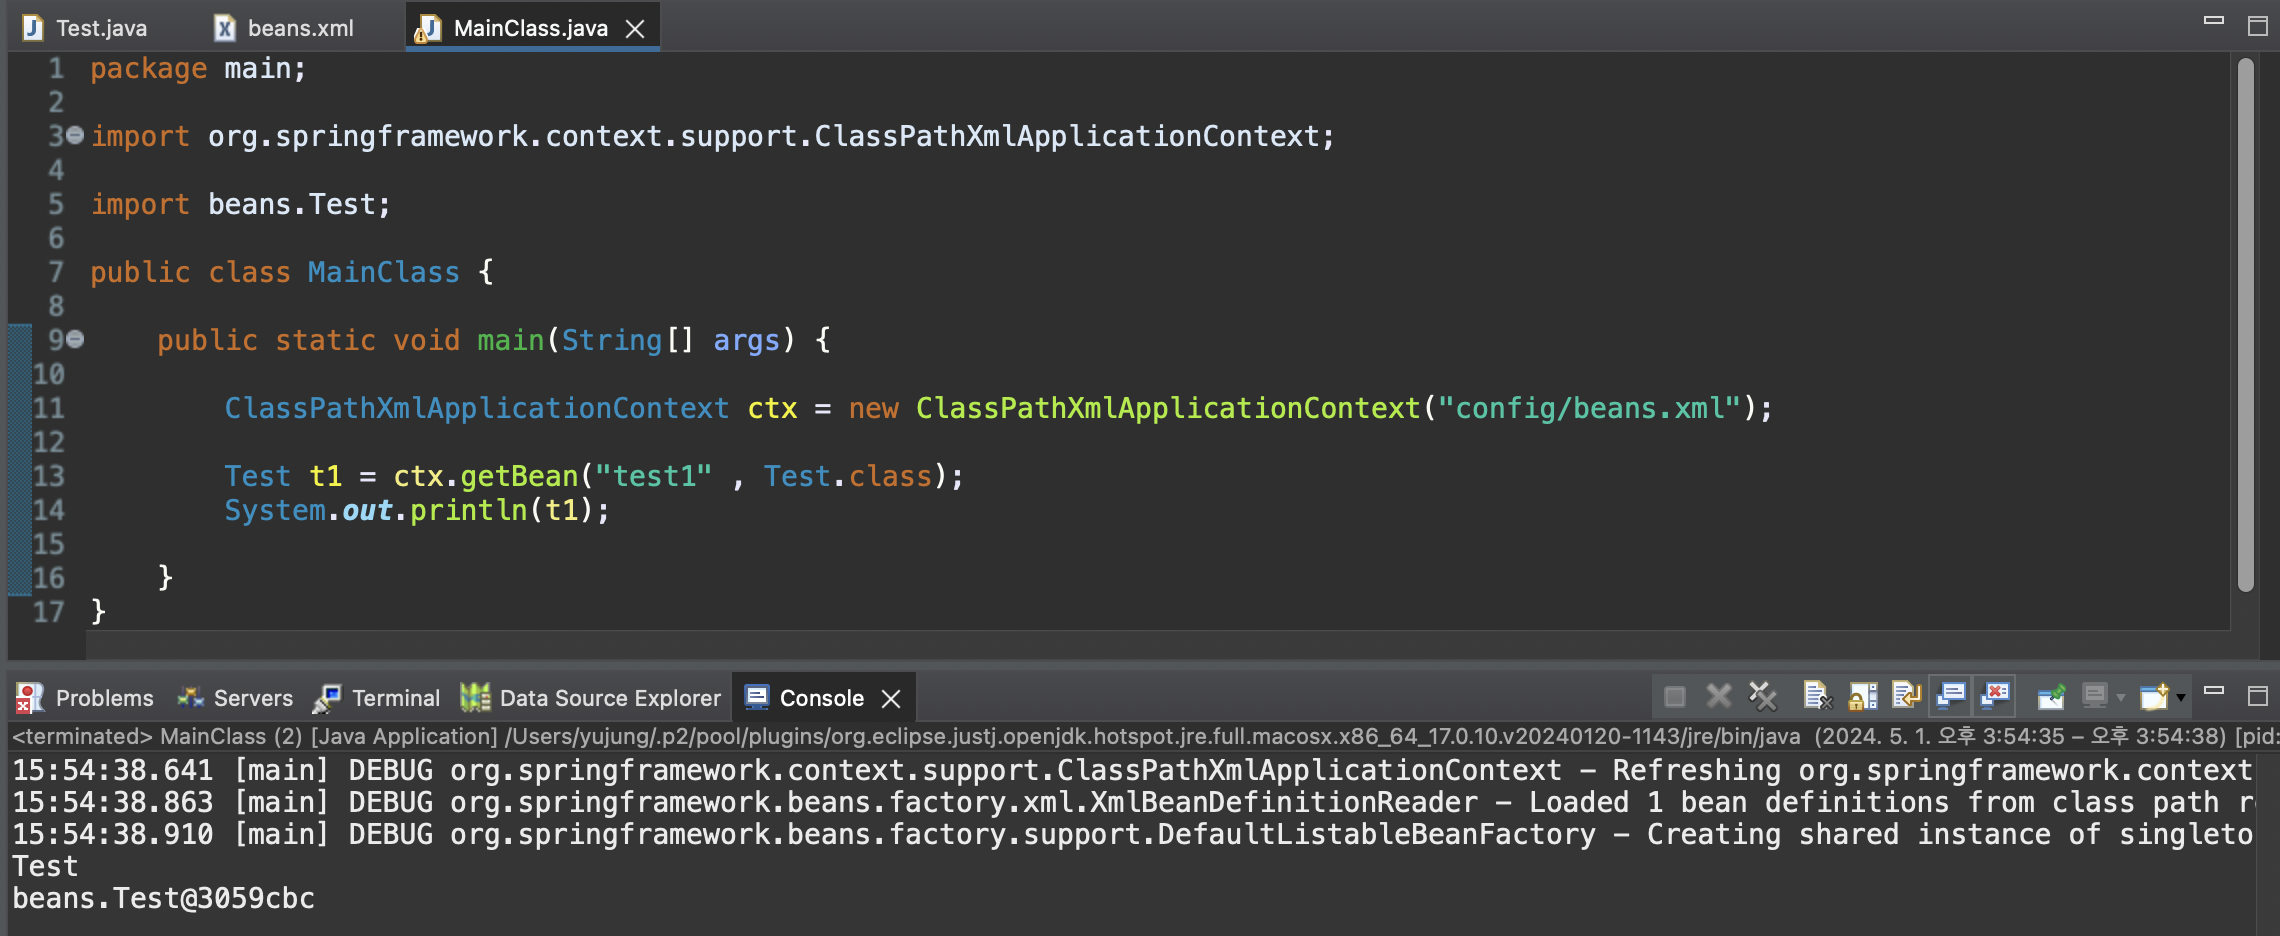
3) main package에 MainClass.java class에 ClassPathXmlApplicationContext로 파일로딩해서 .getBean으로 객체 가져오기
이때 객체는 따로 따로 생성 되는 것이 아닌 싱글톤 객체로 생성 됨 !!! 스프링에서 객체를 등록해서 사용하면 기본값이 싱글톤임 !
package main;

import org.springframework.context.support.ClassPathXmlApplicationContext;
import org.springframework.context.support.FileSystemXmlApplicationContext;

import beans.Test;

public class MainClass {

	public static void main(String[] args) {
		test1();
	}

	//1. classxml
	public static void test1() {

		ClassPathXmlApplicationContext ctx = new ClassPathXmlApplicationContext("config/beans.xml"); //config package안에 beans.xml 파일 가져오기 !

		Test t1=ctx.getBean("test1", Test.class);
		System.out.println(t1);

		Test t2=ctx.getBean("test1", Test.class);  //객체가 따로 생성 되는 것이 아닌 싱글톤 객체 생성 !! 스프링에서 객체를 등록하면 기본값이 싱글톤 !
		System.out.println(t2);
	}
}
4) beans.xml 파일을 프로젝트 외부에 생성해서 사용도 가능 함 -> 프로젝트에 오른쪽 클릭으로 xml 파일 생성
이렇게 해서 객체를 가져올 경우에는 FileSystemXmlApplicationContext를 사용해서 가져오기 !!!
<?xml version="1.0" encoding="UTF-8"?>
<beans xmlns="http://www.springframework.org/schema/beans"
	xmlns:xsi="http://www.w3.org/2001/XMLSchema-instance"
	xsi:schemaLocation="http://www.springframework.org/schema/beans
	                    http://www.springframework.org/schema/beans/spring-beans.xsd">

	<bean id="test2" class="beans.Test"></bean>

</beans>
package main;
import org.springframework.context.support.ClassPathXmlApplicationContext;
import org.springframework.context.support.FileSystemXmlApplicationContext;
import beans.Test;
public class MainClass {
public static void main(String[] args) {
test1();
test2();
}
//1. classxml
public static void test1() {
ClassPathXmlApplicationContext ctx = new ClassPathXmlApplicationContext("config/beans.xml"); //config package안에 beans.xml 파일 가져오기 !
Test t1=ctx.getBean("test1", Test.class);
System.out.println(t1);
Test t2=ctx.getBean("test1", Test.class); //객체가 따로 생성 되는 것이 아닌 싱글톤 객체 생성 !! 스프링에서 객체를 등록하면 기본값이 싱글톤 !
System.out.println(t2);
}
public static void test2() {
FileSystemXmlApplicationContext ctx = new FileSystemXmlApplicationContext("beans.xml"); //외부 beans.xml을 가져오기
Test t1=ctx.getBean("test2", Test.class);
System.out.println(t1);
Test t2=ctx.getBean("test2", Test.class); //객체가 따로 생성 되는 것이 아닌 싱글톤 객체 생성 !! 스프링에서 객체를 등록하면 기본값이 싱글톤 !
System.out.println(t2);
}
}
[ Spring3 - project ]
- 위에랑 beans.xml과 pom.xml의 셋팅은 동일.
1) beans.xml에 객체 등록 (=객체를 쓴다고 정의만 한것 생성은 아님 생성은 MainClass.java에서 하는 것)
이때 id 값을 적지 않으면 객체 생성해서 사용할 수 없음 !!! id 값을 지정해줘야 주소 값을 이용할 수 있다.
id 값을 설정하면 getBean 메서드를 통해 객체의 주소값을 가져올 수 있다.
싱글톤 개념의 객체 = 생성된 객체는 더 이상 생성되지 않는다
<?xml version="1.0" encoding="UTF-8"?>
<beans xmlns="http://www.springframework.org/schema/beans"
	xmlns:xsi="http://www.w3.org/2001/XMLSchema-instance"
	xsi:schemaLocation="http://www.springframework.org/schema/beans
	                    http://www.springframework.org/schema/beans/spring-beans.xsd">

	<!-- xml로딩할 때 자동으로 객체가 생성 된다 !!! -->
      <!-- id에 이름 설정하면 getBean 메서드를 통해 객체의 주소값을 가져올 수 있다. -->
	<!--  생성된 객체는 더 이상 생성되지 않는다 = 싱글톤 -->
	<bean id="test1" class="beans.Test" />

</beans>
2) MainClass.java에서 ClassPathXmlApplicationContext를 활용하여 .getBean 메서드를 통해 객체 주소값 가져오기
package main;

import org.springframework.context.support.ClassPathXmlApplicationContext;

import beans.Test;

public class MainClass {

	public static void main(String[] args) {

		ClassPathXmlApplicationContext ctx = new ClassPathXmlApplicationContext("config/beans.xml");

		Test t1 = ctx.getBean("test1" , Test.class);
		System.out.println(t1);

	}
}
3) lazy-init="true" 적으면 / 안적어주면 default값이 자동으로 false
<!-- xml로딩할 때 자동으로 객체가 생성 된다 !!! => lazy-init이 false일 때 -->
<!-- id에 이름 설정하면 getBean 메서드를 통해 객체의 주소값을 가져올 수 있다. -->
<!-- 생성된 객체는 더 이상 생성되지 않는다 = 싱글톤 -->
<bean id="test1" class="beans.Test" />
<!-- xml로딩할 때 자동으로 객체가 생성되지 않음 !!! => lazy-init이 true일 때 -->
<!-- lazy-init : true - xml 로딩할 때 객체가 생성되지 않는다 -->
<!-- getBean 메서드를 호출할 때 객체가 생성되며 Singleton이다 -->
<bean id="test2" class="beans.Test" lazy-init="true" />
즉, MainClas..java에서
ClassPathXmlApplicationContext ctx = new ClassPathXmlApplicationContext("config/beans.xml");
만 적어도 lazy-init="false"는 Test가 출력됨 / lazy-init="true"는 Test 출력 안됨
lazy-init="true"는
ClassPathXmlApplicationContext ctx = new ClassPathXmlApplicationContext("config/beans.xml");
Test t2 = ctx.getBean("test2" , Test.class);
System.out.println(t2);
이것 까지 적어 줘야지 Test 출력 됨 !!!
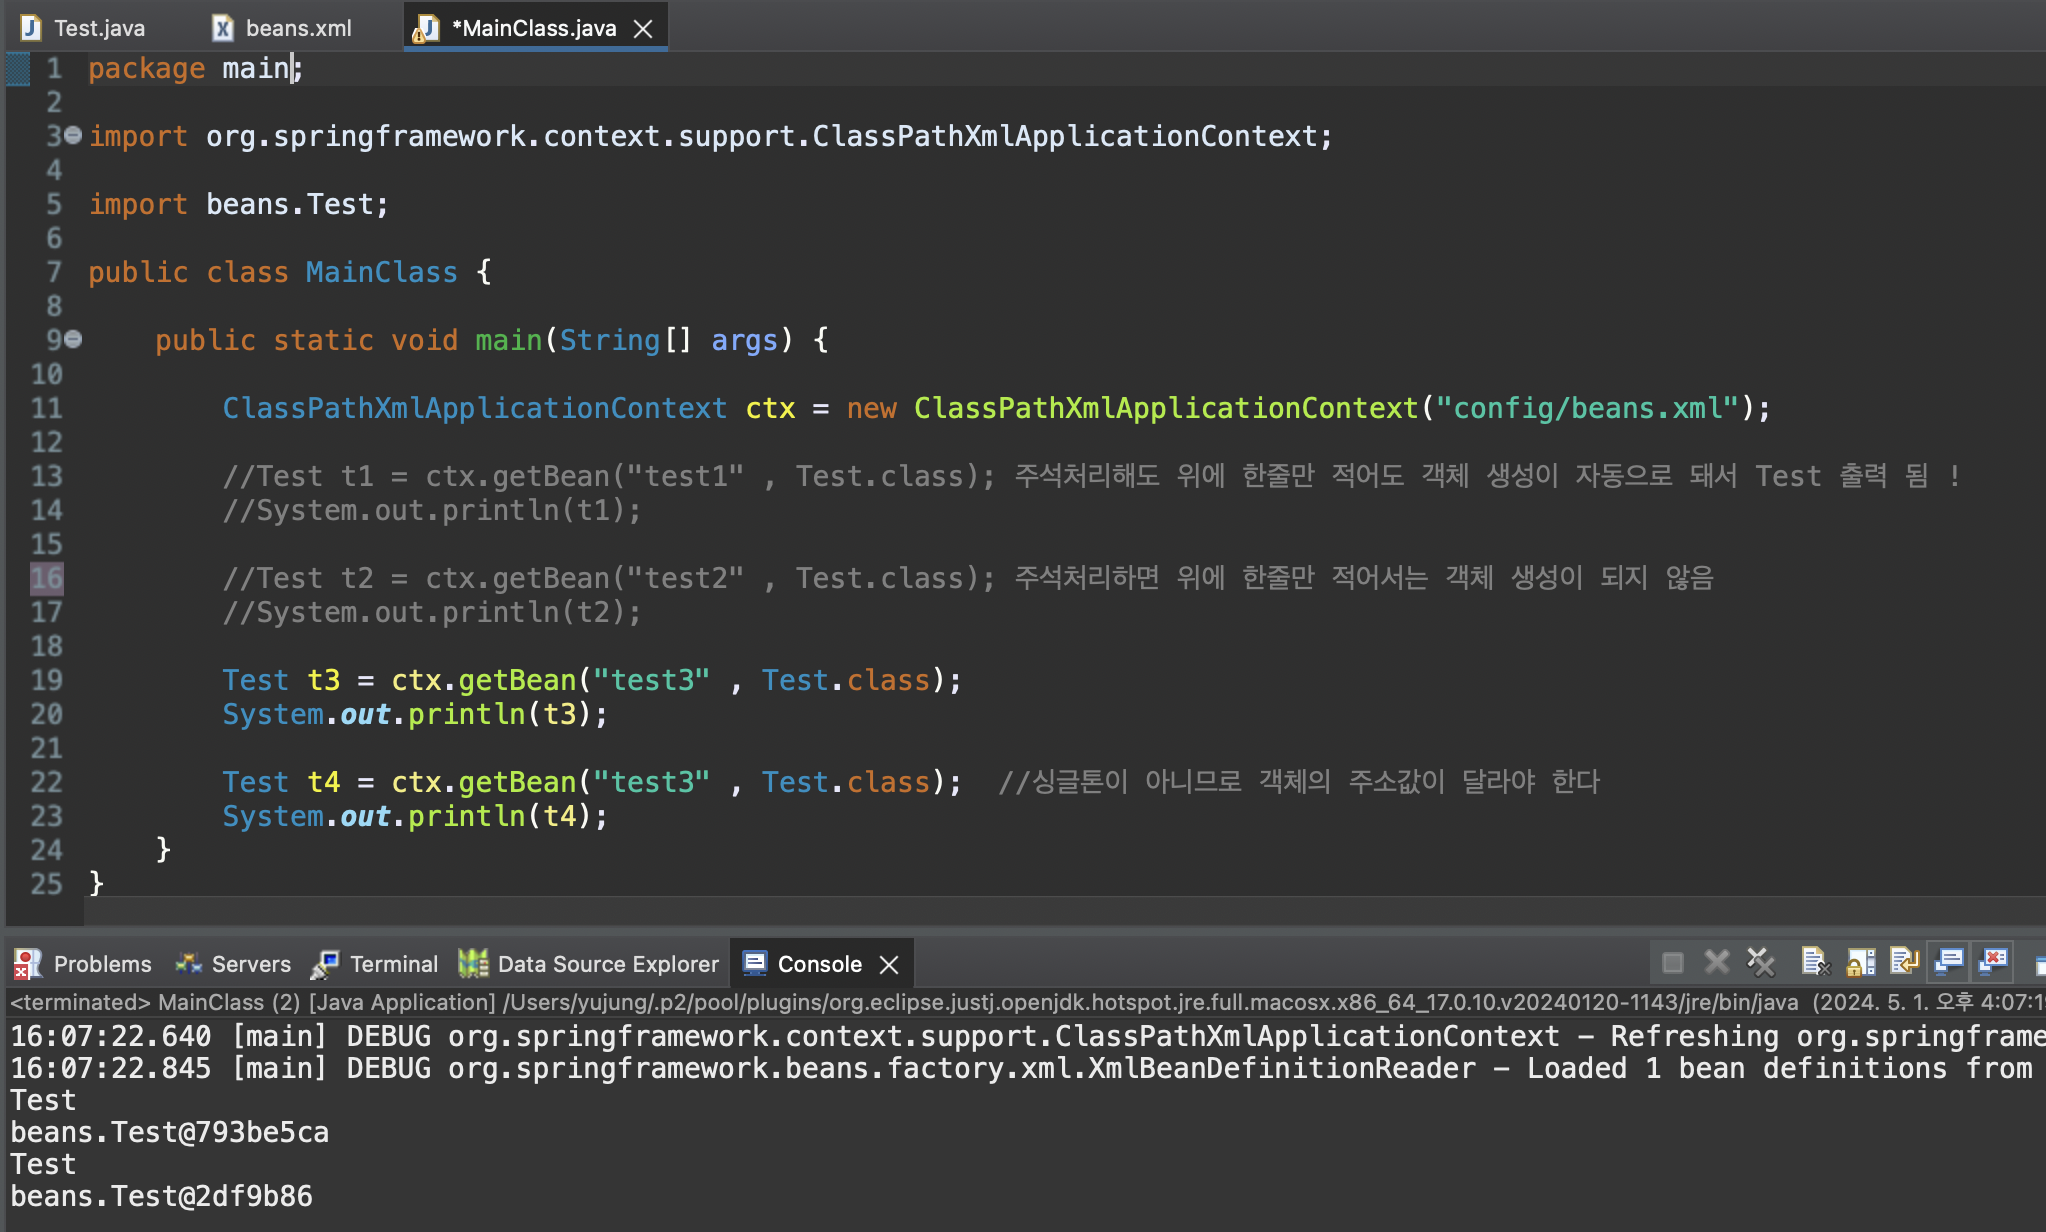
4) scope="prototype"
싱글톤 객체가 아님 ! .getBean 메서드를 호출할 때 마다 다른 객체가 생성 됨
<!-- scope="prototype" - xml 로딩할 때 객체가 생성되지 않는다 -->
<!-- getBean메서드를 호출할 때 마다 객체가 생성된다 -->
<bean id="test3" class="beans.Test" scope="prototype" />
<?xml version="1.0" encoding="UTF-8"?>
<beans xmlns="http://www.springframework.org/schema/beans"
	xmlns:xsi="http://www.w3.org/2001/XMLSchema-instance"
	xsi:schemaLocation="http://www.springframework.org/schema/beans
	                    http://www.springframework.org/schema/beans/spring-beans.xsd">

	<!-- xml로딩할 때 자동으로 객체가 생성 된다 !!! => lazy-init이 false일 때 -->
	<!-- id에 이름 설정하면 getBean 메서드를 통해 객체의 주소값을 가져올 수 있다. -->
	<!--  생성된 객체는 더 이상 생성되지 않는다 = 싱글톤 -->
	<bean id="test1" class="beans.Test" />


	<!-- lazy-init : true - xml 로딩할 때 객체가 생성되지 않는다 -->
	<!--  getBean 메서드를 호출할 때 객체가 생성되며 Singleton이다 -->
	<bean id="test2" class="beans.Test" lazy-init="true" />

	<!-- scope="prototype" - xml 로딩할 때 객체가 생성되지 않는다 -->
	<!-- getBean메서드를 호출할 때 마다 객체가 생성된다 -->
	<bean id="test3" class="beans.Test" scope="prototype" />

</beans>
package main;
import org.springframework.context.support.ClassPathXmlApplicationContext;
import beans.Test;
public class MainClass {
public static void main(String[] args) {
ClassPathXmlApplicationContext ctx = new ClassPathXmlApplicationContext("config/beans.xml");
//Test t1 = ctx.getBean("test1" , Test.class); 주석처리해도 위에 한줄만 적어도 객체 생성이 자동으로 돼서 Test 출력 됨 !
//System.out.println(t1);
//Test t2 = ctx.getBean("test2" , Test.class); 주석처리하면 위에 한줄만 적어서는 객체 생성이 자동으로 되지 않음
//System.out.println(t2);
Test t3 = ctx.getBean("test3" , Test.class);
System.out.println(t3);
Test t4 = ctx.getBean("test3" , Test.class); //싱글톤이 아니므로 객체의 주소값이 달라야 한다
System.out.println(t4);
}
}
[ Spring4 - project ]
- 위에랑 beans.xml과 pom.xml의 셋팅은 동일.
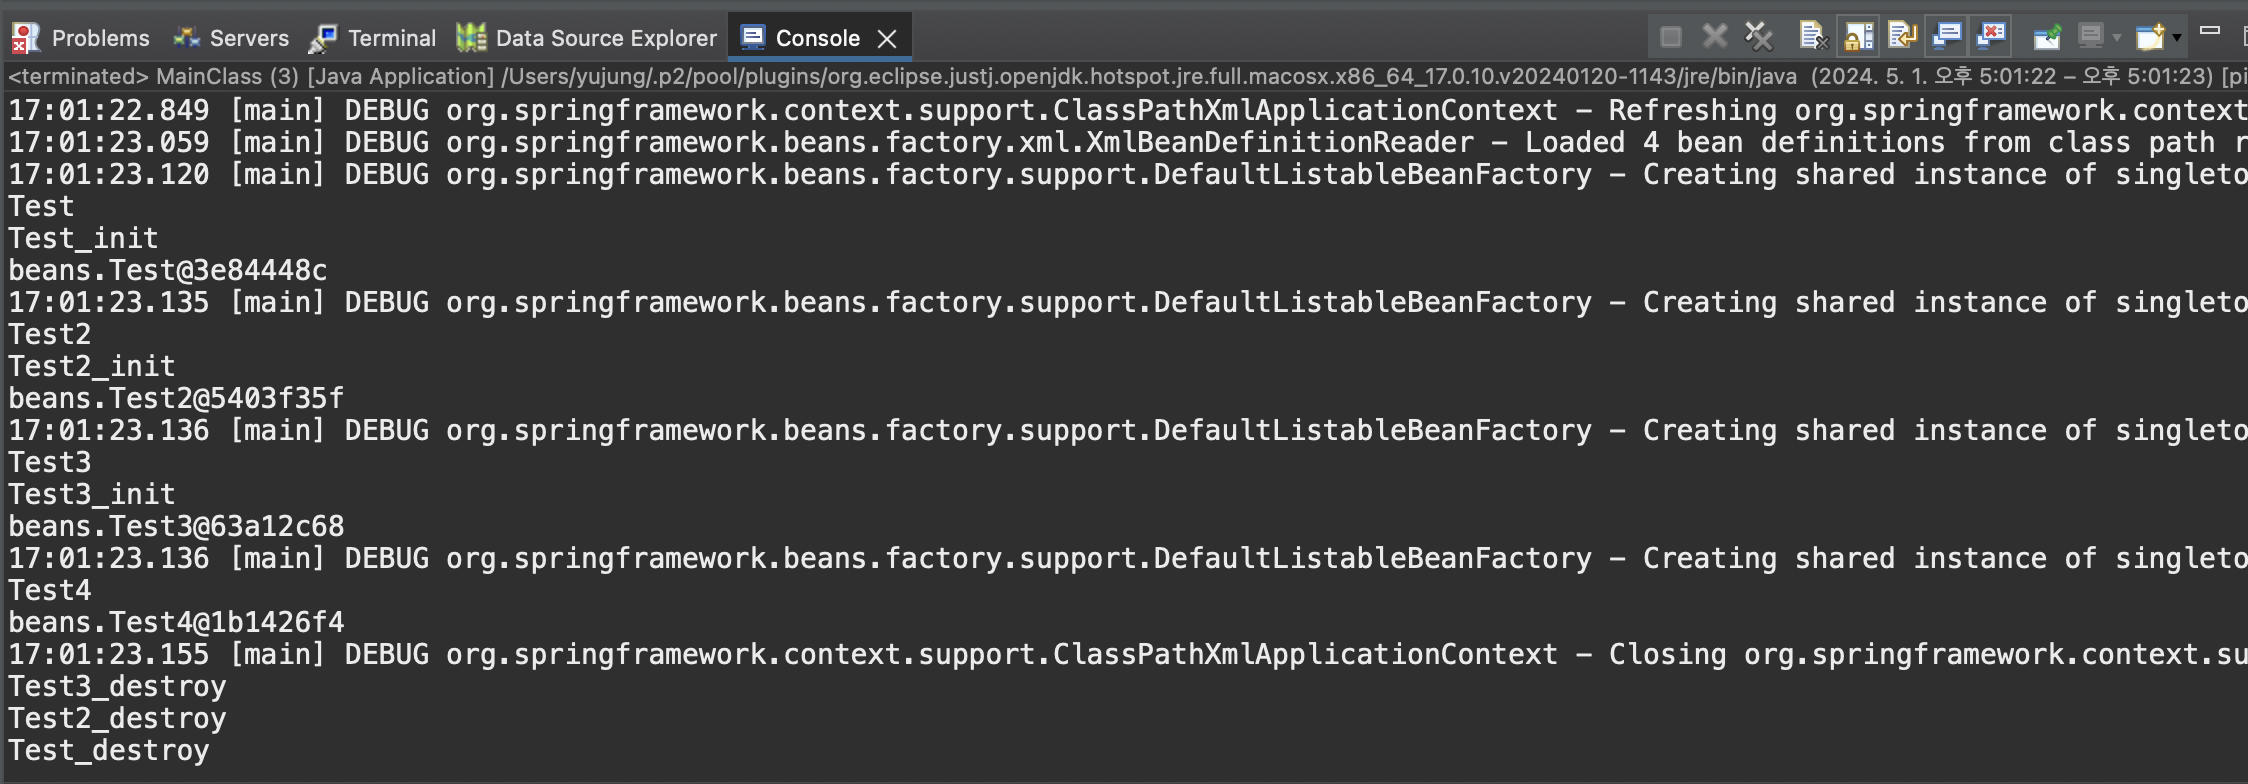
1) Test.java에 Test, Test_init, Test_destroy 함수 생성
Test2.java, Test3.java, Test4.java까지 만들어줌
package beans;

public class Test2 {

	public Test2() {
		System.out.println("Test");
	}

	public void default_init() {
		System.out.println("Test_init");
	}

	public void default_destroy() {
		System.out.println("Test_destroy");
	}
}
package beans;
public class Test2 {
public Test2() {
System.out.println("Test2");
}
public void default_init() {
System.out.println("Test2_init");
}
public void default_destroy() {
System.out.println("Test2_destroy");
}
}package beans;
public class Test3 {
public Test3() {
System.out.println("Test3");
}
public void default_init() {
System.out.println("Test3_init");
}
public void default_destroy() {
System.out.println("Test3_destroy");
}
public void Test3_init() {
System.out.println("Test3_init");
}
public void Test3_destroy() {
System.out.println("Test3_destroy");
}
}package beans;
public class Test4 {
public Test4() {
System.out.println("Test4"); //생성자만
}
}
2) beans.xml에 객체 등록
lazy-init="ture" init-method="Test_init" destroy-method="Test_destroy"
init-method=""로 인해서 객체가 생성된 후 생성자 호출 이후 init-method에 등록된 함수 자동으로 호출 됨
destroy-method=""로 인해서 IoC 컨테이너 닫으면 객체가 소멸되면서 destroy-method에 등록된 함수가 자동으로 호출 됨
lazy-init="true" init-method="Test3_init" destroy-method="Test3_destroy"
default-init-method="default_init" default-destroy-method="default_destroy">
<?xml version="1.0" encoding="UTF-8"?>
<beans xmlns="http://www.springframework.org/schema/beans"
	xmlns:xsi="http://www.w3.org/2001/XMLSchema-instance"
	xsi:schemaLocation="http://www.springframework.org/schema/beans
	                    http://www.springframework.org/schema/beans/spring-beans.xsd"
	default-init-method="default_init" default-destroy-method="default_destroy">


	<!-- 객체가 생성된 후 생성자 호출 이후 init-method에 등록된 함수 자동으로 호출 됨 -->
	<!-- IoC 컨테이너 닫으면 객체가 소멸되면서 destroy-method에 등록된 함수가 자동으로 호출된다 -->
	<bean id="test1" class="beans.Test" lazy-init="true" init-method="Test_init"
	      destroy-method="Test_destroy"/>

	<bean id="test2" class="beans.Test2" lazy-init="true"></bean>

	<bean id="test3" class="beans.Test3" lazy-init="true" init-method="Test3_init" destroy-method="Test3_destroy"></bean>

	<!-- Test4에는 init함수를 설정하지 않아서 init-method="Test4_init"는 에러 발생  -->
	<bean id="test4" class="beans.Test4" lazy-init="true" ></bean>
</beans>
3) MainClas.java 에서 객체 생성
lazy-init="true"로 인해서 .getBean메서드 호출해야지 객체 생성 됨
package main;

import org.springframework.context.support.ClassPathXmlApplicationContext;

import beans.Test;
import beans.Test2;
import beans.Test3;
import beans.Test4;

public class MainClass {

	public static void main(String[] args) {

		ClassPathXmlApplicationContext ctx = new ClassPathXmlApplicationContext("config/beans.xml");

		Test t1 = ctx.getBean("test1", Test.class);
		System.out.println(t1);

		Test2 t2 = ctx.getBean("test2", Test2.class);
		System.out.println(t2);

		Test3 t3 = ctx.getBean("test3", Test3.class);
		System.out.println(t3);

		Test4 t4 = ctx.getBean("test4", Test4.class); //init-method 설정하고 돌리면 error 발생
		System.out.println(t4);

		ctx.close();
	}
}
[ ☆★ 주입 ★☆ ]
외부에서 객체 IoC를 만들면 -> 주입 -> 내부로
즉, beans.xml(외부)에서 객체를 만들어서 -> 주입 -> MainClass.java(내부)로 주입
생성자를 만들어서 주입할 수도 있고 메서드를 만들어서 자동 주입할 수도 있고 .. 여러 종류가 있는데
가장 많이 쓰이는 방식이 자동 주입 !!!
[ Constructor_DI - project - 주입(생성자를 이용한 방법) ]
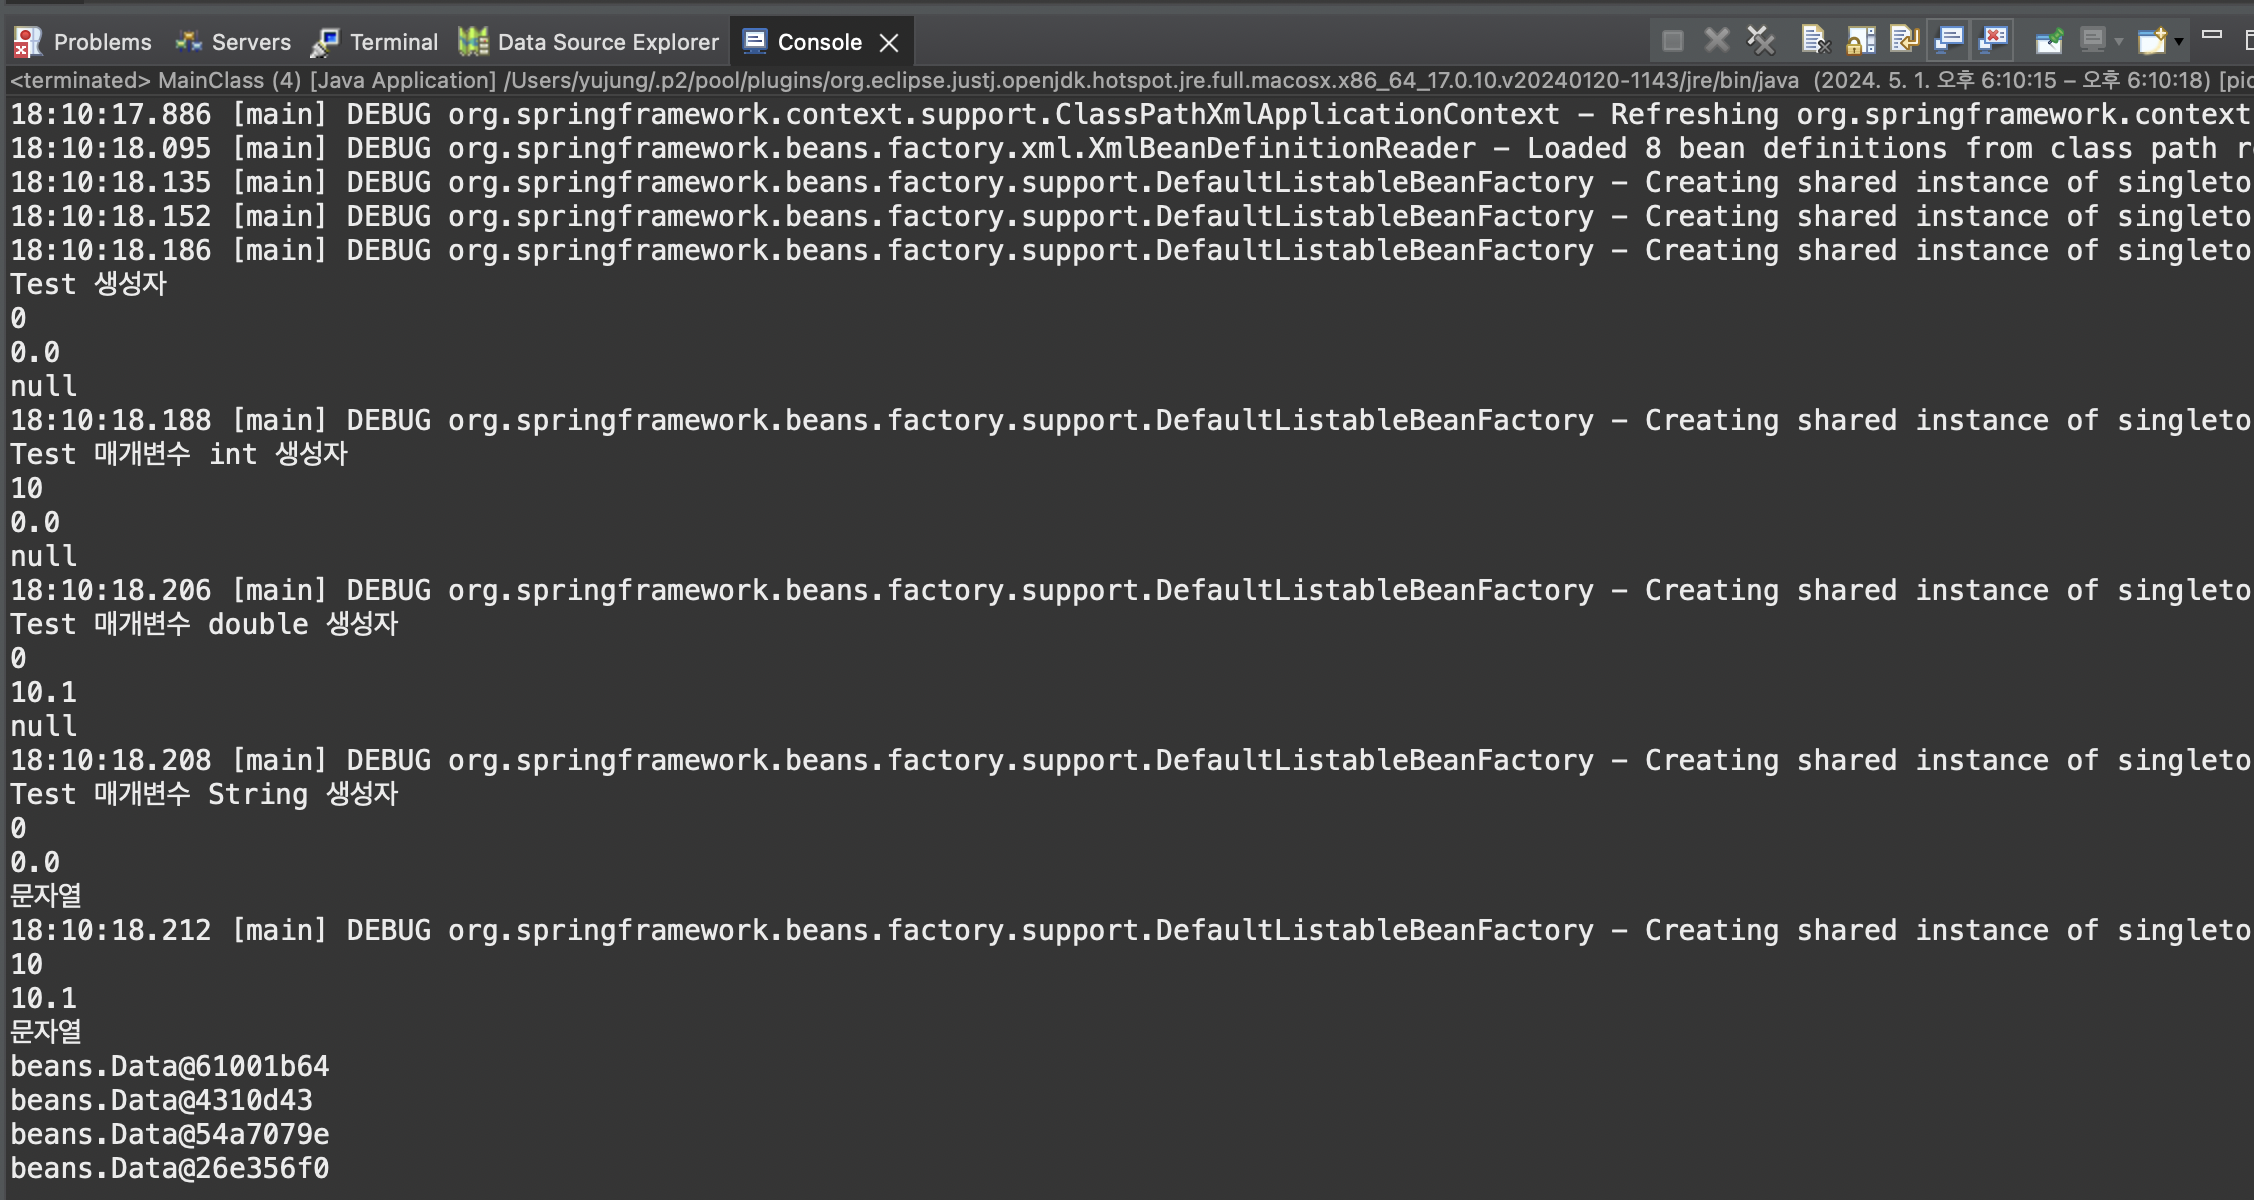
1) Test.java에 필드&함수 생성
package beans;

public class Test {

	private int d1;
	private double d2;
	private String d3;

	public Test() {
		System.out.println("Test 생성자");
		this.d1=0;
		this.d2=0.0;
		this.d3=null;
	}

	public Test(int d1) {
		System.out.println("Test 매개변수 int 생성자");
		this.d1=d1;
		this.d2=0.0;
		this.d3=null;
	}

	public Test(double d1) {
		System.out.println("Test 매개변수 double 생성자");
		this.d1=0;
		this.d2=d2;
		this.d3=null;
	}

	public Test(String d1) {
		System.out.println("Test 매개변수 String 생성자");
		this.d1=0;
		this.d2=0.0;
		this.d3=d3;
	}

	public Test(int d1, double d2, String d3) {
		this.d1=d1;
		this.d2=d2;
		this.d3=d3;
	}

	public void show() {
		System.out.println(d1);
		System.out.println(d2);
		System.out.println(d3);
	}
}
2) Test2.java에 데이터 만든거에 대한 객체 생성
package beans;

public class Test2 {

	private Data d1;
	private Data d2;

	public Test2(Data d1, Data d2) {
		this.d1=d1;
		this.d2=d2;
	}

	public void show() {
		System.out.println(d1);
		System.out.println(d2);
	}
}
3) beans.xml에 객체 등록
<?xml version="1.0" encoding="UTF-8"?>
<beans xmlns="http://www.springframework.org/schema/beans"
	xmlns:xsi="http://www.w3.org/2001/XMLSchema-instance"
	xsi:schemaLocation="http://www.springframework.org/schema/beans
	                    http://www.springframework.org/schema/beans/spring-beans.xsd">


	<bean id="test" class="beans.Test" lazy-init="true"></bean>

	<bean id="test2" class="beans.Test" lazy-init="true">
		<constructor-arg value='10' type="int" /> <!-- 매개변수 int인 (int d1)생성자로 가서 this.d1에 value값 들어감  -->
	</bean>

	<bean id="test3" class="beans.Test" lazy-init="true">
		<constructor-arg value='10.10' type="double" /> <!-- 매개변수 double인 (double d2)생성자로 가서 this.d2에 value값 들어감  -->
	</bean>

	<bean id="test4" class="beans.Test" lazy-init="true">
		<constructor-arg value='문자열' /> <!-- type default가 String이라서 type="String" 안 적어줘도 됨 ! 매개변수 Stirng인 (String d3)생성자로 가서 this.d3에 value값 들어감  -->
	</bean>

	<bean id="test5" class="beans.Test" lazy-init="true">
		<constructor-arg value='10' type="int" index='0'/>
		<constructor-arg value='10.10' type="double" index='1'/>
		<constructor-arg value='문자열' type='java.lang.String'/> <!-- (int d1, double d2, String d3)에 한번에 value 값 들어감 -->
	</bean>

	<!-- 여기서 부턴 Test2 -->
	<bean id="test6" class="beans.Test2"> <!-- 여기서는 scope="prototype"으로 안 줘도 당연히 객체 주소 다름 -->
		<constructor-arg>
			<bean class="beans.Data" />
		</constructor-arg>
		<constructor-arg>
			<bean class="beans.Data" />
		</constructor-arg>
	</bean>

	<bean id="data" class="beans.Data" scope="prototype" />
	<bean id="test7" class="beans.Test2">
		<constructor-arg ref='data' /> <!-- 위에 id="data" 주소값을 참고할 수 있게끔 ref='data'로 준 것  -->
		<constructor-arg ref='data' /> <!-- 주소를 주입하면 beans.Test2에서 찾는 다는 뜻 / scope="prototype"으로 줘서 싱글톤 아님 객체 주소 다르게 출력 됨 -->
	</bean>


</beans>
4) MainClass.java 출력
package main;

import org.springframework.context.support.ClassPathXmlApplicationContext;

import beans.Test;
import beans.Test2;

public class MainClass {

	public static void main(String[] args) {

		ClassPathXmlApplicationContext ctx = new ClassPathXmlApplicationContext("config/beans.xml");

		Test t1 = ctx.getBean("test",Test.class);
		t1.show();

		Test t2 = ctx.getBean("test2",Test.class);
		t2.show();

		Test t3 = ctx.getBean("test3",Test.class);
		t3.show();

		Test t4 = ctx.getBean("test4",Test.class);
		t4.show();

		Test t5 = ctx.getBean("test5",Test.class);
		t5.show();

		Test2 t6 = ctx.getBean("test6",Test2.class);
		t6.show();

		Test2 t7 = ctx.getBean("test7",Test2.class);
		t7.show();
	}
}
[ 스프링 프레임워크 개념 ]
[ 스프링을 왜 사용하는가? ]
1. 스프링 컨테이너(경량)에 객체를 스프링 빈으로 등록하면 스프링 빈으로 찾아서 사용 (DI, AOP, IoC, myBatis라이브러리 지원)지원
2. 스프링 빈 의존관계 설정
3. 객체 지향 언어의 특징을 살린 프레임워크
ex) 추상화, 상속, 다형성, 캡슐화
4. 자바 플랫폼을 위한 오픈 소스 애플리케이션 프레임워크
5. 소프트웨어 개발의 뼈대 역할
6. 자바 코드를 줄일 . 수있다(반복되는 작업을 줄일 수 있다)
7. 프로젝트 관리 용이(개발자들과 동시에 프로젝트 하기가 용이)
[ IoC(Inversion of Control) : 제어역전 ] - 객체들만 들어있는 컨테이너 !
1) 객체를 생성하고 연결, 실행하는 것은 결합도가 높아지고 유지보수가 힘들어진다.
-> 따라서, 제어흐름을 외부에서 관리하고 각각의 객체들은 본인의 로직에서만 실행하도록 하는 것이 IoC
2) 프로그램을 개발할 때, 프로그램 흐름, 객체에 대한 제어권을 원래는 개발자가 갖고 있다.
-> 하지만 스프링에서는 제어권을 프레임워크가 갖는다.
[ IoC 컨테이너 종류 ]
A.BeanFactory : 스프링컨테이너의 최상위 인터페이스 : 스프링 빈을 관리, 조회 (ClassPathResource)
B. ApplicationContext : BeanFactory상속받아 제공. 스프링 빈을 관리, 조회외 부가기능 제공
-> 스프링프레임워크는 IoC컨테이너를 이용해 Bean객체들을 관리한다.
-> 스프링 컨테이너 만드는 방법: xml, annotation
[ getBean()이란 ]
A.메소드를 호출할 때 객체 생성된다.
B.같은 id인 객체를 가지고 오면 이미 생성된 객체 주소값을 받아와 사용할 수 있다.(싱글톤)
======================================
A.싱글톤인 경우 xml파일 로딩할 때 객체 생성됨
B.싱글톤이고 lazy-init속성이 true인 경우 getBean() 호출 시 객체 생성됨
C.prototype 인 경우 getBean() 호출 시 객체 생성됨
D.IoC컨테이너 종료할 때 객체 소멸
[ DI (의존성 주입) : Dependency Injection ]
- Bean객체를 생성할 때 Bean객체가 관리할 값이나 객체를 주입하는 것을 의미함
- 구성요소 간의 의존관계가 소스코드 내부가 아닌 외부에서 설정을 통해 정의되는 방식으로 모듈간의 결합도를 낮출 수 있다.
(의존대상 B가 변하면 그것이 A에 영향을 미친다.)
'네이버 클라우드 부트캠프 > 복습 정리' 카테고리의 다른 글
| 52일차 스프링 [ Component, AOP, JDBC ] (0) | 2024.05.03 |
|---|---|
| 51일차 스프링 [ 주입 DI ] (0) | 2024.05.02 |
| 46일차 JSP [ 게시판 만들기 ] (0) | 2024.04.25 |
| 45일차 JSP [ EL언어 ] (0) | 2024.04.24 |
| 44일차 JSP [ 커넥션풀, 마이페이지 만들기 ] (5) | 2024.04.23 |


