

| 일 | 월 | 화 | 수 | 목 | 금 | 토 |
|---|---|---|---|---|---|---|
| 1 | 2 | 3 | 4 | 5 | ||
| 6 | 7 | 8 | 9 | 10 | 11 | 12 |
| 13 | 14 | 15 | 16 | 17 | 18 | 19 |
| 20 | 21 | 22 | 23 | 24 | 25 | 26 |
| 27 | 28 | 29 | 30 |
- Controller
- git
- MVC
- jquery
- API
- Board
- db
- Array
- string
- Java
- Thymeleaf
- 조건문
- Oracle
- 배열
- spring
- Eclipse
- View
- 이클립스
- Scanner
- Uipath
- rpa
- html
- Database
- JDBC
- React
- 문자열
- mysql
- jsp
- SpringBoot
- 상속
- Today
- Total
유정잉
23일차 JDBC [ DB MySQL과 eclipse 연동 ] (22일차와 연결해서 보기) 본문
[ JDBC ]
JDBC(Java Database Connectivity)는 자바에서 데이터베이스에 접속할 수 있도록 하는 자바 API이다.
JDBC는 데이터베이스에서 자료를 쿼리하거나 업데이트하는 방법을 제공한다.
[ 데이터베이스(DataBase)와 연결하는 방법 ] ( import java.sql*;)
1. JDBC 드라이버 로드
2. 데이터베이스와 연결
3. SQL문 실행
4. 데이터베이스와 연결 끊음
Connection : 데이터베이스와 연결
Statement : 질의, 갱신 실행
ResultSet : 결과물
[ 데이터베이스(DataBase)와 연결하는 방법과 순서 ]
[ 1. create table 테이블 생성 - users와 boards ]
create table users( -- 테이블 생성
userid varchar(20) primary key,
username varchar(20) not null,
password varchar(20) not null,
age int(3) not null,
email varchar(40) not null);
desc users; -- 구조 확인
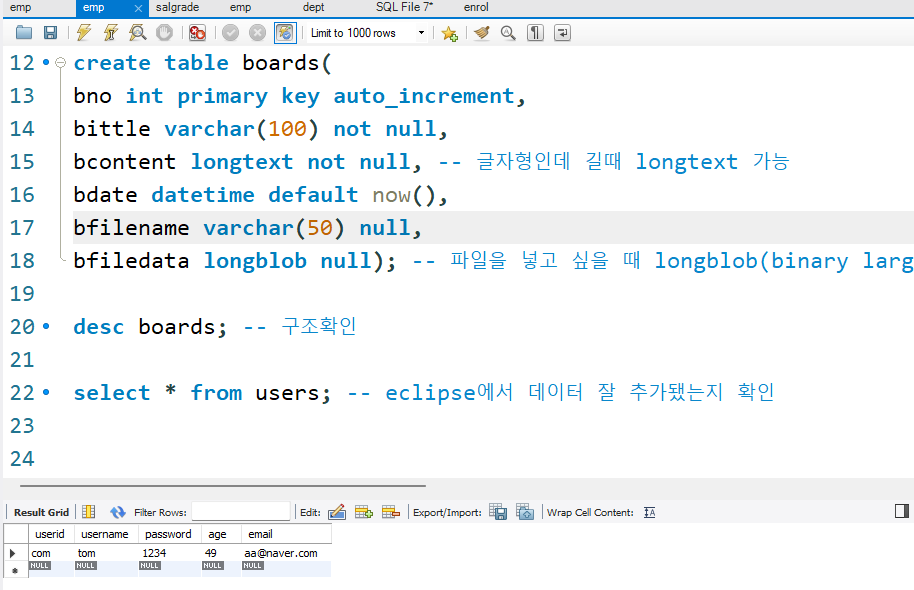
create table boards(
bno int primary key auto_increment,
btitle varchar(100) not null,
bcontent longtext not null, -- 글자형인데 길때 longtext 가능
bwriter varchar(30) not null,
bdate datetime default now(),
bfilename varchar(50) null,
bfiledata longblob null); -- 파일을 넣고 싶을 때 longblob(binary large object)
desc boards; -- 구조확인
[ 2. eclipse MySQL 연동 하는 코드 ]
import java.sql.Connection;
import java.sql.DriverManager;
import java.sql.SQLException;

public class jdbc1 {

	public static void main(String[] args) throws SQLException {
		//Connection은 인터페이스 객체생성 불가 / DriverManager에 등록후 getConnecion으로 얻음
		Connection conn = null; // 참조하는 값이 없도록 만들어 놓고

		try {
			//Class클래스로 JDBC드라이버를 로딩 (JVM 자바 가상기계 안으로 Driver로딩)
			// Driver 클래스 이름 지정. DriverManager에 등록된다.
			//프로젝트 실행할 시 한번만 실행하주면 됨 !!
			Class.forName("com.mysql.cj.jdbc.Driver"); // MySQL url 환경에 따라 달라짐

			//Connection 객체 생성하여 데이터베이스와 연결이 이루어지도록 한다.(=getConnecion메서드가)
			conn = DriverManager.getConnection(
					"jdbc:mysql://localhost:3306/yujung","root","1234");

            // //////////// 여기까지 DB와 연결하는 과정 MySQL 버전 //////////////
		} catch(Exception e) { }

		conn.close(); //연결끊기

	}

}
[ 3. eclipse에서 MySQL에 데이터 추가하는 법 - users table ]
import java.sql.Connection;
import java.sql.DriverManager;
import java.sql.PreparedStatement;
import java.sql.SQLException;

public class jdbc1 {

	public static void main(String[] args) throws SQLException {
		//Connection은 인터페이스 객체생성 불가 / DriverManager에 등록후 getConnecion으로 얻음
		Connection conn = null; // 참조하는 값이 없도록 만들어 놓고

		try {
			//Class클래스로 JDBC드라이버를 로딩 (JVM 자바 가상기계 안으로 Driver로딩)
			// Driver 클래스 이름 지정. DriverManager에 등록된다.
			//프로젝트 실행할 시 한번만 실행하주면 됨 !!
			Class.forName("com.mysql.cj.jdbc.Driver"); // MySQL url 환경에 따라 달라짐

			//Connection 객체 생성하여 데이터베이스와 연결이 이루어지도록 한다.(=getConnecion메서드가)
			conn = DriverManager.getConnection(
					"jdbc:mysql://localhost:3306/yujung","root","1234");

			//위에까진 연결하는 과정 / 밑에는 연결한 이후에 DB 쿼리문 이용하는 과정
			String sql = "insert into users(userid, username, password, age, email)" // 필드명 생략가능하나 웬만하면 적어주는게 좋음
					+ "values(?,?,?,?,?)"; //? : 바인드 변수 => 매번 값이 바뀔 수 있기 때문에 값을 미리 정해 놓지 않는다.

			//PreparedStatement도 인터페이스 / 연결객체 conn으로 부터 함수 prepareStatement 호출
			PreparedStatement pstmt = conn.prepareStatement(sql);

			//setXXX(순서, 데이터) => setInt setString ... 으로 값 넣어주기
			pstmt.setString(1, "com"); // ? 1번째에다가 "com"을 넣겠다는 의미
			pstmt.setString(2, "tom");
			pstmt.setString(3, "1234");
			pstmt.setInt(4, 49);
			pstmt.setString(5, "aa@naver.com");

			//executeXXX : 쿼리문 실행되기 위해 호출하는 메서드 : 데이터베이스 갱신됨 (얘를 해줘야만 쿼리문 실행 됨 !!)
			int r = pstmt.executeUpdate();
			System.out.println(r); // insert 삽입된 값이 몇개인지 출력해보기 / 1 출력 됨

			pstmt.close(); // 연결끊기

		} catch(Exception e) { }

		conn.close(); //연결끊기

	}

}
[ 4. MySQl로 돌아가서 데이터 잘 추가 됐는지 확인 ]
select * from users;
[ 5. eclipse에서 MySQL에 데이터 추가하는 법 - boards table ]
import java.io.FileInputStream;
import java.sql.Connection;
import java.sql.DriverManager;
import java.sql.PreparedStatement;
import java.sql.ResultSet;
import java.sql.Statement;

public class BoardInsert {
	public static void main(String[] args) {

		Connection conn = null;

		try {
			Class.forName("com.mysql.cj.jdbc.Driver");
			conn = DriverManager.getConnection("jdbc:mysql://localhost:3306/yujung", "root", "1234");

			String sql = "INSERT INTO boards (btitle, bcontent, bwriter, bdate, bfilename,bfiledata) "
					+ "VALUES (?, ?, ?, now(), ?, ?)";

			PreparedStatement pstmt = conn.prepareStatement(sql,
					Statement.RETURN_GENERATED_KEYS);
					// 자동증가(auto_increment)된 bno값 가져오는 것

			pstmt.setString(1, "금요일");
			pstmt.setString(2, "금요일입니다");
			pstmt.setString(3, "juli");
			pstmt.setString(4, "마이멜로디");
			pstmt.setBlob(5, new FileInputStream
					("C:/Users/bitcamp/Documents/A/마이멜로디.jpg"));
                    // 자료형이 longtext인 값 넣는 방법
                    // bdate의 자료형 now()는 값 넣어주지 않아도 됨

			int r = pstmt.executeUpdate(); // insert니깐 .executeUpdate
			System.out.println(r); // 갱신된 행의 개수

			if (r == 1) {
				ResultSet rs = pstmt.getGeneratedKeys(); // bno값
				if (rs.next()) {
					int bno = rs.getInt(1);
					System.out.println("게시글 수 " + bno); // 게시글 수 1 출력 됨
				}
				rs.close();
			}
			pstmt.close();
			conn.close();
		} catch (Exception e) {
		}
	}
}
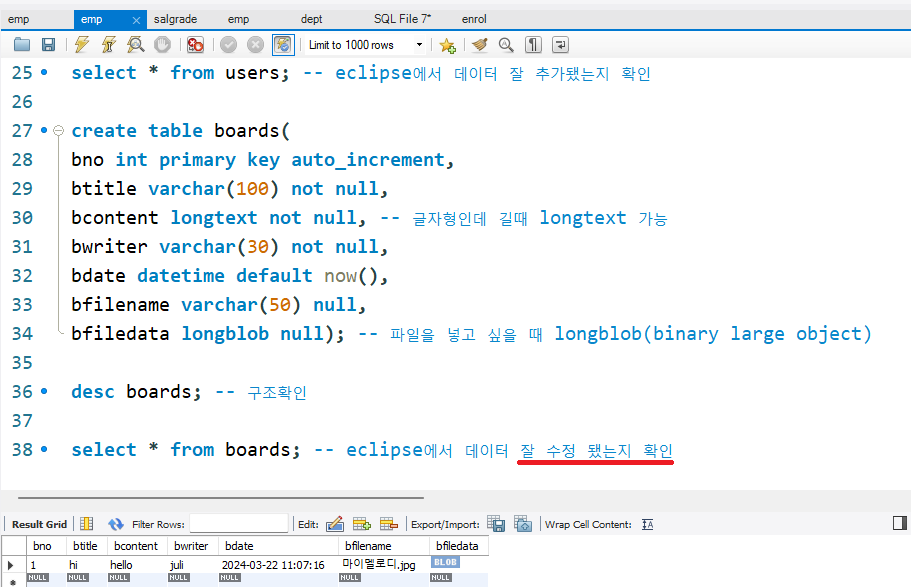
[ 6. MySQl로 돌아가서 데이터 잘 추가 됐는지 확인 ]
select * from boards;

[ 7. eclipse에서 MySQL에 행 데이터 수정 하는 법 - boards table ]
import java.io.FileInputStream;
import java.sql.Connection;
import java.sql.DriverManager;
import java.sql.PreparedStatement;

public class BoardUpdate {
	public static void main(String[] args) {

		Connection conn = null;

		try {
			Class.forName("com.mysql.cj.jdbc.Driver");
			conn = DriverManager.getConnection("jdbc:mysql://localhost:3306/yujung", "root", "1234");

			 String sql = new StringBuilder()
		                .append("UPDATE boards SET ")
		                .append("btitle= ?, ")
		                .append("bcontent= ?, ")
		                .append("bfilename= ?, ")
		                .append("bfiledata= ? ")
		                .append("WHERE bno= ?")
		                .toString();

			PreparedStatement pstmt  = conn.prepareStatement(sql);
			pstmt.setString(1, "hi");
			pstmt.setString(2, "hello");
			pstmt.setString(3, "마이멜로디.jpg");
			pstmt.setBlob(4, new FileInputStream
					("C:/Users/bitcamp/Documents/A/마이멜로디.jpg"));
			pstmt.setInt(5, 1);

			int r=pstmt.executeUpdate();
			System.out.println("수정된 행 개수 "+r);
			pstmt.close();
			conn.close();

		} catch (Exception e) {
		}
	}
}
[ 8. MySQl로 돌아가서 데이터 잘 수정 됐는지 확인 ]
select * from boards;
[ 7. eclipse에서 MySQL에 행 데이터 삭제 하는 법 - boards table ]
import java.sql.Connection;
import java.sql.DriverManager;
import java.sql.PreparedStatement;
import java.sql.SQLException;


public class BoardDelete {
	public static void main(String[] args) throws SQLException {

		Connection conn = null;

		try {
			Class.forName("com.mysql.cj.jdbc.Driver");
			conn = DriverManager.getConnection("jdbc:mysql://localhost:3306/yujung", "root", "1234");

			String sql="delete from boards where bno=? "; //bno를 기준으로 테이블 삭제

			PreparedStatement pstmt=conn.prepareStatement(sql);
         	pstmt.setInt(1, 1); //bno 1번 값 지우겠다는 의미
			pstmt.setInt(1, 2); //bno 2번 값 지우겠다는 의미

			pstmt.executeUpdate(); //쿼리문 실행

			int r=pstmt.executeUpdate();
			System.out.println(r);

			pstmt.close();


		} catch (Exception e) {}
			conn.close();

	}
}
[ 8. MySQl로 돌아가서 데이터 잘 삭제 됐는지 확인 ]
select * from boards;

[ 9. eclipse에서 MySQL에 행 데이터 eclipse 콘솔에 출력 하는 법 - users table ]
- 테이블에서 User정보를 가져온 후 콘솔에 출력하기를 원함
public class User {
	private String userid;
	private String username;
	private String password;
	private int age;
	private String email;

	public String getUserid() {
		return userid;
	}
	public void setUserid(String userid) {
		this.userid = userid;
	}
	public String getUsername() {
		return username;
	}
	public void setUsername(String username) {
		this.username = username;
	}
	public String getPassword() {
		return password;
	}
	public void setPassword(String password) {
		this.password = password;
	}
	public int getAge() {
		return age;
	}
	public void setAge(int age) {
		this.age = age;
	}
	public String getEmail() {
		return email;
	}
	public void setEmail(String email) {
		this.email = email;
	}

	@Override
	public String toString() {
		return userid + " " + username + " " + email;
	}
}

//테이블에서 User정보를 가져온 후 콘솔에 출력하기를 원함
import java.sql.Connection;
import java.sql.DriverManager;
import java.sql.PreparedStatement;
import java.sql.ResultSet;
import java.sql.SQLException;
public class UserSelect {
public static void main(String[] args) throws SQLException {
//// 테이블에서 User정보를 가져온 후 콘솔에 출력하기를 원함
Connection conn = null;
try {
Class.forName("com.mysql.cj.jdbc.Driver");
// Class클래스로 JDBC드라이버를 로딩되어지면서
// DriverManager에 등록된다
conn = DriverManager.getConnection("jdbc:mysql://localhost:3306/yujung", "root", "1234");
// Connection객체 생성하여 데이터베이스와 연결이 이루어지도록 한다
String sql = "select *from users where userid=?"; // pstmt.setString(1, "com");와 연결
PreparedStatement pstmt = conn.prepareStatement(sql);
pstmt.setString(1, "com");
// ResultSet: 반환값이 여러 개의 행인 경우에 쉽게 처리할 수 있게 설계된 클래스
// 행기준으로 값을 얻어낼 수 있음
ResultSet rs = pstmt.executeQuery(); // 정보들 가져옴
if (rs.next()) { //콘솔에 출력하기 위한 작업
User u = new User();
// System.out.println(rs.getString(1)); 이렇게 해도 출력은 됨 아래처럼 하는 이유는 필드에다가 저장도 하고 출력도 하고
//테이블에 저장되어 있는 userid 값을 가져와서 User클래스에 userid라는 필드에 세팅한다.
// 테이블에 저장되어있는 userid값을 가져와서
// User클래스에 userid라는 필드에 세팅한다
u.setUserid(rs.getString(1));//getString(1)은 컬럼1 userid에 있는 com값을 뜻함
u.setUsername(rs.getString("username")); // 숫자말고 필드명 넣어서 뽑아와도 됨
u.setPassword(rs.getString(3));
u.setAge(rs.getInt(4));
u.setEmail(rs.getString(5));
System.out.println(u);
// id 기준으로 rs에 들어있는 정보를 하나씩 가져와서 User 클래스에 필드에 저장한 거임 !!
}
rs.close();
pstmt.close();
} catch (Exception e) {
}
conn.close(); //제일 먼저 연걸 제일 마지막에 닫기
}
}
/////////// com tom aa@naver.com 출력 됨 ///////////////
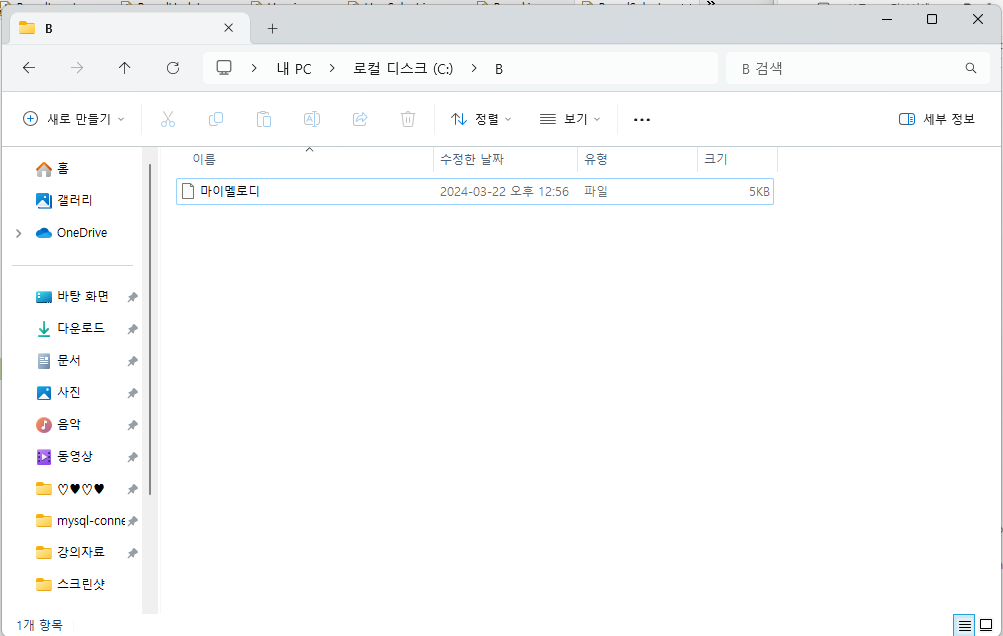
[ 10. eclipse에서 MySQL에 행 데이터 eclipse 콘솔에 출력 하는 법 + 폴더에 사진 저장하는 법 - boards table ]
- 테이블에서 boards 정보를 가져온 후 콘솔에 출력하기를 원함
- 테이블에서 setBfilename에 저장된 '마이멜로디' 사진 폴더 'B'에 저장하기 !!!
import java.sql.Blob;
import java.util.Date;

public class Board {

	private int bno;
	private String btitle;
	private String bcontent;
	private String bwriter;
	private Date bdate;
	private String bfilename;
	private Blob bfiledata;

	@Override
	public String toString() {
		return btitle+" "+bwriter;
	}

	public int getBno() {
		return bno;
	}
	public void setBno(int bno) {
		this.bno = bno;
	}
	public String getBtitle() {
		return btitle;
	}
	public void setBtitle(String btitle) {
		this.btitle = btitle;
	}
	public String getBcontent() {
		return bcontent;
	}
	public void setBcontent(String bcontent) {
		this.bcontent = bcontent;
	}
	public String getBwriter() {
		return bwriter;
	}
	public void setBwriter(String bwriter) {
		this.bwriter = bwriter;
	}
	public Date getBdate() {
		return bdate;
	}
	public void setBdate(Date bdate) {
		this.bdate = bdate;
	}
	public String getBfilename() {
		return bfilename;
	}
	public void setBfilename(String bfilename) {
		this.bfilename = bfilename;
	}
	public Blob getBfiledata() {
		return bfiledata;
	}
	public void setBfiledata(Blob bfiledata) {
		this.bfiledata = bfiledata;
	}


}
import java.io.FileOutputStream;
import java.io.InputStream;
import java.io.OutputStream;
import java.sql.Blob;
import java.sql.Connection;
import java.sql.DriverManager;
import java.sql.PreparedStatement;
import java.sql.ResultSet;
import java.sql.SQLException;
public class BoardSelect {
public static void main(String[] args) throws SQLException {
Connection conn=null;
try {
Class.forName("com.mysql.cj.jdbc.Driver");
//Class클래스로 JDBC드라이버를 로딩되어지면서
// DriverManager에 등록된다
conn=DriverManager.getConnection(
"jdbc:mysql://localhost:3306/yujung",
"root",
"1234");
String sql="select *from boards where bno=?"; // pstmt.setInt(1, 2);와 연결
PreparedStatement pstmt=conn.prepareStatement(sql);
pstmt.setInt(1, 5); //bno값이 5인 데이터 다 가져옴
ResultSet rs=pstmt.executeQuery();
while(rs.next()) {
Board bo=new Board();
bo.setBno(rs.getInt(1));
bo.setBtitle(rs.getString("btitle")); // 숫자말고 필드명 넣어서 뽑아와도 됨
bo.setBcontent(rs.getString(3));
bo.setBwriter(rs.getString(4));
bo.setBdate(rs.getDate(5));
bo.setBfilename(rs.getString(6));
bo.setBfiledata(rs.getBlob(7));
System.out.println(bo);
Blob b=bo.getBfiledata();
if(b!=null) { //이미지 있음
InputStream is= b.getBinaryStream(); // 이미지 읽어들임
OutputStream os=new FileOutputStream("C://B/"+
bo.getBfilename()); // 이미지 저장
is.transferTo(os); //자바 이미지 파일 os에 복사할 때 사용 됨
os.flush();
os.close();
is.close();
}
}
rs.close();
pstmt.close();
}catch(Exception e) {}
conn.close();
}
}
'네이버 클라우드 부트캠프 > 복습 정리' 카테고리의 다른 글
| 25일차 CSS [ 기본태그 ] (0) | 2024.03.26 |
|---|---|
| 24일자 HTML < 기본 태그, Visual Studio Code > (0) | 2024.03.25 |
| 22일차 MySQL [ DB 총정리, 면접 준비, 변수선언 set @, IF문, while문 ] (0) | 2024.03.21 |
| 21일차 Java [ 데이터베이스 입출력, DB MySQL과 eclipse 연결 ] (0) | 2024.03.20 |
| 19일차 MySQL [ view, 스토어드 프로시저, 트리거 ] (1) | 2024.03.18 |


