
| 일 | 월 | 화 | 수 | 목 | 금 | 토 |
|---|---|---|---|---|---|---|
| 1 | 2 | 3 | 4 | 5 | ||
| 6 | 7 | 8 | 9 | 10 | 11 | 12 |
| 13 | 14 | 15 | 16 | 17 | 18 | 19 |
| 20 | 21 | 22 | 23 | 24 | 25 | 26 |
| 27 | 28 | 29 | 30 |
- Array
- string
- db
- Database
- API
- 조건문
- Thymeleaf
- Scanner
- git
- spring
- Controller
- JDBC
- rpa
- html
- jsp
- mysql
- 문자열
- React
- 이클립스
- jquery
- View
- 배열
- Board
- Uipath
- Eclipse
- 상속
- Oracle
- MVC
- Java
- SpringBoot
- Today
- Total
유정잉
eclipse 와 MySQL 연결 방법 !!! 본문
[ MySQL emp 테이블에 값 저장하는 법 ]

import java.sql.*;

public class Test4 {

	public static void main(String[] args) {

		String url="jdbc:mysql://localhost:3306/yujung";
		String que="insert into emp(empno,ename,job)"
				+"values(?,?,?)";

		//? : 주기적으로 변경해서 입력할 값 (바인드 변수)

		Connection con=null; // 인터페이스이기 때문에 null 가능
		PreparedStatement pstmt=null;

		try {
			Class.forName("com.mysql.cj.jdbc.Driver");
			con=DriverManager.getConnection(url,"root","1234");

			pstmt=con.prepareStatement(que); //문자열 작업 쿼리문 들어옴

			pstmt.setInt(1, 1234); // 컬럼 1 , 넣고싶은 값 1234
			pstmt.setString(2, "Bob");
			pstmt.setString(3, "ANALYST");

			pstmt.executeUpdate();
		}catch(Exception e) { }
	}
}

import java.sql.Connection;
import java.sql.DriverManager;

public class Test {
	public static Connection get() {
		Connection con=null;

		try {
			String id="root";
			String pw="1234";
			String url="jdbc:mysql://localhost:3306/yujung";

			Class.forName("com.mysql.cj.jdbc.Driver");
			//Class 클래스로 mysql 드라이버를 로딩하는 코드 => DriverManager에 등록됨

			con=DriverManager.getConnection(url,id,pw);
			//Connection객체를 얻음
			//con은 실제로 데이터베이스와 연결하여 작업을 수행할 수 있는 통로롤 작용하는
			//중요한 객체 변수로 사용된다!!!!

			System.out.println("데이터베이스에 연결됐다");
		}
		catch(Exception e) {
			System.out.println("로딩실패");
		}
		return con;
	}
}
[ 데이터 저장 ]
매개변수화된 SQL 문을 실행하려면 PreparedStatement가 필요하다. 다음과 같이 Conection의 prepateStatement() 메소드로부터 PreparedStatement를 얻는다.
PreparedStatement pstmt = con.prepareStatement(sql);

import java.sql.Connection;
import java.sql.PreparedStatement;
import java.sql.ResultSet;
import java.sql.SQLException;

public class Test2 {
	public static void main(String[] args) throws SQLException {

		Connection con=null;  //DB와 연결하는 인터페이스
		PreparedStatement psmt=null; //sql문 객체
		ResultSet rs=null;  //sql에 대한 반환 (쿼리 실행에 대한 결과값 저장)

		try {
			String que="select *from emp";

			con=Test.get(); //DB연결

			psmt=con.prepareStatement(que);
			rs=psmt.executeQuery();

			//select -> executeQuery()
			//DML(insert, update, delete) -> executeUpdate();
			while(rs.next()) {
				//DB에 있는 값들을 가져옴(행 기준)
				String empno=rs.getString(1);
				String ename=rs.getString(2);
				String job=rs.getString(3);
				int mgr=rs.getInt(4);

				java.sql.Date hiredate=rs.getDate(5);
				int sal=rs.getInt(6);
				int comm=rs.getInt(7);
				int deptno=rs.getInt(8);

				System.out.println(empno+" "+ename+" "+job);

			}
		}
		catch(Exception e) {
			e.printStackTrace();
		}
		rs.close();
		psmt.close();
		con.close();
	}
}
[ JDBC Driver 설치 ]
MySQL :: Download Connector/J
MySQL Connector/J is the official JDBC driver for MySQL. MySQL Connector/J 8.0 and higher is compatible with all MySQL versions starting with MySQL 5.7. Additionally, MySQL Connector/J 8.0 and higher supports the new X DevAPI for development with MySQL Ser
dev.mysql.com
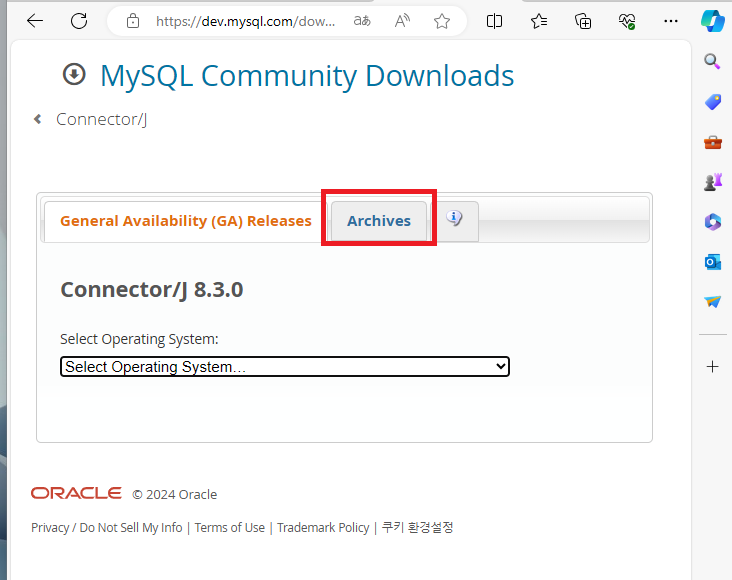
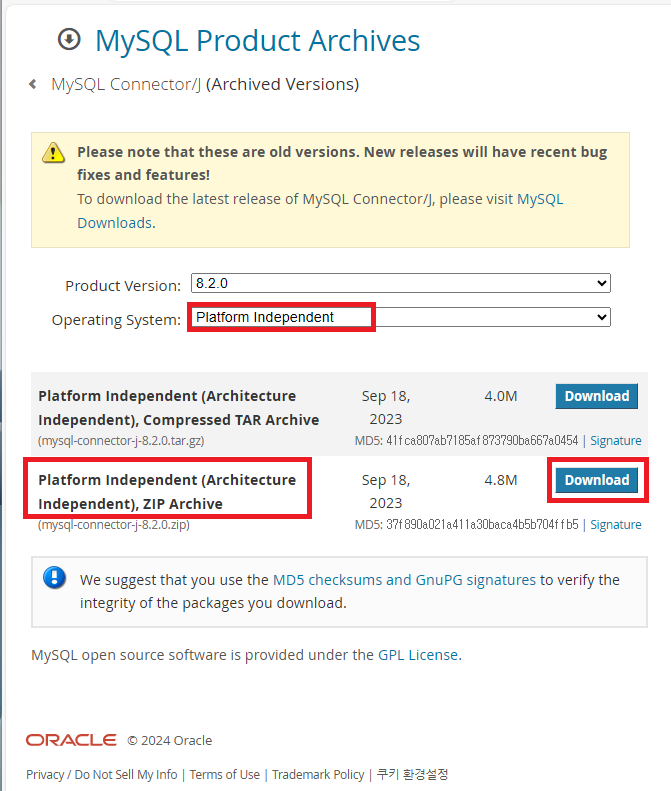
[ Archives -> Operating System : Platform Independent 선택 ( 윈도우환경 ) -> 밑에 ZIP Archive 파일 다운로드 -> 압축풀기 -> mysql-connector-j-8.2.0 확인 ]

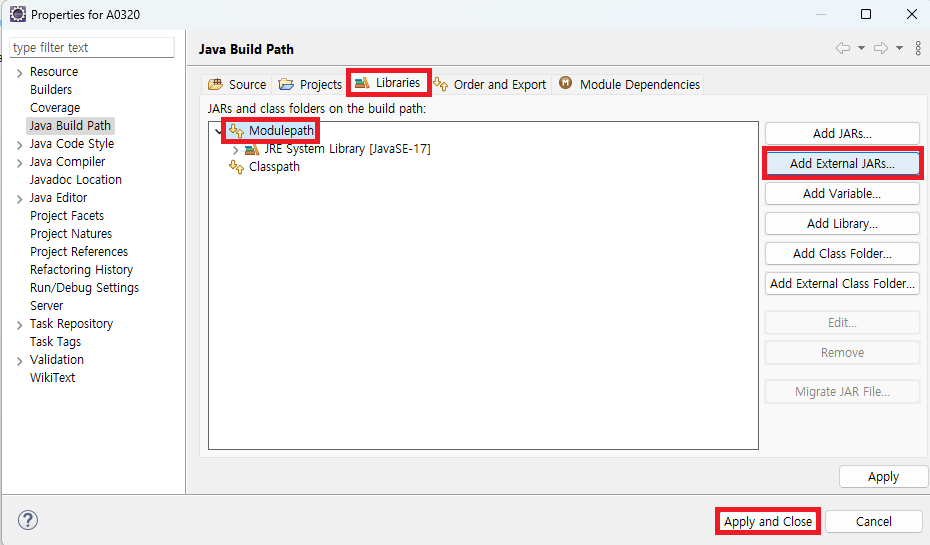
[ 이클립스 eclipse 실행 -> DB와 연결할 프로젝트 오른쪽 클릭 -> Build Path -> Configure Build Path -> Libraries -> Modulepath -> Add External JARs... -> mysql-connector-j-8.2.0 선택후 열기 클릭 -> 프로젝트에 Referenced Libraries 잘 생성 됐는지 확인 !! ]


[ DB 연결 ]
클라이언트 프로그램을 DB와 연결하기 위해 가장 먼저 해야 할 작업은 JDBC Driver를 메모리로 로딩하는 것이다.
Class.forName() 메소드는 문자열로 주어진 JDBC Driver 클래스를 Build Path에서 찾고, 메모리로 로딩한다.
Class.forName("com.mysql.cj.jdbc.Driver"); // MySQL
// Class 클래스로 MySQL 드라이버를 로딩하는 코드 => DriverManager에 등록됨
Class.forName("oracle.jdbc.OracleDriver); // Oracle용
이 과정에서 JDBC Driver 클래스의 static 블록이 실행되면서 DriverManager에 JDBC Driver 객체를 등록하게 된다. 만약 Build Path에서 JDBC Driver 클래스를 찾지 못하면 ClassNotFoundException이 발생하므로 예외 처리를 해야 한다. DriverManager에 JDBC Driver가 등록되면 getConnection() 메소드로 DB와 연결할 수 있다.
Connection con = DriverManager.getConnection(연결 문자열 url ,사용자 id,비밀번호 pw);
첫번째 매개값은 연결 문자열인데, DBMS마다 다른 형식을 가지고 있다.
String url="jdbc:mysql//localhost:3306/yujung"; -> MySQL
"jdbc:oracle:thin:@localhost(IP주소):3306(Port)/yujung(DB명)"; -> Oracle
연결이 성공하면 getConnection() 메소드는 Connection 객체를 리턴한다. 만약 연결이 실패하면 SQLException이 발생하므로 예외 처리를 해야 한다.
성공했던 DB 연결을 끊을 때에는 Connection 객체의 close() 메소드를 호출한다. 이 메소드는 SQLException이 발생할 수 있으므로 예외 처리가 필요하다. ( 연결을 끊고 싶을 때는 con.close(); )
import java.sql.Connection;
import java.sql.DriverManager;

public class Test {
	public static Connection get() {
		Connection con=null;

		try {
			String id="root";
			String pw="1234";
			String url="jdbc:mysql://localhost:3306/yujung";

			Class.forName("com.mysql.cj.jdbc.Driver");
			//Class 클래스로 mysql 드라이버를 로딩하는 코드 => DriverManager에 등록됨

			con=DriverManager.getConnection(url,id,pw);
			//Connection객체를 얻음
			//con은 실제로 데이터베이스와 연결하여 작업을 수행할 수 있는 통로롤 작용하는
			//중요한 객체 변수로 사용된다!!!!

			System.out.println("데이터베이스에 연결됐다");
		}
		catch(Exception e) {
			System.out.println("로딩실패");
		}
		return con;
	}
}
[ 데이터 저장 ]
매개변수화된 SQL 문을 실행하려면 PreparedStatement가 필요하다. 다음과 같이 Conection의 prepateStatement() 메소드로부터 PreparedStatement를 얻는다.
PreparedStatement pstmt = con.prepareStatement(sql);
import java.sql.Connection;
import java.sql.PreparedStatement;
import java.sql.ResultSet;
import java.sql.SQLException;

public class Test2 {
	public static void main(String[] args) throws SQLException {

		Connection con=null;  //DB와 연결하는 인터페이스
		PreparedStatement psmt=null; //sql문 객체
		ResultSet rs=null;  //sql에 대한 반환 (쿼리 실행에 대한 결과값 저장)

		try {
			String que="select *from emp";

			con=Test.get(); //DB연결

			psmt=con.prepareStatement(que);
			rs=psmt.executeQuery();

			//select -> executeQuery()
			//DML(insert, update, delete) -> executeUpdate();
			while(rs.next()) {
				//DB에 있는 값들을 가져옴(행 기준)
				String empno=rs.getString(1);
				String ename=rs.getString(2);
				String job=rs.getString(3);
				int mgr=rs.getInt(4);

				java.sql.Date hiredate=rs.getDate(5);
				int sal=rs.getInt(6);
				int comm=rs.getInt(7);
				int deptno=rs.getInt(8);

				System.out.println(empno+" "+ename+" "+job);

			}
		}
		catch(Exception e) {
			e.printStackTrace();
		}
		rs.close();
		psmt.close();
		con.close();
	}
}
'네이버 클라우드 부트캠프 > 정보' 카테고리의 다른 글
| Git 과 Sourcetree 사용법 !!! (1) | 2024.03.30 |
|---|---|
| HTML, CSS, JavaScript [ 연습 관련 정보 사이트 ] (0) | 2024.03.26 |
| MySQL API 사이트 (0) | 2024.03.14 |
| 프로젝트 모델링 작업 !!! (0) | 2024.03.14 |
| Java AWT [ eclipse JFrame UI 만들기 ] (0) | 2024.03.13 |

