
Notice
Recent Posts
Recent Comments
Link
| 일 | 월 | 화 | 수 | 목 | 금 | 토 |
|---|---|---|---|---|---|---|
| 1 | 2 | 3 | 4 | 5 | 6 | 7 |
| 8 | 9 | 10 | 11 | 12 | 13 | 14 |
| 15 | 16 | 17 | 18 | 19 | 20 | 21 |
| 22 | 23 | 24 | 25 | 26 | 27 | 28 |
| 29 | 30 |
Tags
- React
- Eclipse
- Oracle
- Scanner
- 배열
- SpringBoot
- JDBC
- 문자열
- Uipath
- 이클립스
- html
- spring
- View
- API
- Controller
- Array
- string
- Java
- MVC
- 조건문
- jsp
- jquery
- 자료구조
- mysql
- Database
- Board
- Thymeleaf
- 상속
- rpa
- db
Archives
- Today
- Total
유정잉
🎀 스프링부트 SpringBoot 파일 생성 본문
1) start.spring.io로 SpringBoot Project 생성
-> Spring Boot Dev Tools, Spring Web, Lombok, MySQL Driver, Thymeleaf, Psring Data JAP
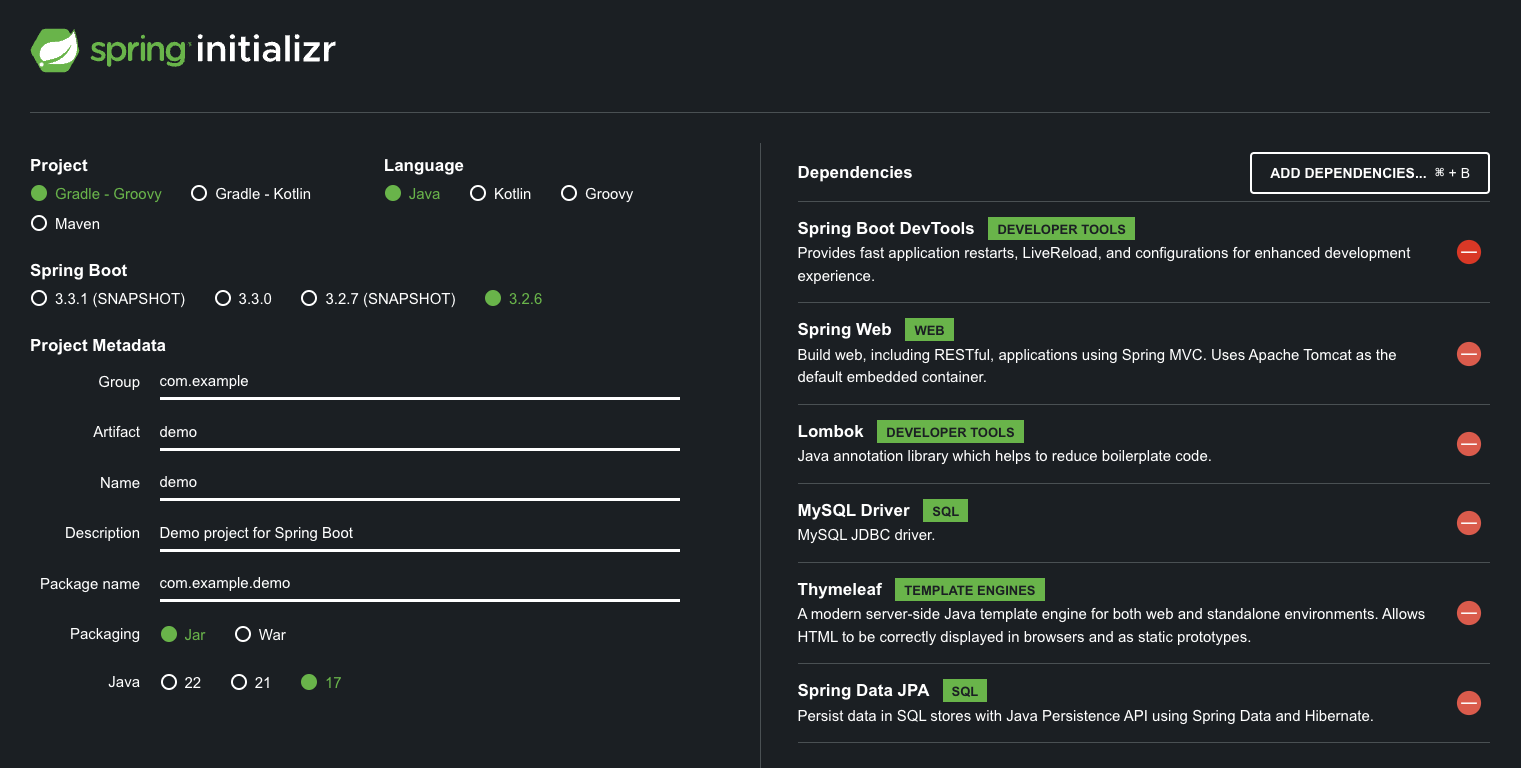
2) application.properties 파일에 DB 연결 설정

spring.datasource.url=jdbc:mysql://localhost:3306/yujung
spring.datasource.username=root
spring.datasource.password=00000000
spring.jpa.hibernate.ddl-auto=update
3) controller와 html 파일 생성 -> html에서 Thymeleaf를 통해 데이터 값 출력
-> Thymeleaf는 <th:> 태그 사용

Thymeleaf 템플릿 코드는 서버 측에서 전달된 list 데이터를 순회하면서 HTML 표의 각 행에 데이터를 표시하는 역할
<tr th:each="data: ${list}"> : th:each 속성은 list 변수를 순회합니다. list 변수는 서버 측에서 전달된 데이터 목록입니다. list의 각 항목을 data 변수에 할당하여 <tr> 요소를 반복 생성합니다.
<td th:text="${data}"></td> : th:text 속성은 data 변수의 값을 셀의 텍스트로 설정합니다.data 변수는 현재 반복 중인 목록의 항목을 나타냅니다.
4) entity 폴더 생성 -> @Entity를 적어줘야지만 클래스가 table로 변경됨 !


728x90
'개발자 공부 > 🎀 스프링 공부' 카테고리의 다른 글
| 🎀 스프링 부트 [ 게시판 만들기 ] (0) | 2024.07.10 |
|---|---|
| 🎀 스프링 부트 [ JPA, Repository, @Query ] (0) | 2024.07.09 |
| 🎀 스프링 레거시 흐름과 코드 예시 (0) | 2024.06.15 |
| ⭐️ @PostConstruct와 @PreDestroy 빈의 초기화 + 빈의 소멸 (0) | 2024.05.29 |
| ⭐️ Controller와 RestController의 차이점 (0) | 2024.05.29 |
'개발자 공부/🎀 스프링 공부' Related Articles
more


