🎀 스프링 부트 [ Thymeleaf ]
Thymeleaf의 기본적인 사용 방법은 기존 속성 앞에 'th:'를 붙여주고 속성값을 지정하는 것이다.
package org.zerock.ex3.dto;

import lombok.Builder;
import lombok.Data;

import java.time.LocalDateTime;

@Data
@Builder(toBuilder = true)
public class SampleDTO {
    private Long sno;

    private String first;

    private String last;

    private LocalDateTime regTime;
}
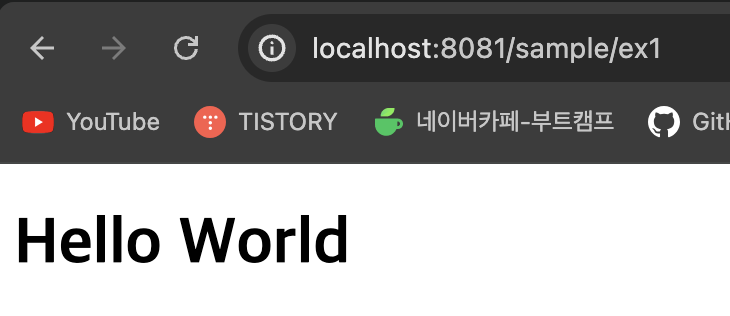
[ Thymeleaf의 기본 사용 방법 ]
<!DOCTYPE html>
<html lang="en" xmlns:th="http://www.thymeleaf.org">
<head>
    <meta charset="UTF-8">
    <title>Title</title>
</head>
<body>
<h1 th:text="'Hello World'"></h1>
</body>
</html>
package org.zerock.ex3.controller;

import lombok.extern.log4j.Log4j2;
import org.springframework.stereotype.Controller;
import org.springframework.ui.Model;
import org.springframework.web.bind.annotation.GetMapping;
import org.springframework.web.bind.annotation.RequestMapping;
import org.zerock.ex3.dto.SampleDTO;

import java.time.LocalDateTime;
import java.util.List;
import java.util.stream.Collectors;
import java.util.stream.IntStream;

@Controller
@RequestMapping("/sample")
@Log4j2
public class SampleController {

    @GetMapping("/ex1")
    public void ex1(){
        log.info("ex1............");
    }
}
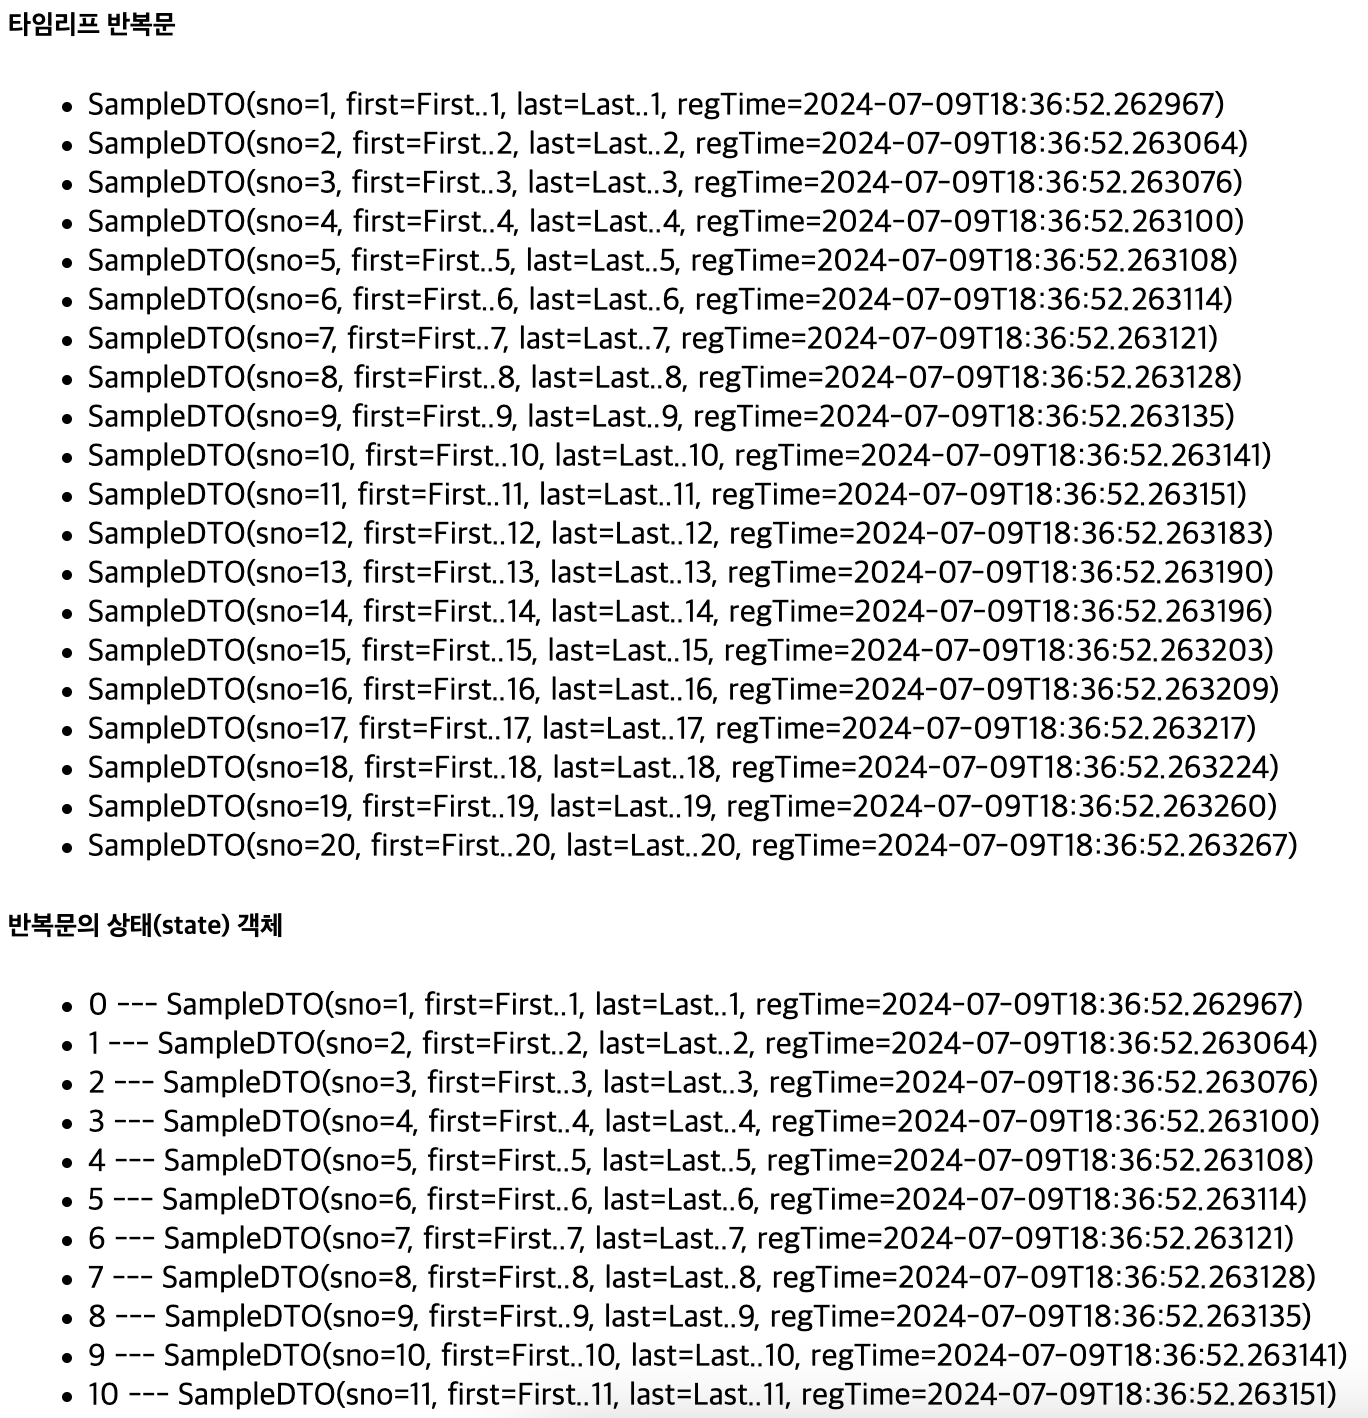
[ Thymeleaf의 반복문 처리 ]
Thymeleaf에서 반복은 th:each라는 속성을 이용한다.
⭐️ th:each = "변수 : ${목록}" ⭐️
아래의 예제에서는 'dto'라는 변수를 만들어서 사용하고 Model로 전달된 데이터는 ${list}를 이용해서 처리한다.
<li>태그 안쪽에 사용된 '[[]]'는 인라인 표현식으로 별도의 태그 속성으로 지정하지 않고 사용하고자 할 때 유용하게 쓸 수 있다.
[ Thymeleaf의 반복문의 상태(state) 객체 ]
상태 객체를 이용하면 순번이나 인덱스 번호, 홀수/짝수 등을 지정할 수 있다.
state는 index 혹은 count라는 속성을 이용할 수 있는데, index는 0부터 시작하고, count는 1부터 시작한다.
<!DOCTYPE html>
<html lang="en" xmlns:th="http://www.thymeleaf.org">
<head>
    <meta charset="UTF-8">
    <title>Title</title>
</head>
<body>
    <h5>타임리프 반복문</h5>
        <ul>
            <li th:each="dto : ${list}">
                [[${dto}]]
            </li>
        </ul>

    <h5>반복문의 상태(state) 객체</h5>
        <ul>
            <li th:each="dto, state : ${list}">
                [[${state.index}]] --- [[${dto}]]
            </li>
        </ul>
</body>
</html>
package org.zerock.ex3.controller;

import lombok.extern.log4j.Log4j2;
import org.springframework.stereotype.Controller;
import org.springframework.ui.Model;
import org.springframework.web.bind.annotation.GetMapping;
import org.springframework.web.bind.annotation.RequestMapping;
import org.zerock.ex3.dto.SampleDTO;

import java.time.LocalDateTime;
import java.util.List;
import java.util.stream.Collectors;
import java.util.stream.IntStream;

@Controller
@RequestMapping("/sample")
@Log4j2
public class SampleController {

    @GetMapping({"/ex2"})
    public void exModel(Model model){
        List<SampleDTO> list = IntStream.rangeClosed(1,20).asLongStream().mapToObj(i->{
            SampleDTO dto = SampleDTO.builder()
                    .sno(i)
                    .first("First.."+i)
                    .last("Last.."+i)
                    .regTime(LocalDateTime.now())
                    .build();
            return dto;
        }).collect(Collectors.toList());
        model.addAttribute("list",list);
    }
}
[ Thymeleaf의 제어문 처리 ]
⭐️ th:if / th:unless ⭐️ 등을 이용할 수 있고, 삼항연산자 스타일을 사용할 수 있다.
<!DOCTYPE html>
<html lang="en" xmlns:th="http://www.thymeleaf.org">
<head>
    <meta charset="UTF-8">
    <title>Title</title>
</head>
<body>
    <h5>제어문 처리</h5>
    <ul>
        <li th:each="dto, state : ${list}" th:if="${dto.sno % 5 == 0}">
            [[${dto}]]
        </li>
    </ul>
</body>
</html>
<!DOCTYPE html>
<html lang="en" xmlns:th="http://www.thymeleaf.org">
<head>
    <meta charset="UTF-8">
    <title>Title</title>
</head>
<body>
    <h5>제어문 처리</h5>
    <ul>
        <li th:each="dto, state : ${list}">
            <span th:if="${dto.sno % 5 == 0}" th:text="${'-----------------'+dto.sno}"></span>
            <span th:unless="${dto.sno % 5 == 0}" th:text="${dto.first}"></span>
        </li>
    </ul>
</body>
</html>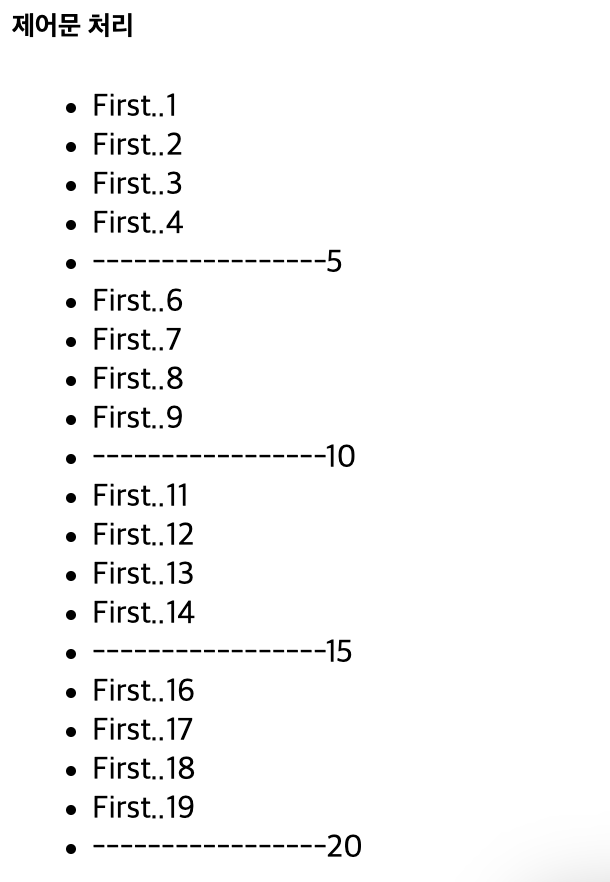
[ Thymeleaf의 제어문 처리에 style 적용하기 ]
<!DOCTYPE html>
<html lang="en" xmlns:th="http://www.thymeleaf.org">
<head>
    <meta charset="UTF-8">
    <title>Title</title>
    <style>
        .target {
            background-color : red;
        }
    </style>
</head>
<body>
    <h5>제어문에 style 적용</h5>
    <ul>
        <li th:each="dto, state : ${list}" th:class="${dto.sno % 5 == 0}?'target'" th:text="${dto}">
        </li>
    </ul>
</body>
</html>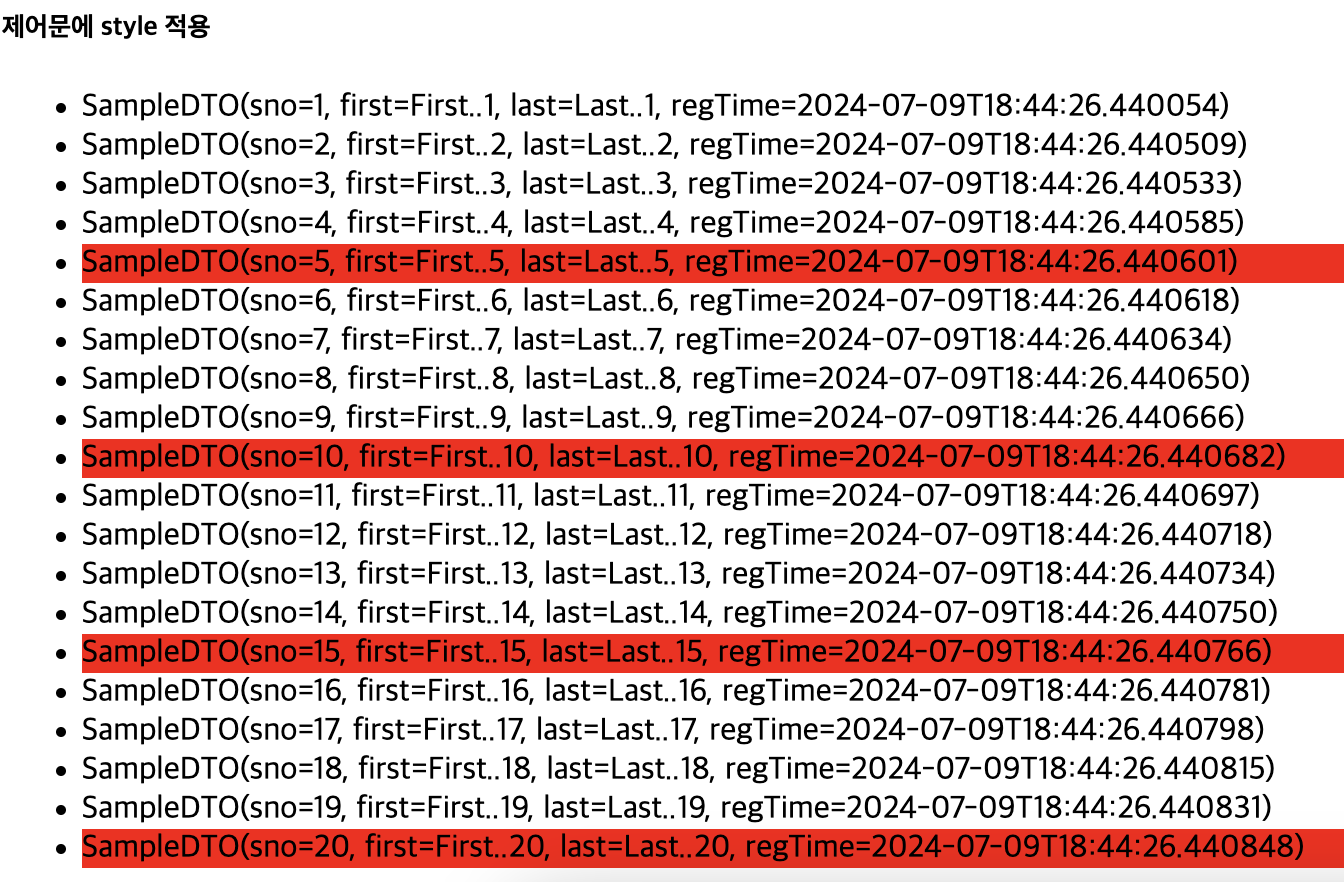
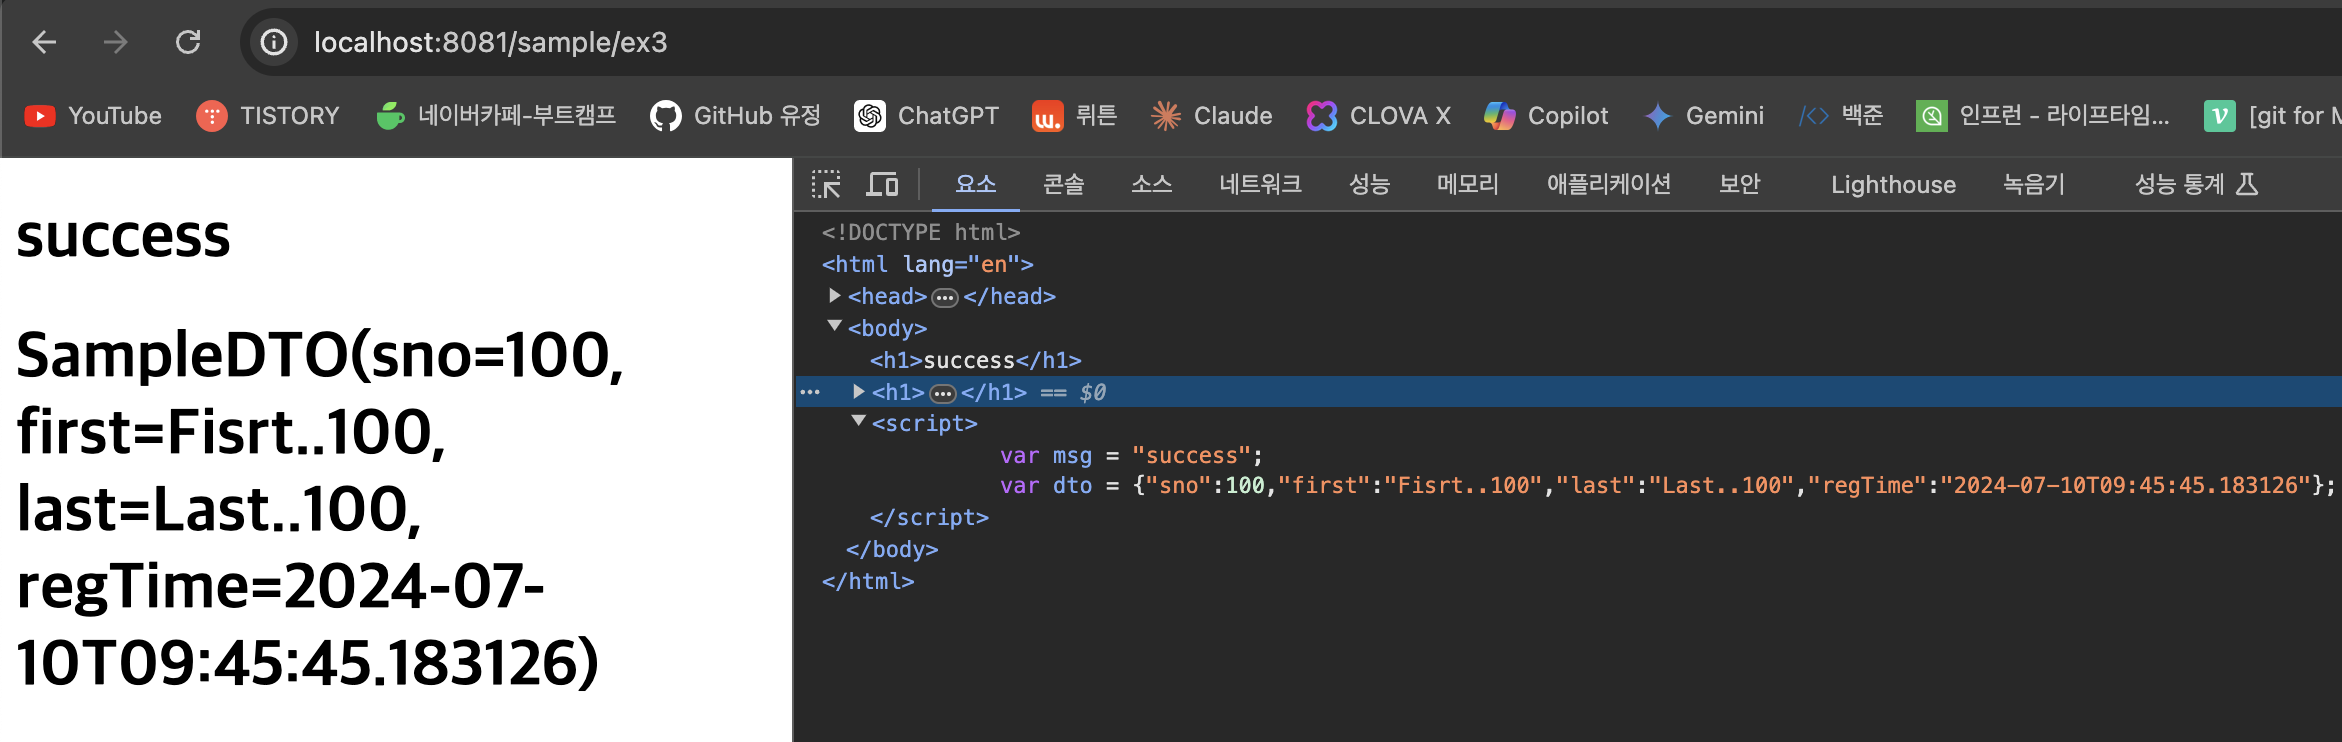
[ inline 속성 ]
inline 속성은 주로 JavaScript 처리에서 유용하다.
밑에 예제에서 result는 단순한 문자열이지만, dto는 SampleDTO의 객체이다. -> exInline호출하고 ex3를 호출해야 화면 출력 됨
-> 콘솔에 자바스크립트 생성 됨. 별도의 처리가 없음에도 문자열은 자동으로 " "이 추가되어 문자열이 됨. dto는 JSON 포맷의 문자열 됨
package org.zerock.ex3.controller;

import lombok.extern.log4j.Log4j2;
import org.springframework.stereotype.Controller;
import org.springframework.ui.Model;
import org.springframework.web.bind.annotation.GetMapping;
import org.springframework.web.bind.annotation.RequestMapping;
import org.springframework.web.servlet.mvc.support.RedirectAttributes;
import org.zerock.ex3.dto.SampleDTO;

import java.time.LocalDateTime;
import java.util.List;
import java.util.stream.Collectors;
import java.util.stream.IntStream;

@Controller
@RequestMapping("/sample")
@Log4j2
public class SampleController {

    @GetMapping({"/exInline"})
    public String exInline(RedirectAttributes redirectAttributes){
        log.info("exInline...........");

        SampleDTO dto = SampleDTO.builder()
                .sno(100L)
                .first("Fisrt..100")
                .last("Last..100")
                .regTime(LocalDateTime.now())
                .build();

        redirectAttributes.addFlashAttribute("result", "success");
        redirectAttributes.addFlashAttribute("dto",dto);

        return "redirect:/sample/ex3";
    }

    @GetMapping("/ex3")
    public void ex3(){
        log.info("ex3");
    }
}
<!DOCTYPE html>
<html lang="en" xmlns:th="http://www.thymeleaf.org">
<head>
<meta charset="UTF-8">
<title>Title</title>
</head>
<body>
<h1 th:text="${result}"></h1>
<h1 th:text="${dto}"></h1>
<script th:inline="javascript">
var msg = [[${result}]]
var dto = [[${dto}]]
</script>
</body>
</html>
[ th:block ]
th:block은 별도의 태그가 필요하지 않기 때문에 반드시 태그에 붙여서 사용하지 않아도 됨. 유용함 !
html로 처리 되지 않기 때문에 아래 예제와 같이 루프 등을 별도로 처리하는 용도로 많이 사용 됨.
<h5>th:block</h5>
<ul>
    <th:block th:each="dto : ${list}">
        <li th:text="${dto.sno % 5 == 0} ? ${dto.sno} : ${dto.first}"></li>
    </th:block>
</ul>
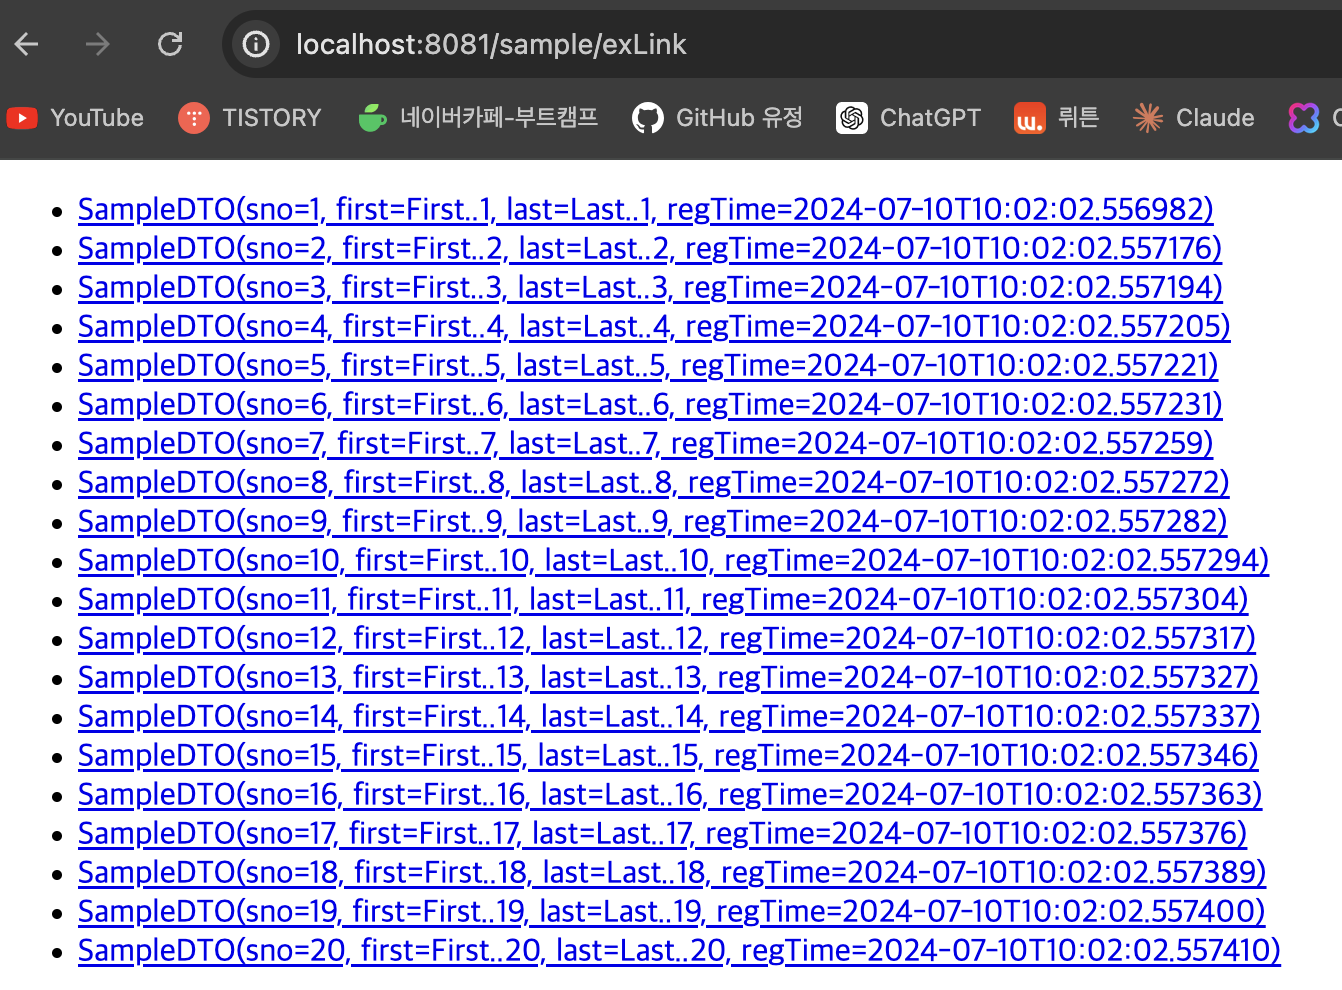
[ 링크 처리 ]
링크는 ⭐️ @{} ⭐️ 를 이용해서 사용 함. 파라미터를 전달해야 하는 상황에서는 좀 더 가독성이 좋은 코드를 만들 수 있다.
아래 예제와 같이 @GetMapping()에는 배열을 이용해서 하나 이상의 URL을 처리할 수 있다.
@GetMapping({"/ex2", "/exLink"})
public void exModel(Model model){
    List<SampleDTO> list = IntStream.rangeClosed(1,20).asLongStream().mapToObj(i->{
        SampleDTO dto = SampleDTO.builder()
                .sno(i)
                .first("First.."+i)
                .last("Last.."+i)
                .regTime(LocalDateTime.now())
                .build();
        return dto;
    }).collect(Collectors.toList());
    model.addAttribute("list",list);
}
<!DOCTYPE html>
<html lang="en" xmlns:th="http://www.thymeleaf.org">
<head>
<meta charset="UTF-8">
<title>Title</title>
</head>
<body>
<ul>
<li th:each="dto : ${list}">
<a th:href="@{/sample/exView}">[[${dto}]]</a>
</li>
</ul>
</body>
</html>
여기서 파라미터 값을 추가해 주고 싶다면 ()를 추가하고 파라미터의 이름과 값을 적어주면 됨. (sno=${dto.sno})
<body>
    <ul>
        <li th:each="dto : ${list}">
            <a th:href="@{/sample/exView(sno=${dto.sno})}">[[${dto}]]</a>
        </li>
    </ul>
</body>
sno을 path로 이용하고 싶다면 -> 아래 사진처럼 브라우저상에서는 태그들이 생성되는 것을 확인할 수 있다.
<ul>
    <li th:each="dto : ${list}">
        <a th:href="@{/sample/exView/{sno}(sno = ${dto.sno})}">[[${dto}]]</a>
    </li>
</ul>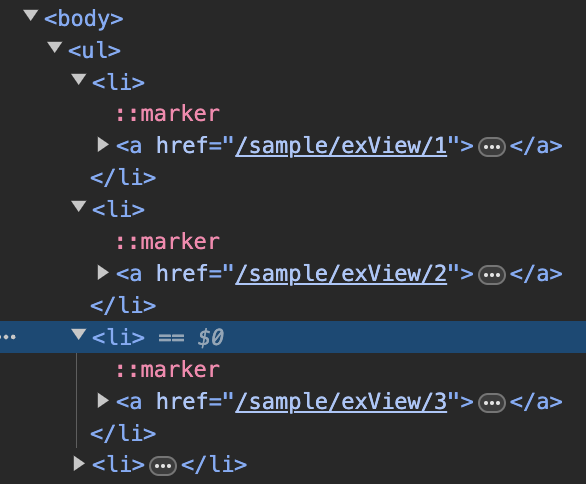
[ 기본 객체 LocalDataTime ]
Thymeleaf는 #numbers나 #dates 등을 별도의 설정 없이 사용할 수 있다.
그러나 LocalDataTime에 대해서는 상당히 복잡한 방식으로 처리해야 하는 단점이 있다. ->
의존성에 https://github.com/thymeleaf/thymeleaf-extras-java8time을 추가하면 좀 더 편하게 사용 가능하다.
compile group: 'ord.thymeleaf.extras', name: 'thymeleaf-extras-java8time'
<h5>sno를 모두 5자리로 만들 때</h5>
<ul>
    <li th:each="dto : ${list}">
        [[${#numbers.formatInteger(dto.sno,5)}]]
    </li>
</ul>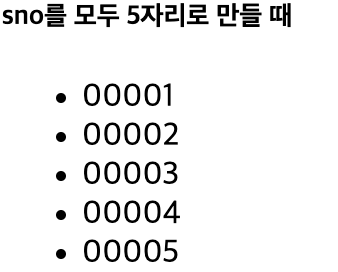
[ 레이아웃 ]
레이아웃 기능은 크게 2가지 형태로 사용할 수 있다
- JSP의 include와 같이 특정 부분을 외부 혹은 내부에서 가져와서 포함하는 형태
- 특정한 부분을 파라미터로 전달해서 내용에 포함하는 형태
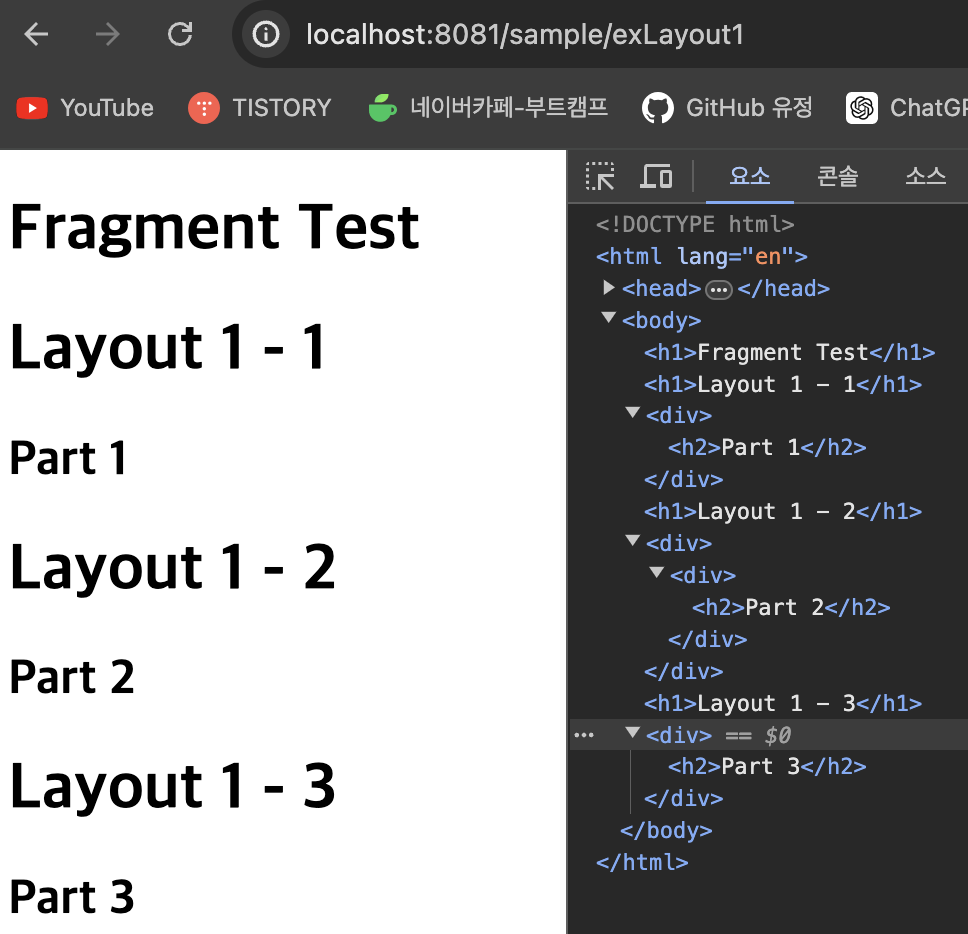
th:insert와 th:replace는 특정한 부분을 다른 내용으로 변경할 수 있다.
이때 insert는 기존 내용의 바깥쪽 태그는 그대로 유지하면서 추가 되는 방식이고, replace는 기존의 내용을 완전히 '대체'하는 방식이다.
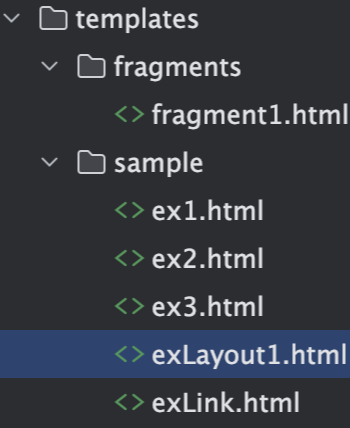
exLayout.html은 내부적으로 다른 파일에 있는 일부분을 조각처럼 가져와서 구성할 것이다.
콘솔창을 보면 replace는 대체 되었지만, insert를 이용한 경우 <div>캐그 내에 다시 <div>태그가 생성되었다.
@GetMapping("/exLayout1")
public void exLayout1(){
    log.info("exLayout...........");
}
<!DOCTYPE html>
<html lang="en" xmlns:th="http://www.thymeleaf.org">
<head>
<meta charset="UTF-8">
<title>Title</title>
</head>
<body>
<div th:fragment="part1">
<h2>Part 1</h2>
</div>
<div th:fragment="part2">
<h2>Part 2</h2>
</div>
<div th:fragment="part3">
<h2>Part 3</h2>
</div>
</body>
</html>
:: 뒤에는 fragment의 이름을 지정하거나 CSS의 #id와 같은 선택자를 이용할 수 있다.
만약 :: 이하를 생략하려면 해당 파일의 전체 내용을 가져올 수도 있다.
<!DOCTYPE html>
<html lang="en" xmlns:th="http://www.thymeleaf.org">
<head>
    <meta charset="UTF-8">
    <title>Title</title>
</head>
<body>
    <h1>Fragment Test</h1>

    <h1>Layout 1 - 1</h1>
    <div th:replace="~{/fragments/fragment1 :: part1}"></div>

    <h1>Layout 1 - 2</h1>
    <div th:insert="~{/fragments/fragment1 :: part2}"></div>

    <h1>Layout 1 - 3</h1>
    <th:block th:replace="~{/fragments/fragment1 :: part3}"></th:block>

</body>
</html>
<!DOCTYPE html>
<html lang="en" xmlns:th="http://www.thymeleaf.org">
<head>
    <meta charset="UTF-8">
    <title>Title</title>
</head>
<body>
    <div>
        <hr/>
        <h2>Fragment2 File</h2>
        <h2>Fragment2 File</h2>
        <h2>Fragment2 File</h2>
    </div>
</body>
</html>
<!DOCTYPE html>
<html lang="en" xmlns:th="http://www.thymeleaf.org">
<head>
    <meta charset="UTF-8">
    <title>Title</title>
</head>
<body>
    <h1>Fragment Test</h1>
    <div style="border: 1px solid blue">
        <th:block th:replace="~{/fragments/fragment2}"></th:block>
    </div>
</body>
</html>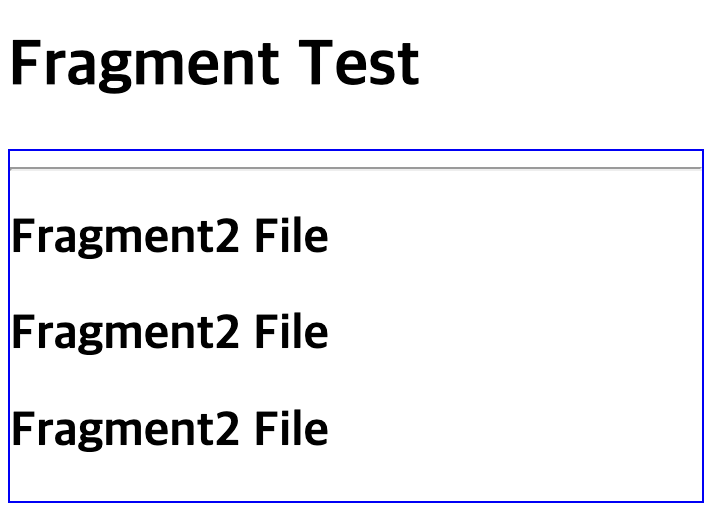
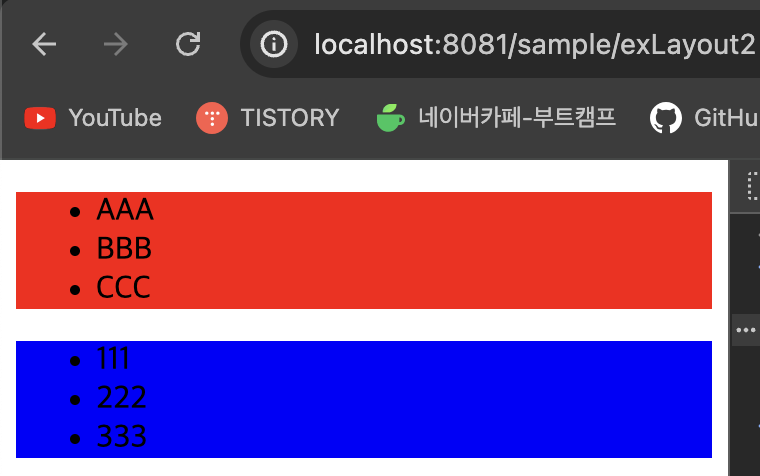
[ 파라미터 방식의 처리 ]
controller에 @GetMapping을 배열로 받기. target을 통해 두개의 파라미터 값을 받음.
여기서 this는 현재 페이지를 의미 생략 가능. #ulFirst는 CSS의 id 선택자 의미.
<th:block th:replace="~{/fragments/fragment3 :: target(~{this :: #ulFirst}, ~{this::#ulSecond} )}">
@GetMapping({"/exLayout1","/exLayout2"})
public void exLayout1(){
    log.info("exLayout...........");
}
<!DOCTYPE html>
<html lang="en" xmlns:th="http://www.thymeleaf.org">
<head>
<meta charset="UTF-8">
<title>Title</title>
</head>
<body>
<div th:fragment="target(first, second)">
<style>
.c1{
background-color: red;
}
.c2 {
background-color: blue;
}
</style>
<div class="c1">
<th:block th:replace="${first}"></th:block>
</div>
<div class="c2">
<th:block th:replace="${second}"></th:block>
</div>
</div>
</body>
</html>
<!DOCTYPE html>
<html lang="en" xmlns:th="http://www.thymeleaf.org">
<head>
    <meta charset="UTF-8">
    <title>Title</title>
</head>
<body>

    <th:block th:replace="~{/fragments/fragment3 :: target(~{this :: #ulFirst}, ~{this::#ulSecond} )}">
        <ul id="ulFirst">
            <li>AAA</li>
            <li>BBB</li>
            <li>CCC</li>
        </ul>

        <ul id="ulSecond">
            <li>111</li>
            <li>222</li>
            <li>333</li>
        </ul>
    </th:block>

</body>
</html>
[ 레이아웃 템플릿 만들기 ]
파라미터로 필요한 영역을 전달해서 처리할 수 있다면 레이아웃 전체를 하나의 페이지로 구성하고, 필요한 부분을 파라미터로 전달하는 방식으로 공통의 레이아웃을 사용할 수 있다.
<!DOCTYPE html>
<html lang="en" xmlns:th="http://www.thymeleaf.org">
<head>
    <meta charset="UTF-8">
    <title>Title</title>
    <style>
        * {
            margin: 0;
            padding: 0;
        }
        header {
            width: 100vw;
            height: 20vh;
            background-color: aqua;
        }
        .content {
            width: 100vw;
            height: 70vh;
            background-color: lightgray;
        }
        footer {
            width: 100vw;
            height: 10vh;
            background-color: green;
        }
    </style>
</head>
<body>
<header>
    <h1>HEADER</h1>
</header>
<div class="content">
    <h1>CONTENT</h1>
</div>
<footer>
    <h1>FOOTER</h1>
</footer>
</body>
</html>
실제 개발을 한다면 중간에 'CONTENT'로 표시된 영역이 다른 내용으로 변경되어야 하기 때문에 아래처럼 수정해야 한다.
th:fragment를 setContent로 지정하고 content라는 파라미터를 받을 수 있도록 변경.
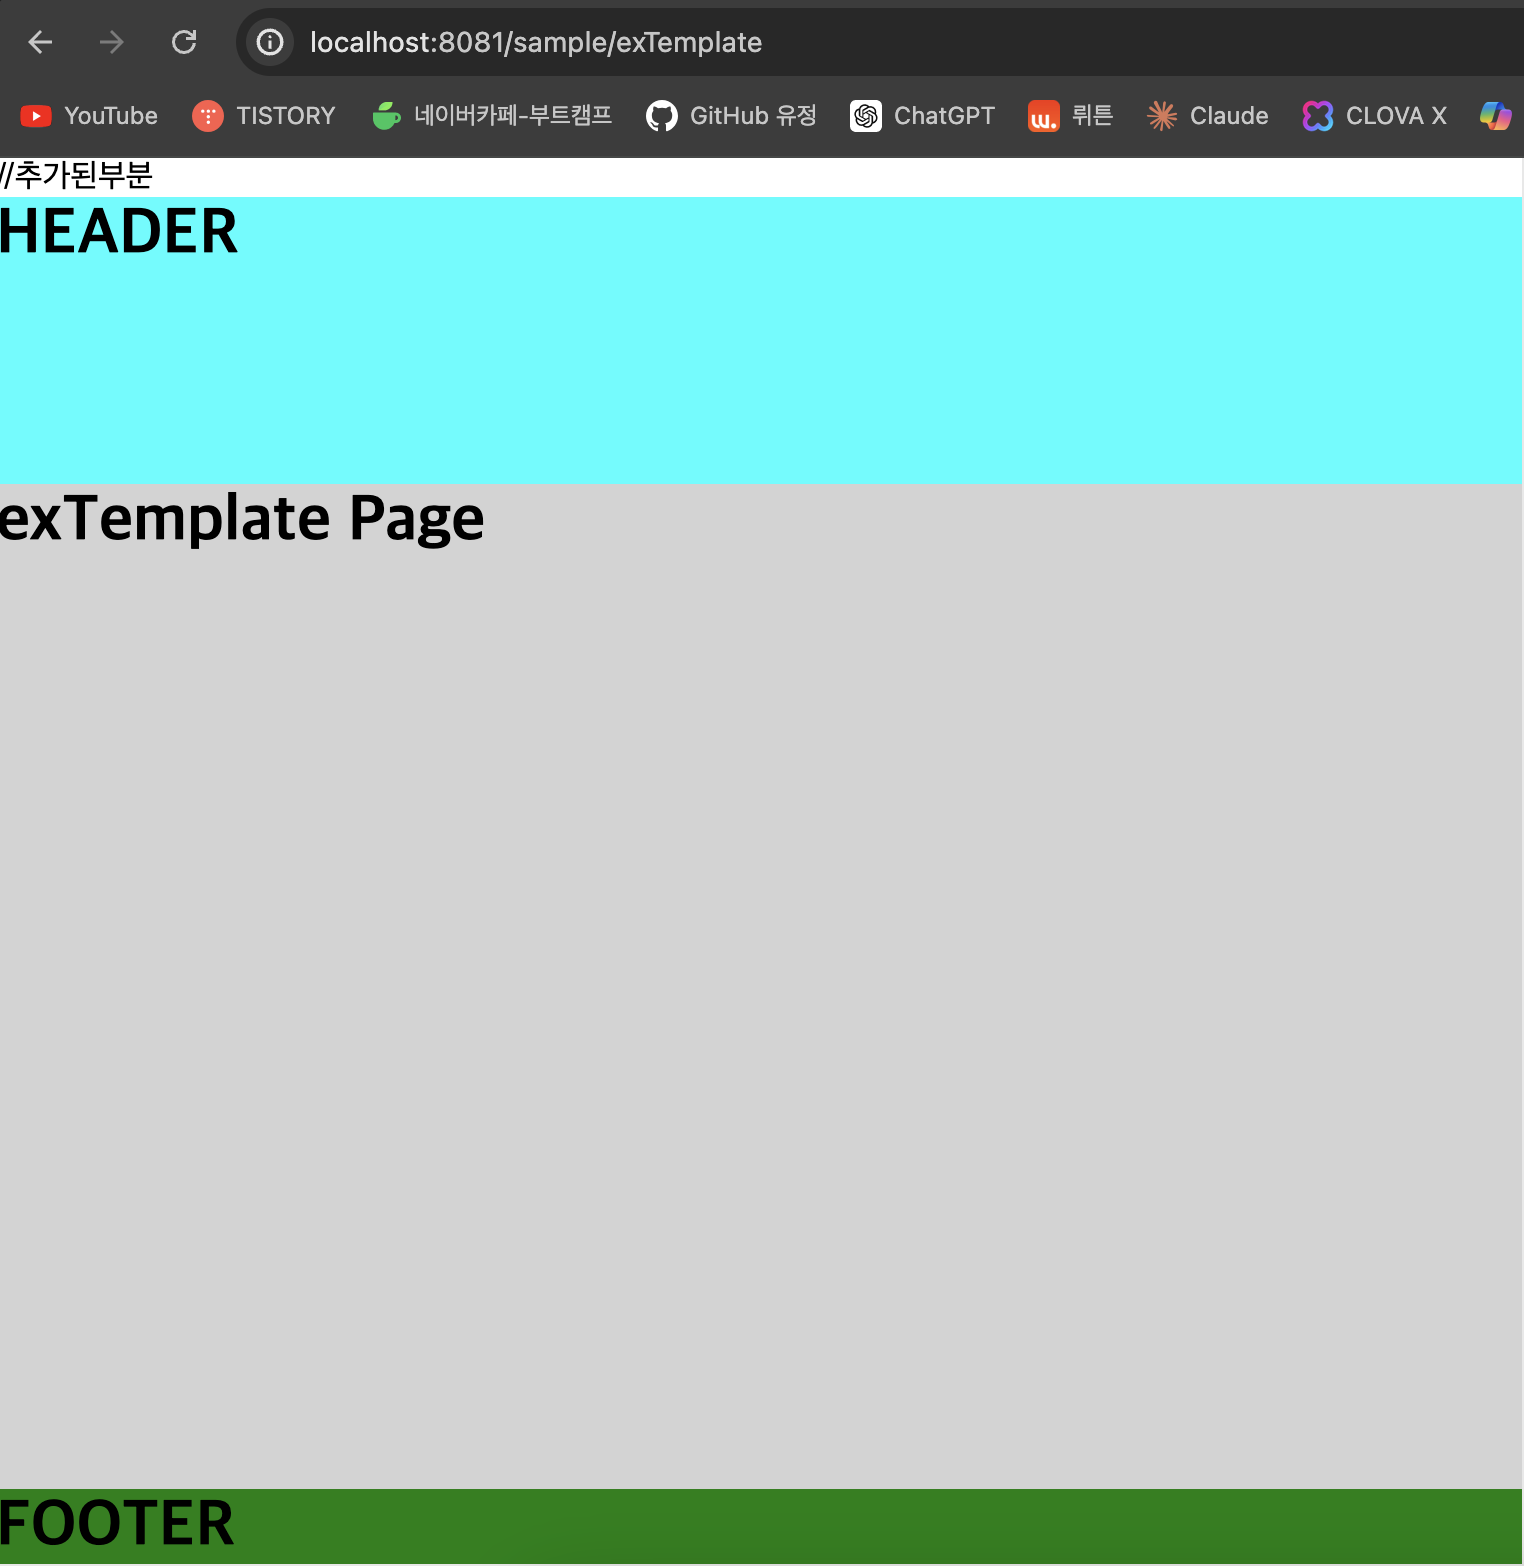
@GetMapping({"/exLayout1","/exLayout2", "/exTemplate"})
public void exLayout1(){
    log.info("exLayout...........");
}
<!DOCTYPE html>
<html lang="en" xmlns:th="http://www.thymeleaf.org">
<th:block th:replace="~{/layout/layout1 :: setContent(~{this::content})}" >
<th:block th:fragment="content">
<h1>exTemplate Page</h1>
</th:block>
</th:block>
<head>
<meta charset="UTF-8">
<title>Title</title>
</head>
<body>
</body>
</html>